DAW
Reliq’s DAW Page provides advanced integration with multiple Digital Audio Workstations (DAWs) through the USB MIDI port, allowing you to control clips, scenes, mixer functions, plugin parameters, and transport—all directly from Reliq.
All track names, clip names, track status, colors, and clip content are displayed on Reliq’s screen, and mappings adapt dynamically depending on the DAW in use.
When combined with U-SYNC (see the Settings chapter), Reliq becomes tightly synced to your DAW, supporting bi-directional start/stop and sample-accurate timing (currently for macOS).
Supported DAWs
Reliq currently includes native support for:
Ableton Live 12
Bitwig Studio 5.2+
Legacy support for Ableton Live 11 is also available via a separate control surface script, but is no longer officially supported.
The Control Surface integration is fully compatible with Windows 10+ and macOS 15+. Older versions of macOS may still work but are not officially supported.
Interface Overview
The DAW Page interface adapts depending on the connected DAW, but certain elements are consistent:
Clip View for launching clips.
Mix View for volume, pan, and sends.
Master View for scene and master volume control.
Navigation via the Joystick Encoder.
Transport and Track Controls using physical buttons.
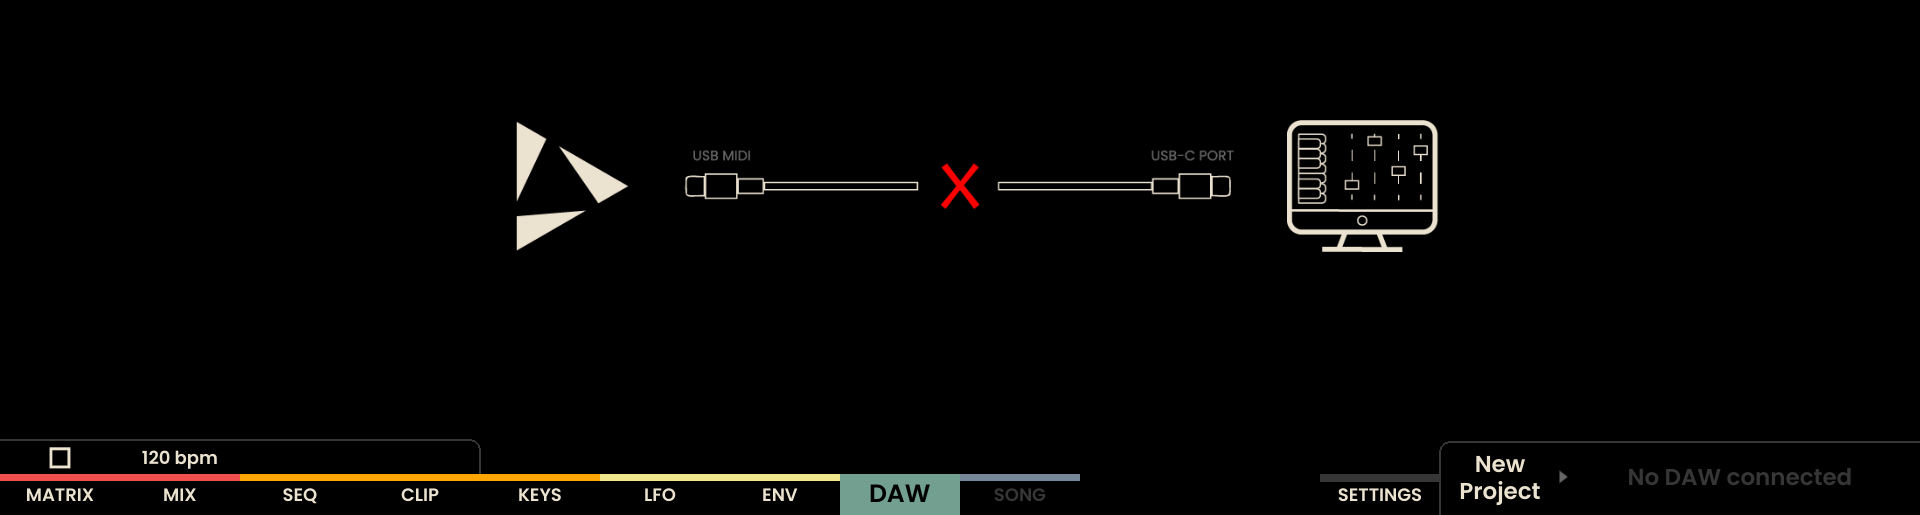
If no DAW is connected, the screen displays “No DAW connected” and disables the Grid Pads. Once a compatible DAW is detected, Reliq displays the DAW name, enables controls, and loads the full interface.
Transport Behavior
The Play , Stop , and Record buttons behave depending on the sync mechanism used:
Without U-SYNC, pressing transport buttons on Reliq will also trigger transport in the DAW if a Control Surface is connected. - The LED on the Play button turns green when the DAW is playing. - The LED turns white when Reliq’s internal sequencer is playing. - The LED color adapts based on context: green on the DAW page, white on other pages.
With U-SYNC loaded, pressing Play on Reliq from any page will: - Start the DAW’s transport. - Reliq will then follow the DAW clock and playhead automatically.
When the DAW is configured to follow Reliq’s clock (via MIDI sync), pressing Play on Reliq will also start the DAW, keeping both systems in sync.
Ableton Live Setup
To use Reliq with Ableton Live, a Control Surface Script must be installed.
Installing the Control Surface Script
Download the Control Surface Script
Copy the “Reliq” folder to the following location:
macOS 15+:
/Applications/Ableton Live 12/Package Contents/App-Resources/MIDI Remote Scripts/
Windows 10+:
C:\ProgramData\Ableton\Live 12 Suite\Resources\MIDI Remote Scripts\
Restart Ableton Live and select “Reliq” in Preferences > Link/MIDI.
Using Reliq as a Control Surface for Ableton Live
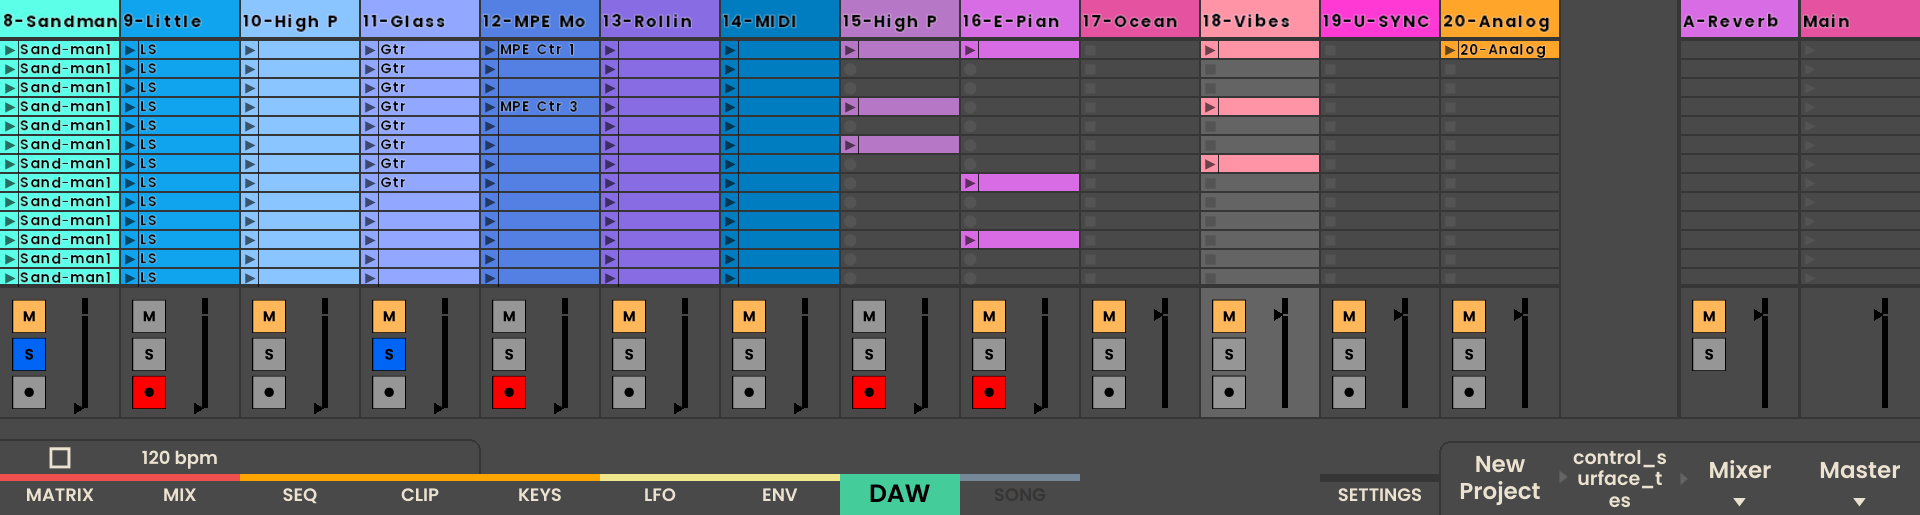
Interface Overview
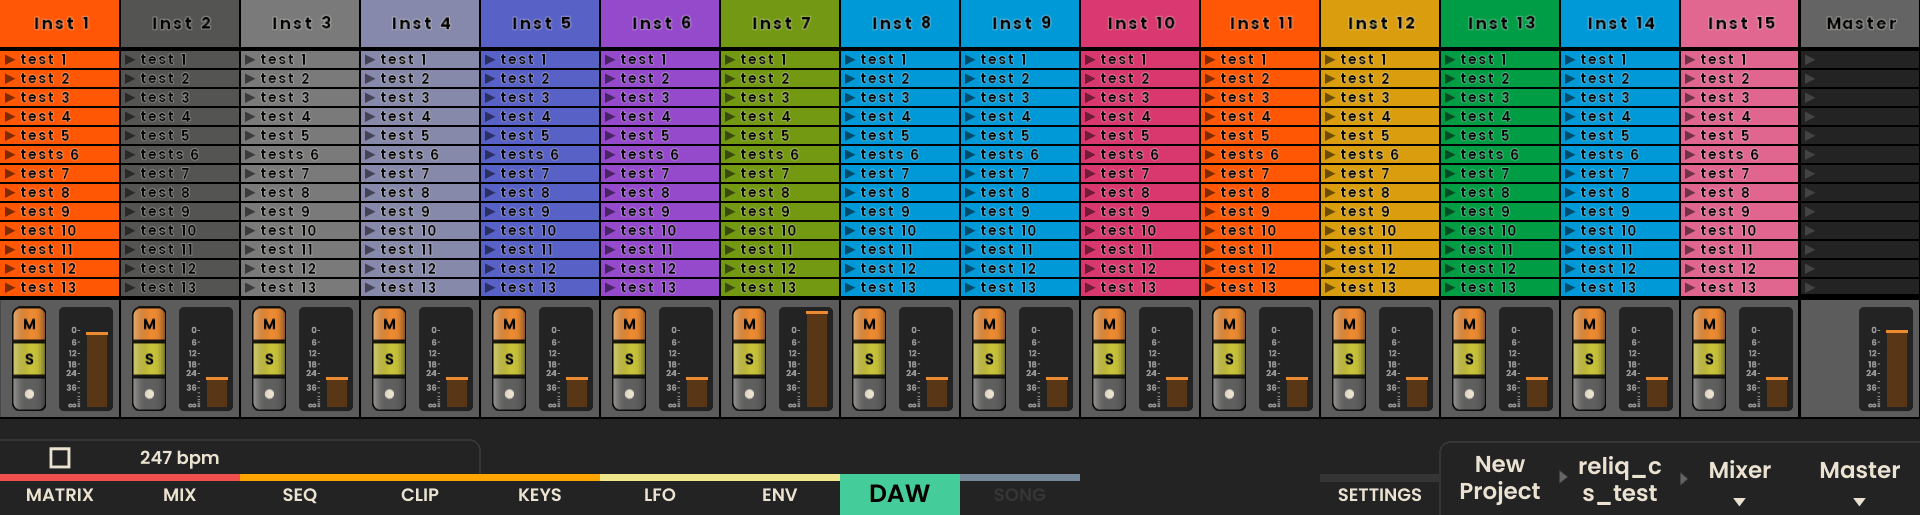
The DAW Page for Ableton Live provides two main pages:
Clip View: Displays clip and track information.
Mix View: Displays volume, pan, and send controls.
Use the Page Button below the Clip/Mix label to switch views.
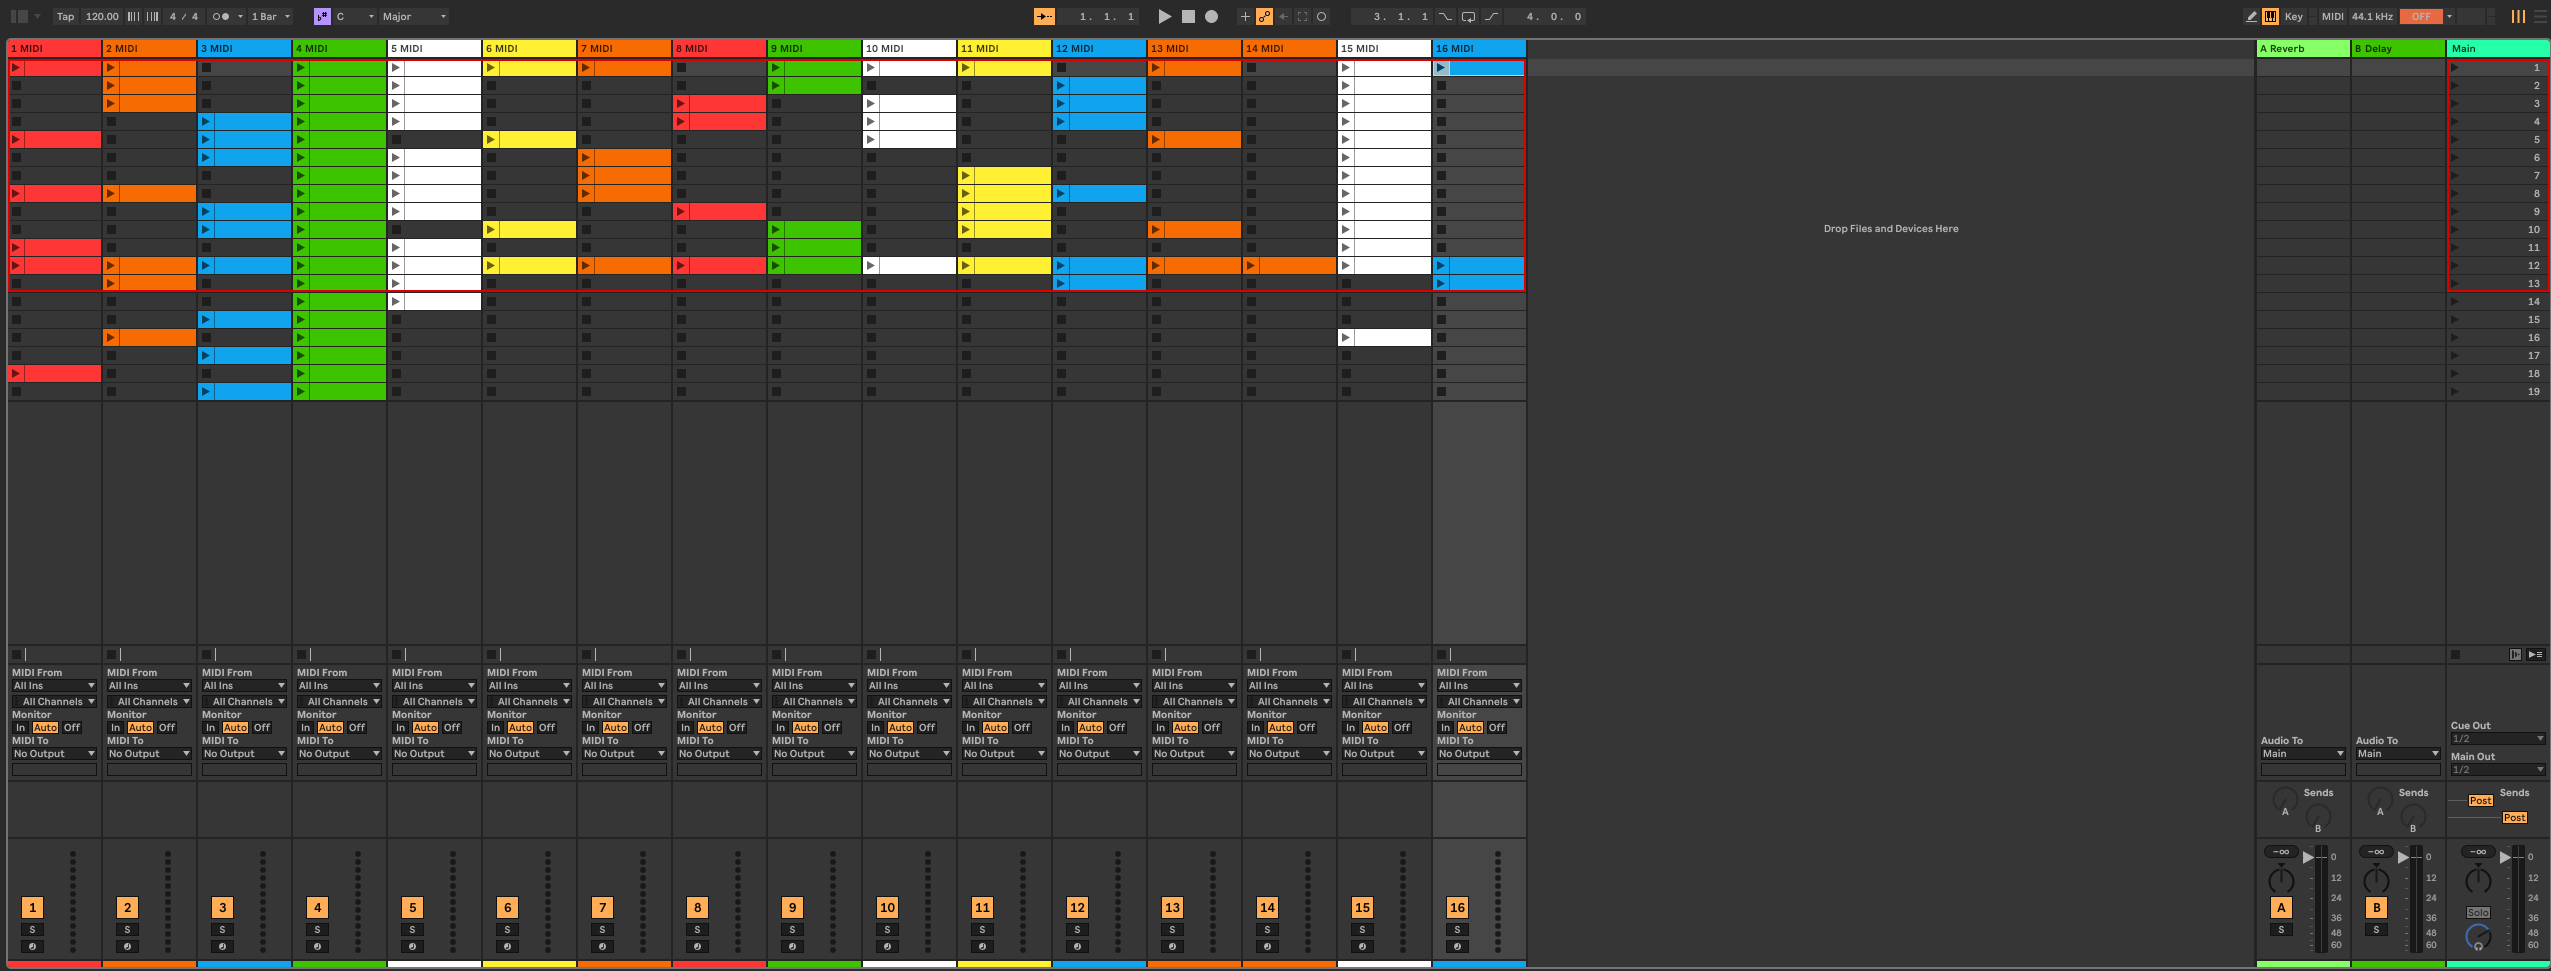
Up to 16 tracks and 13 clip rows are visible at a time.
Track names, colors, clip names, and return tracks are fully displayed.
The last 3 pads of each track column control: Enable, Solo, Arm.
Each track includes a visual fader and encoder for volume.
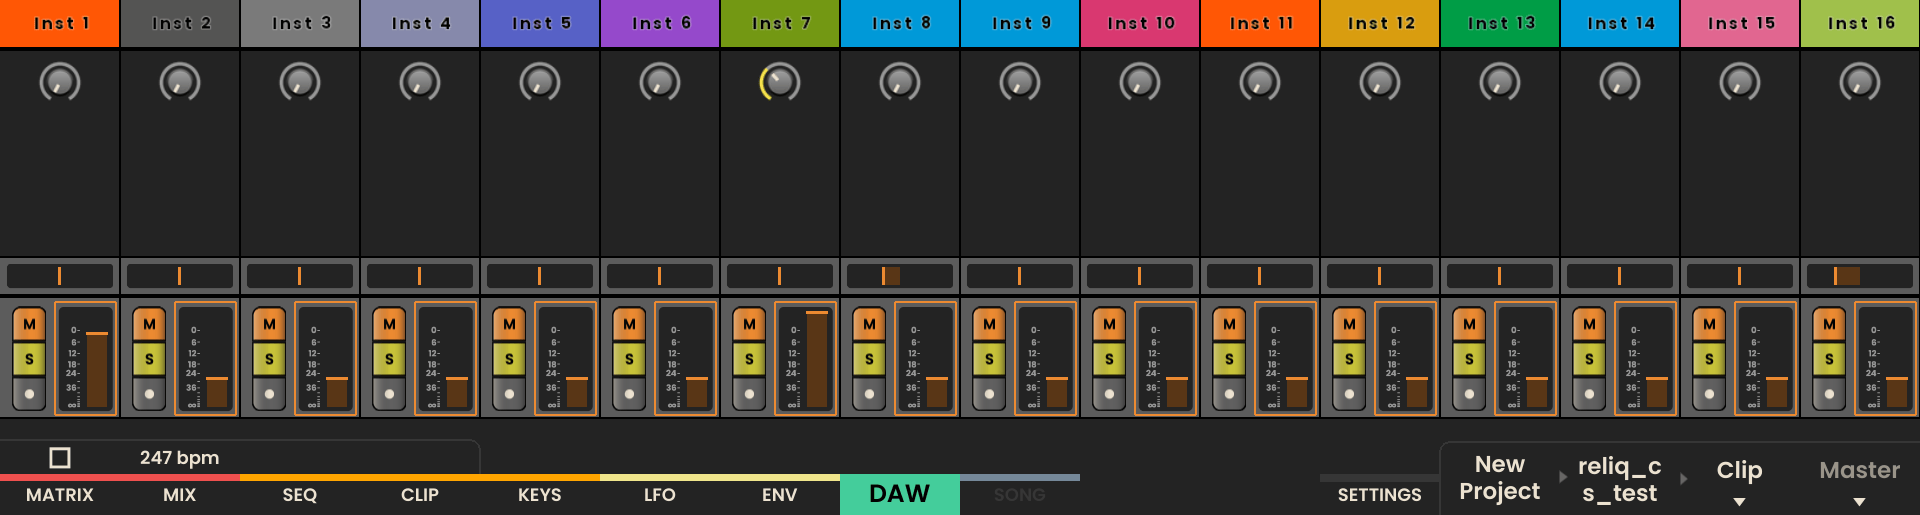
Mix Page
On the Mix Page:
Pads represent virtual faders for each track.
Encoders adjust Volume, Pan, or up to 4 Send Returns.
Use the Joystick: - Left/Right = switch tracks. - Up/Down = switch between Volume/Pan/Send A/Send B/etc.
Master Track View
Toggle the Master view using the Page Button below “Master”.
In Clip View: Master column shows Scenes.
In Mix View: The Master pads act as a virtual fader, and encoder controls Master Volume.
Controlling Ableton Live from Reliq
Launching Clips
Pads mirror Live’s clip grid.
Press a pad to launch a clip.
Clips reflect Live’s colors and show status on Reliq.
Clip States:
Green = Playing
Blinking = Queued
Off = Empty
Colored = Loaded

Deleting Clips
To delete a Clip, hold UNDO and press the corresponding Grid Pad to delete the Clip.
Stopping Clips
To stop a Clip, hold SHIFT and press the corresponding Grid Pad to stop the Clip.
Launching Scenes
Scenes are triggered using the Track Buttons on the left edge.

Active, Solo, and Arm
Each track includes 3 dedicated pads at the bottom:
Yellow: Track Enabled
Blue: Solo
Red: Arm

Mixer Control
In both Clip and Mix views, each track has a fader and encoder:
Fader (Grid Pad) adjusts volume in Mix view.
Encoder adjusts volume in Clip view (when selected).
Joystick Up/Down switches the encoder’s function (e.g., Pan, Send A, Send B, etc.)
Navigation
Use the Joystick Encoder to navigate through Live’s Session View:
Left/Right = Tracks
Up/Down = Scenes (in Clip View) or Parameter Pages (in Mix View)
The Red Box in Live updates automatically to follow Reliq’s view.
Ableton MIDI Sync (Without U-SYNC)
To sync Reliq with Live via MIDI:
On Reliq: Settings > CLOCK OUT USB MIDI → Active
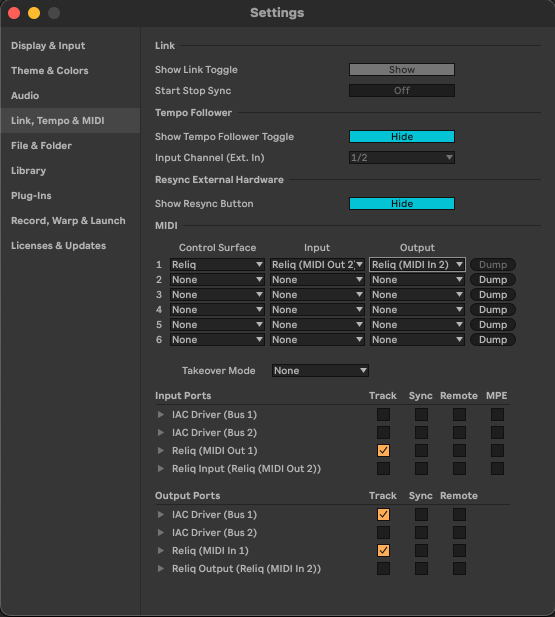
In Live: Preferences > Link/MIDI
Enable Sync + Remote on “Reliq (MIDI Output 1)”
In Live’s top bar, click EXT (External Sync)
Press Play on Reliq to start both systems
Note
For best performance and tighter sync, we recommend using U-SYNC on macOS when available.
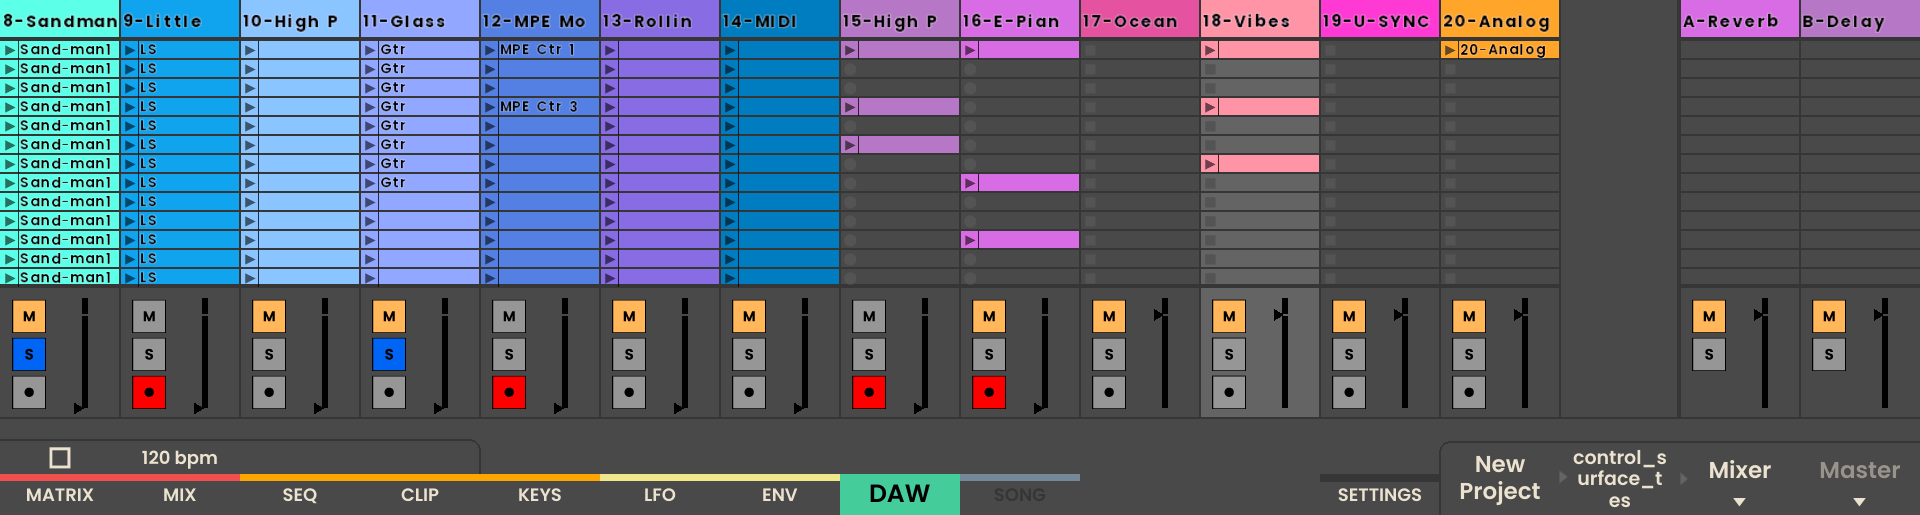
Bitwig Studio
Reliq’s DAW Page offers tight integration with Bitwig Studio 5.2+ or above, giving full control over clips, tracks, mixer parameters, and transport. The integration is cross-platform.
All clip names, track names, colors, and statuses are visible directly on Reliq’s screen. Unlike Ableton Live, Bitwig’s return tracks are not shown in the main control grid (Red Box), but all core mixing features remain accessible.
Installing the Bitwig Extension
To enable Reliq support in Bitwig:
Download the Bitwig Extension.
Copy the downloaded file to the following folder: ~/Documents/Bitwig Studio/Extensions/ (Same for macOS and Windows)
Restart Bitwig Studio. The Reliq Control Surface will be automatically detected and active.
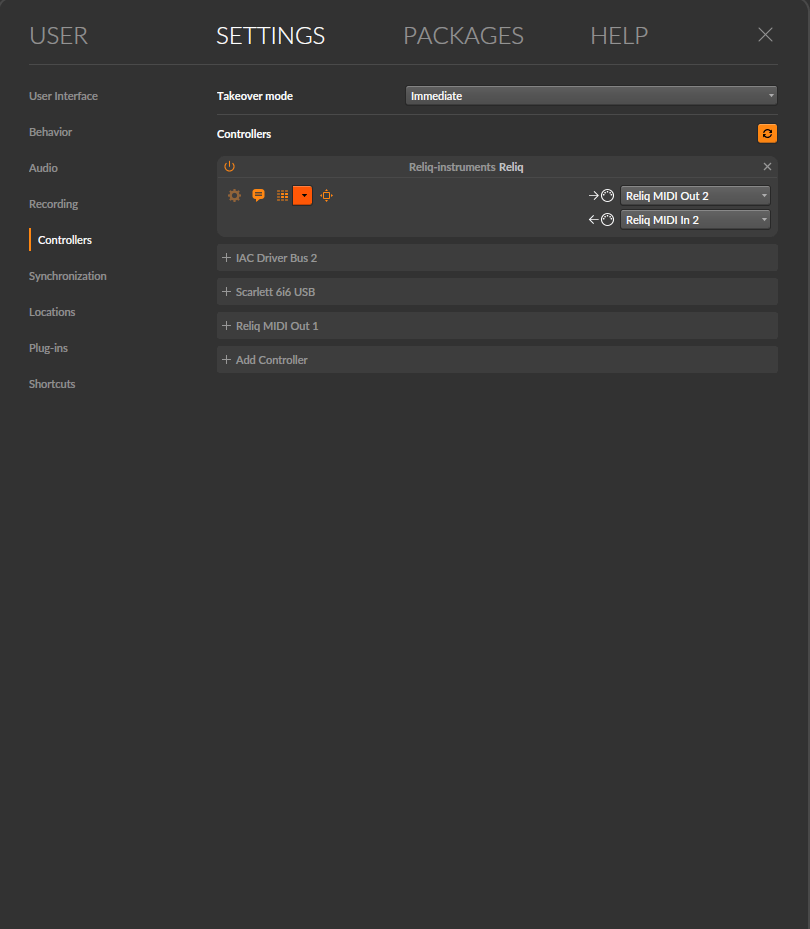
In Bitwig, go to Settings > Controllers and ensure that Reliq is listed as an active controller and assigned to the Reliq MIDIIn2 and ReliqMIDIOut2 ports.
Interface Overview
The Bitwig DAW integration consists of three main views:
Clip View for launching and viewing clips
Mix View for volume, pan, and sends
Master View for scene launch and master volume
All navigation and control layouts are identical to the Ableton Live integration:
Grid Pads trigger clips
Encoders and faders control mixer parameters
Joystick Encoder navigates tracks and pages
Transport buttons control Bitwig’s playback
Using Reliq as a Control Surface for Bitwig
Launching Clips
Pads reflect clip colors and names from Bitwig
Pressing a pad launches the associated clip
Clip states are mirrored live on Reliq’s grid
Deleting Clips
To delete a Clip, hold UNDO and press the corresponding Grid Pad to delete the Clip.
Stopping Clips
To stop a Clip, hold SHIFT and press the corresponding Grid Pad to stop the Clip.
Launching Scenes
Use the Track Buttons on the left to launch scenes.
Active, Solo, and Arm
Each track column includes three dedicated pads:
Orange: Track Muted
Yellow: Solo
Red: Arm
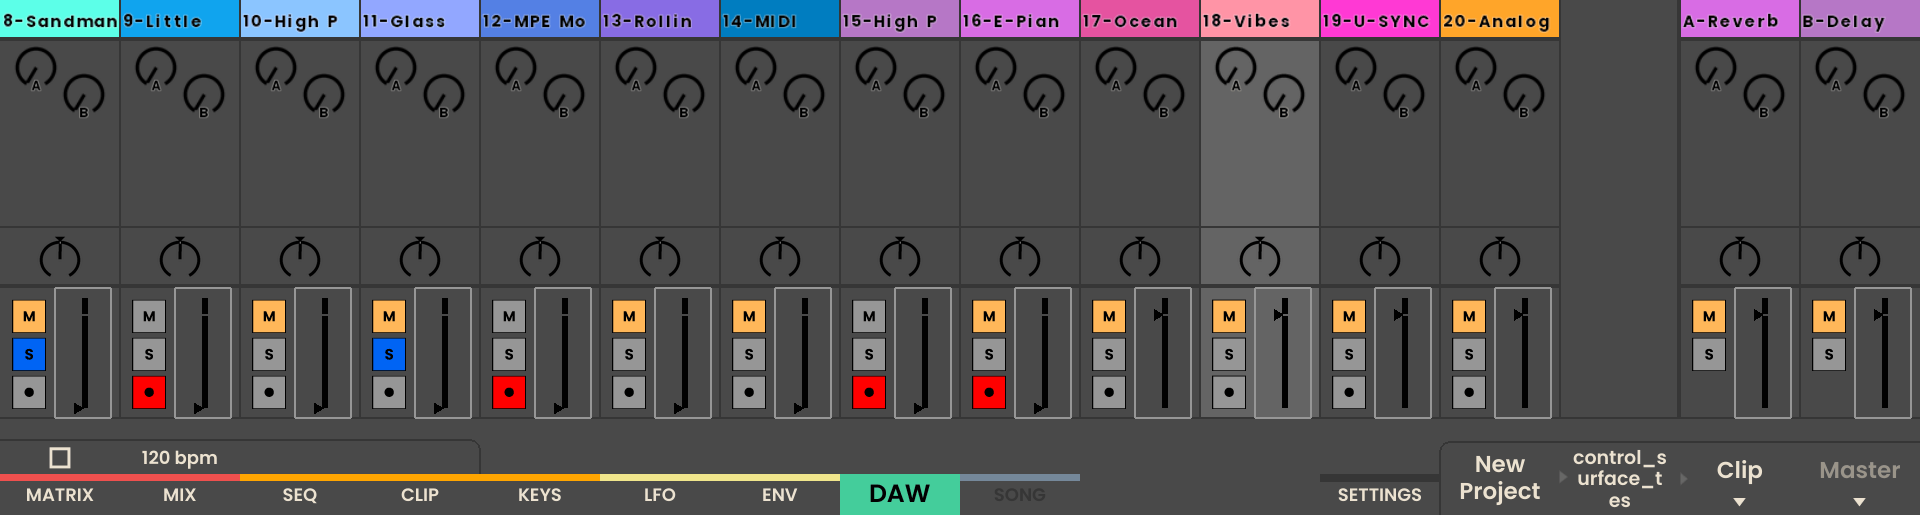
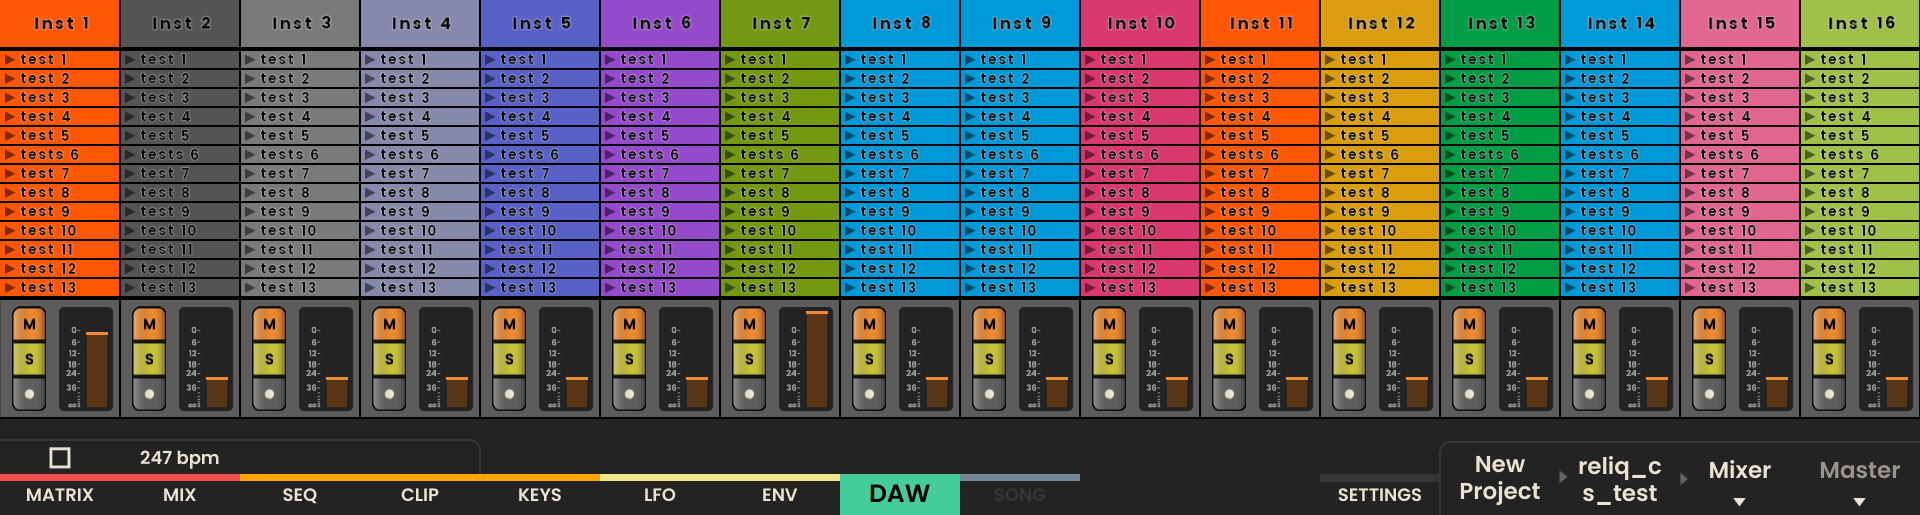
Mix View
In the Mix View:
Pads act as virtual faders
Encoders control: - Volume - Pan - Send A / Send B / Send C / Send D (if applicable)
Use the Joystick Encoder: - Left/Right → switch tracks - Up/Down → switch parameter type (Vol, Pan, Send X)
Master View
Toggle the Master View using the Page Button below “Master”:
In Clip View: Master column represents Scenes
In Mix View: - Pad = virtual master fader - Encoder = Master Volume
Transport Control
Play , Stop , and Record directly control Bitwig’s transport
LED feedback shows the current playback state
If U-SYNC is active and loaded in Bitwig (via plugin), Reliq will follow the DAW clock from any page.
Navigation
Use the Joystick Encoder:
Left/Right → switch tracks
Up/Down: - Clip View → move between scenes - Mix View → move between Volume / Pan / Sends
Bitwig’s session view scrolls automatically with Reliq’s navigation.
Bitwig MIDI Sync (Without U-SYNC)
To manually sync playback:
On Reliq: Go to Settings > CLOCK OUT USB MIDI and set to Active
In Bitwig: Open Settings > Controllers > MIDI Sync Enable Sync and Remote for Reliq’s MIDI port
Activate External Sync in Bitwig’s top bar
Press Play on Reliq → Bitwig will follow Reliq’s clock
Tip
U-SYNC offers tighter, more stable timing and eliminates the need for external MIDI sync. Just load the U-SYNC plugin in Bitwig and hit play on Reliq.