Sequencer
The Reliq Sequencer is a high-resolution, 16-track, 32-step polyphonic sequencer. It can sequence external equipment through MIDI, USB, CV, and Gate outputs, as well as manage analog signal connections via Reliq’s Matrix Routings.
Reliq’s sequencer is based on eight core concepts that, when combined, can create complex, dynamic, and evolving sequences through direct actions:
Voices
Each voice has its own set of parameters that can be set independently of the other voices in the same step:
PITCH
VELOCITY
DURATION
PROBABILITY
MICROTIME
RATCHET
CC
Steps
A step is a single event in the sequence and can include up to 8 voices. Each step has its own set of parameters that can be set independently of the other steps in the same clip and track:
TRIGGER
Sheets
A Sheet is a subdivision of a sequence. Each sheet contains 32 steps. When the length of a clip is 2 sheets, the sequence will have 64 steps.
FX
A sequencer effect can modulate voice, step, or sheet parameters in real time.
Clips
A Clip is a container for sequences. It includes the track settings, the arrangement of sheets within the track and the settings for each individual sheet, step, and voice.
LFO
An LFO (Low-Frequency Oscillator) can modulate voice or step parameters in real time.
Envelope
An envelope is a modulator that can adjust voice or step parameters in real time.
Tracks
A track is a container for clips, LFOs, and envelopes.
Each track can hold up to 32,768 steps or 1,024 sheets, which can be spread across 256 clips per project.
Each track can also hold up to 128 LFO Slots and 128 Envelope Slots ( Slot ).
Each track can store and recall the following settings within a Clip:
Output
The track’s output can be set to MIDI, USB, or CV.
Input
The track’s input can be set to MIDI, USB, or any device connected to the USB HOST port.
Track Type
Each track can be set to a specific Track Type, which defines its behavior and how notes are input. The track type can be set to either Step Sequencer or Euclidean Sequencer.
Sequence Length
The track’s sequence length can be set to a specific number of Sheet and steps.
Direction
The track’s direction can be set to Forward, Backward, Ping Pong, or Random.
Speed
The track’s speed in relation to the project tempo.
Pitch Offset
An offset added to the original pitch of each voice in the track.
Velocity Offset
An offset added to the original velocity of each voice in the track.
Duration Offset
An offset added to the original duration of each voice in the track.
Probability Offset
An offset added to the original probability of each voice in the track.
Swing
A rhythmic shift applied to the steps in the track.
Rotate
A position shift applied to the steps in the track.
These core concepts form the building blocks of Reliq’s sequencer and can be combined in various ways to create intricate and evolving sequences.
A special Matrix Sequencer Track is included in the Sequencer Page. This track is designed to sequence Matrix Routings, providing real-time control over signal paths.

For a comprehensive understanding of the sequencer’s functionality and features, refer to the following sections of this manual.
Sequencer Interface Overview
The sequencer interface is organized into several sections, each providing access to key parameters and settings.
Sequencer Track Overview
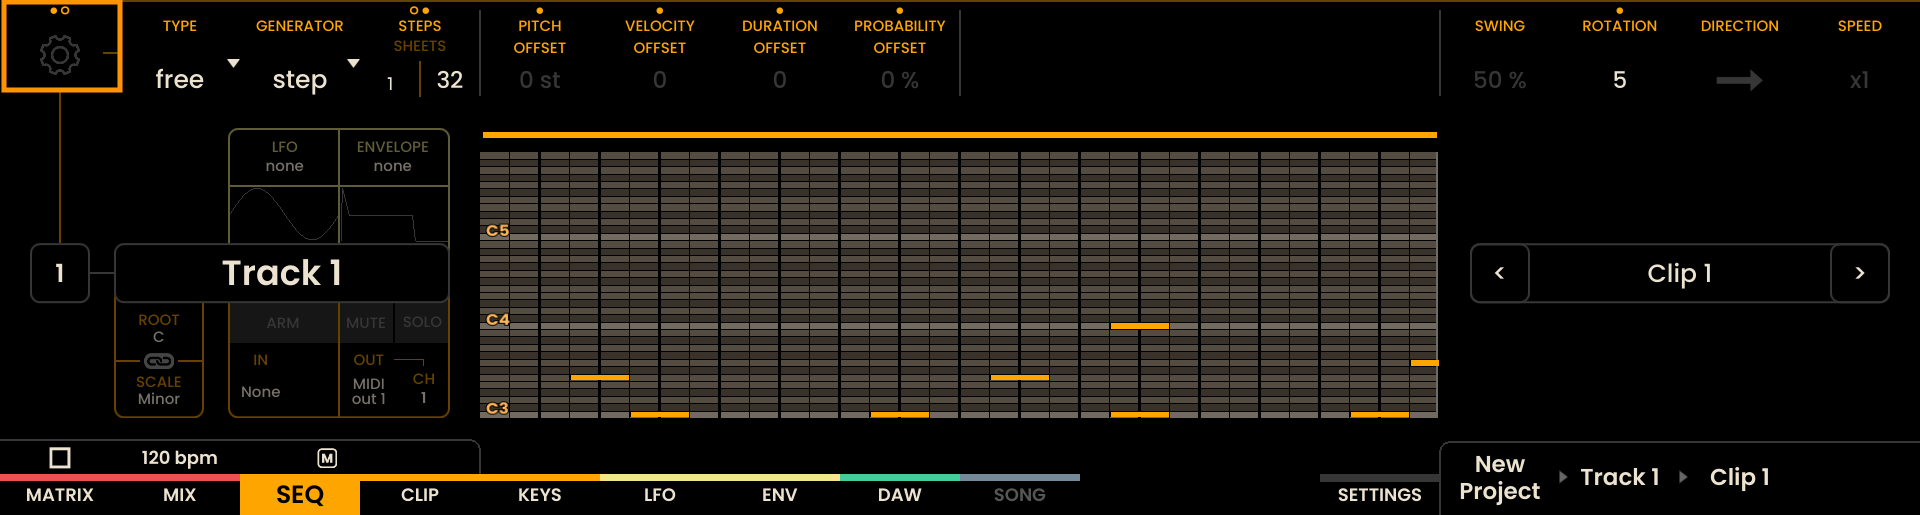
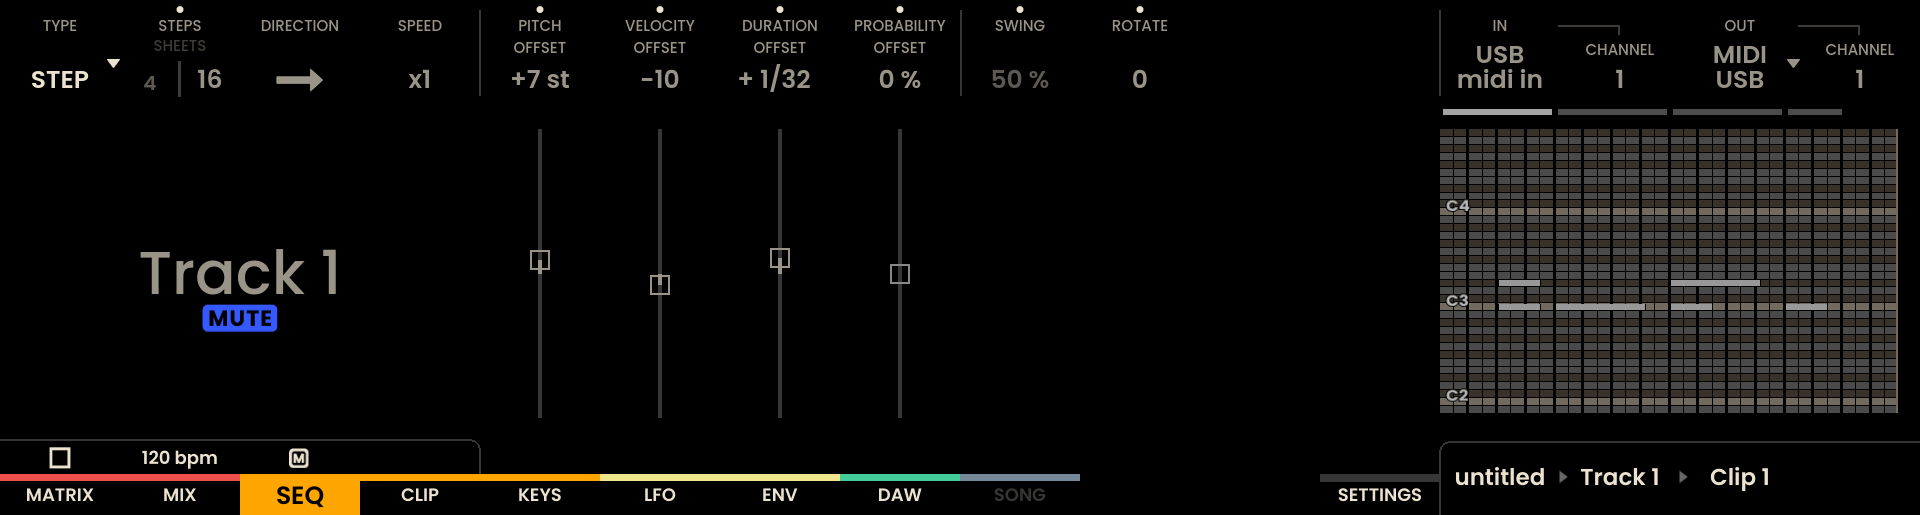
The Sequencer Overview Page displays the global settings for the selected track, including Track Settings, Track Type, Generator Sequence Length, Direction, Speed, and Track Modifiers. These settings apply to the entire track and can be adjusted using the encoders located above each label on the screen . In the bottom-right corner, general information such as the current Clip, Track, and a Piano Roll preview of the selected track is displayed.

On this page, the Grid Pads are used for track navigation, with each row corresponding to a different track. The currently selected track is indicated by a white LED on the respective Track Button . By default, each row on the grid corresponds to 1/16 note values, with the option to zoom in for 1/32 note values.

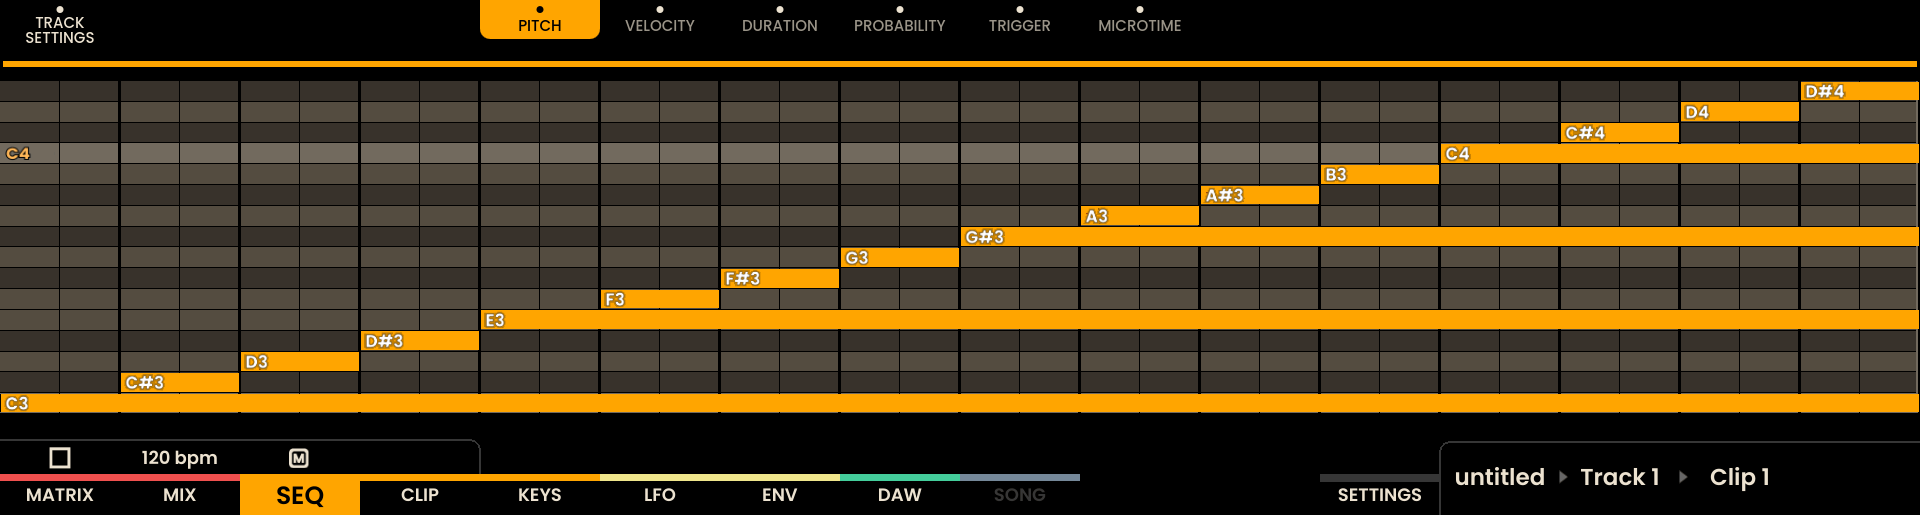
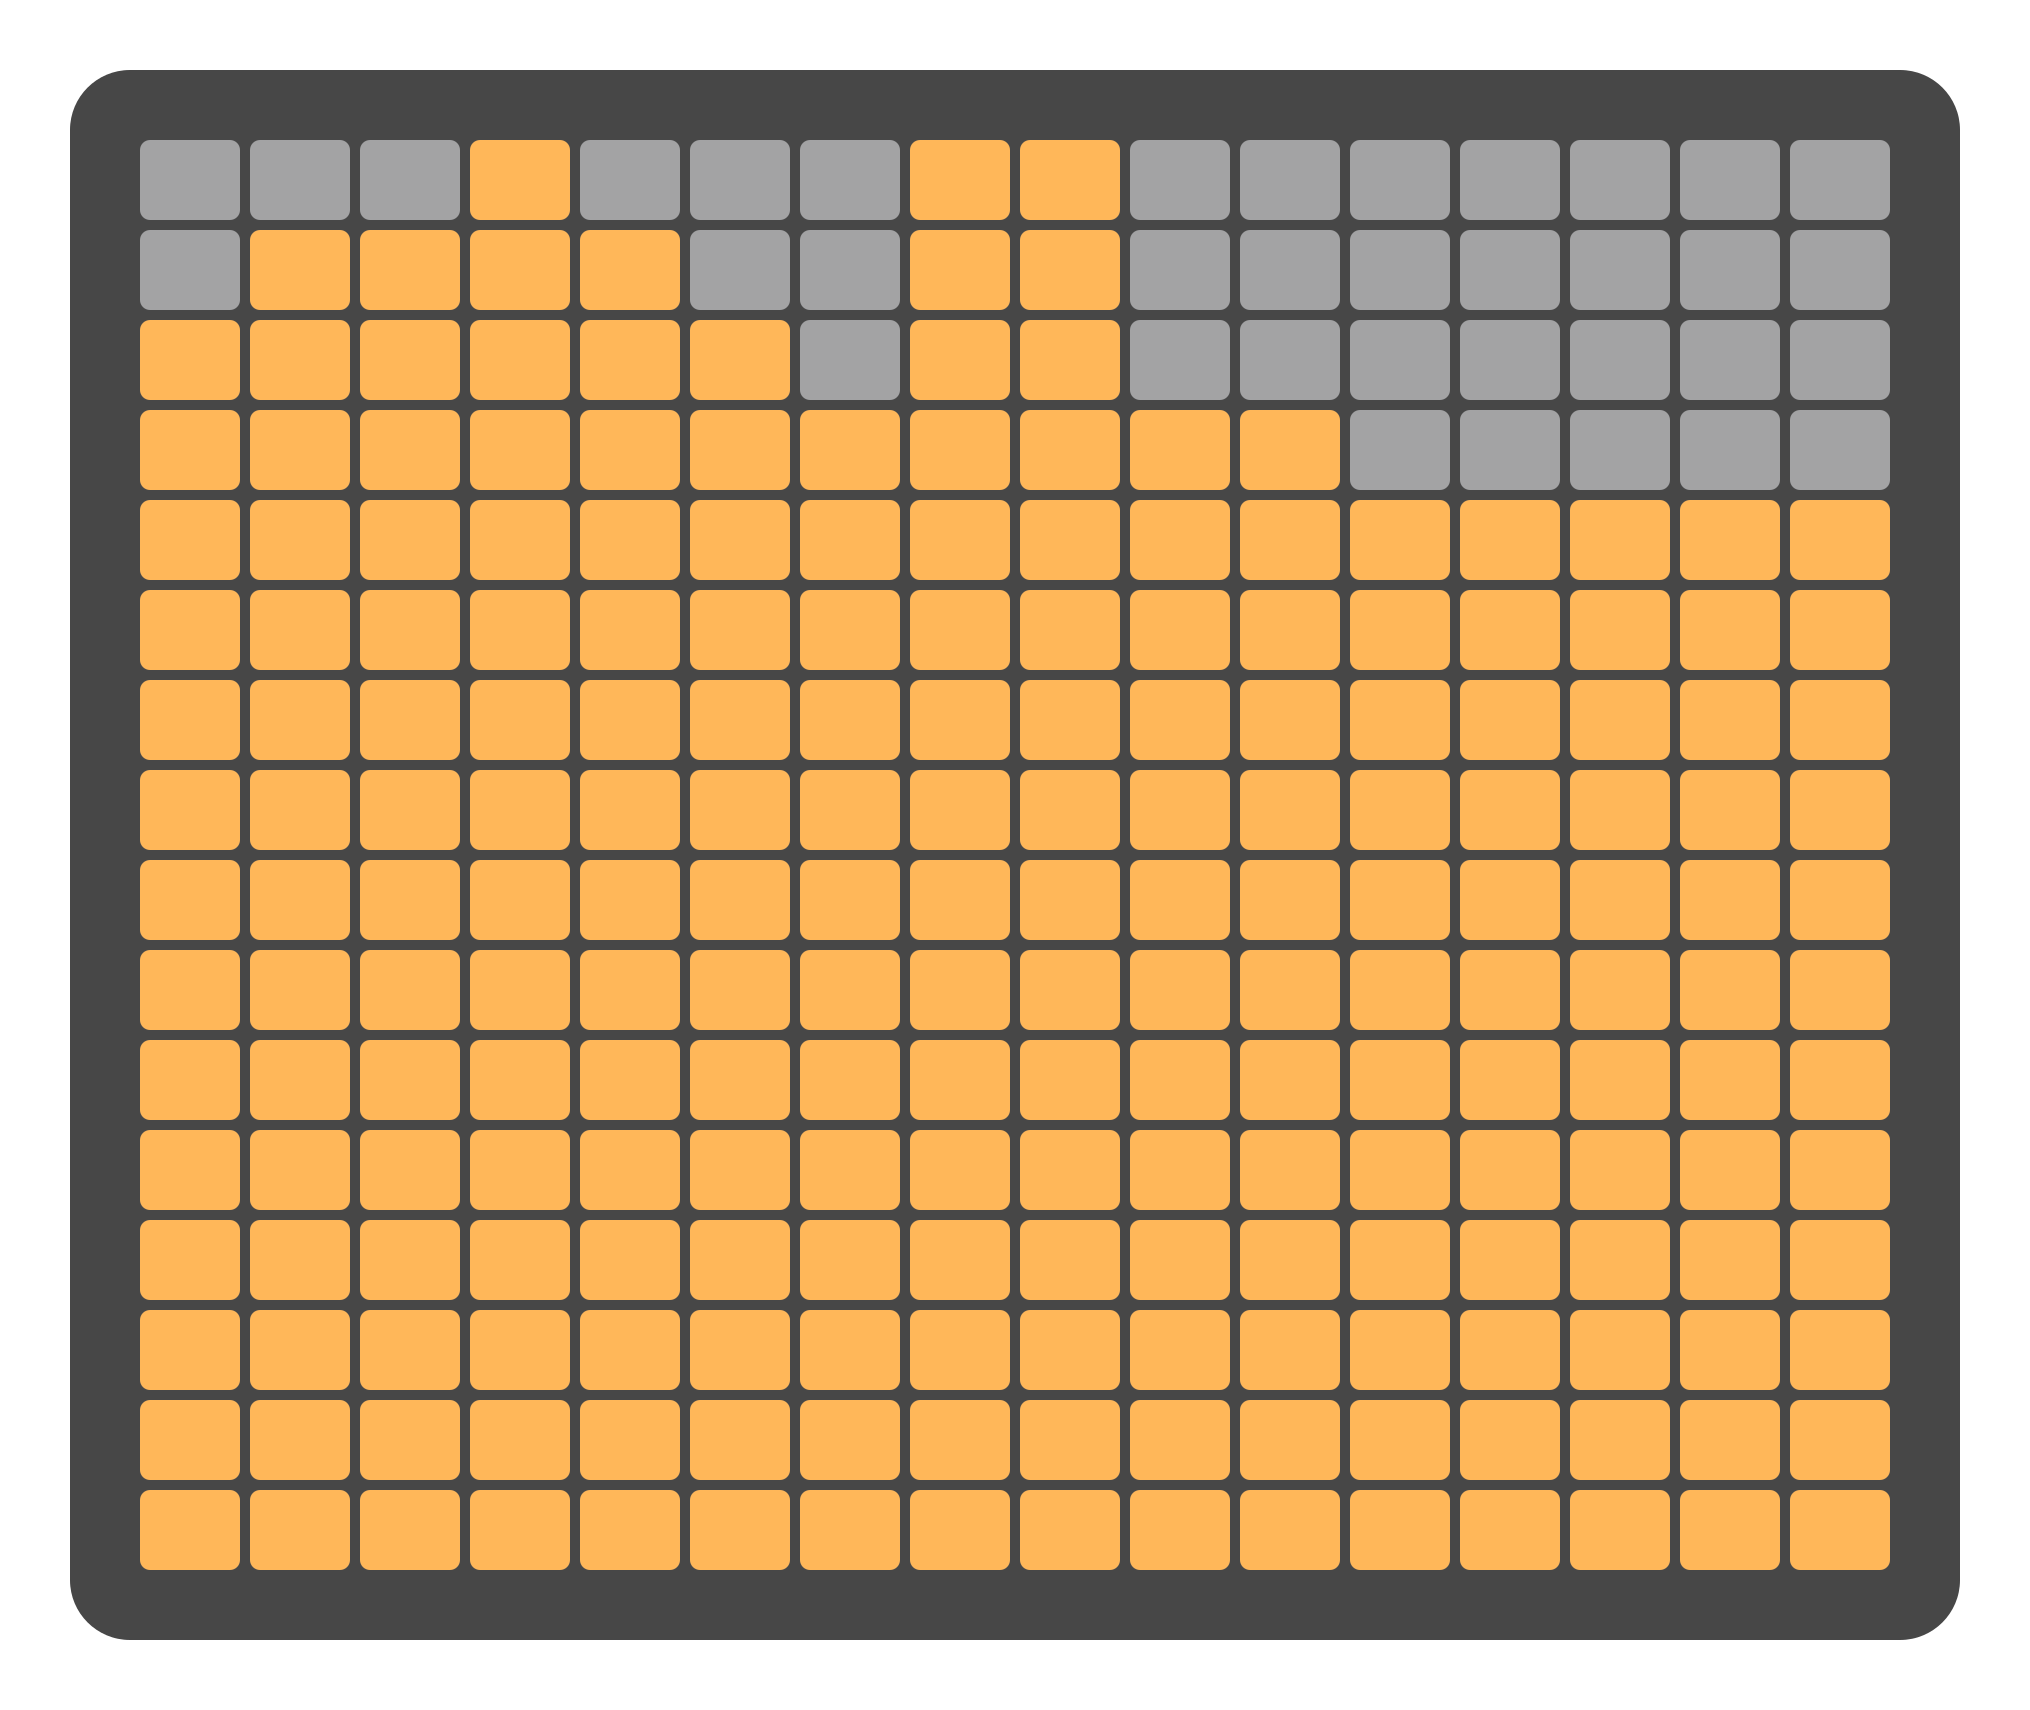
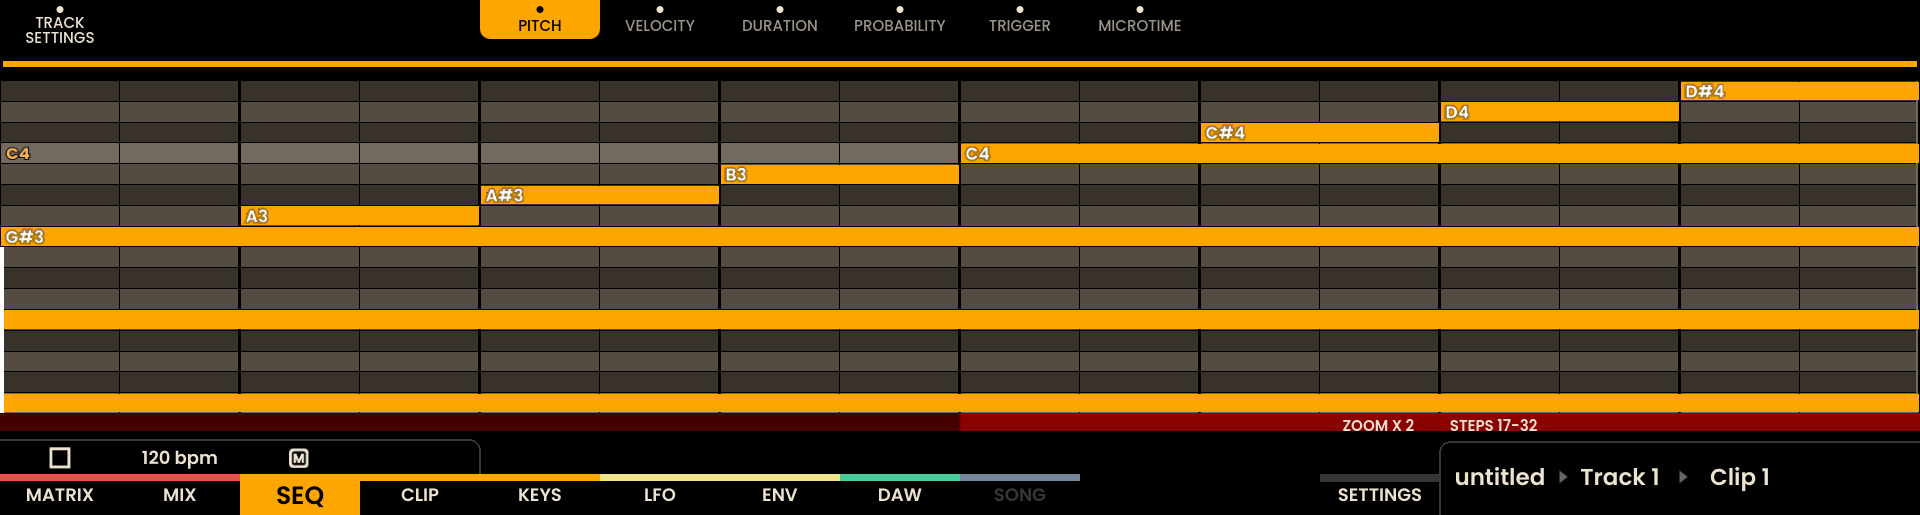
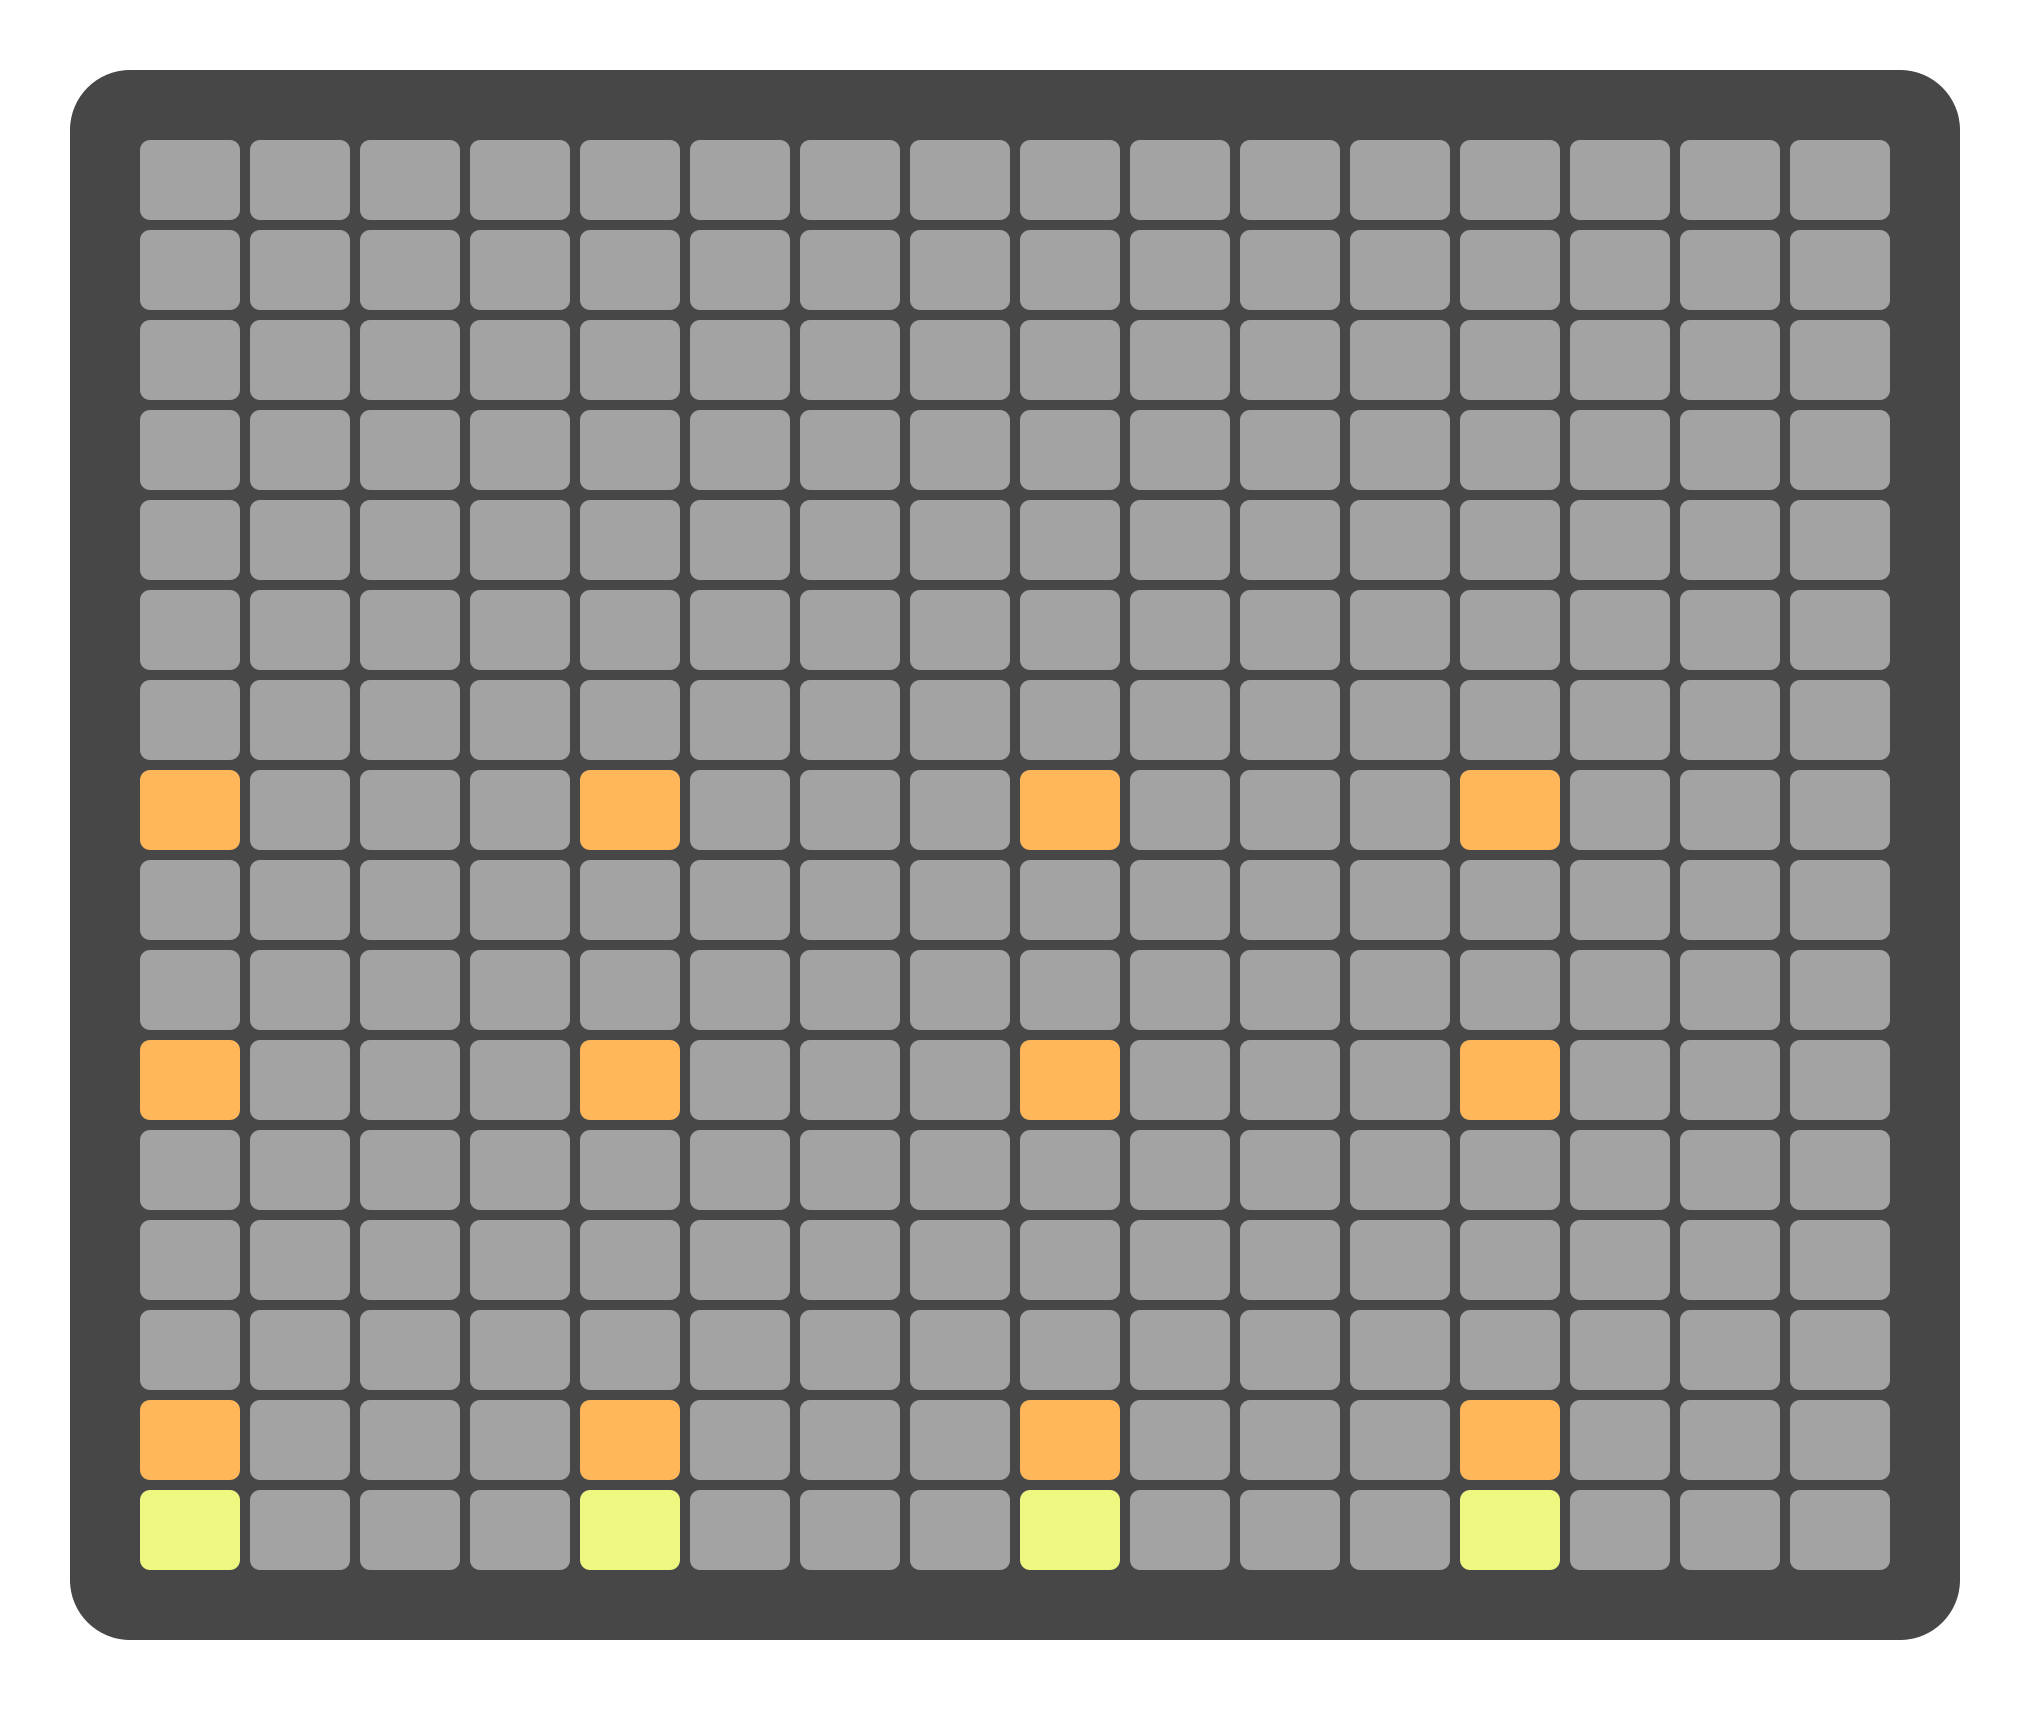
When zoomed out to 1/16, any notes placed at 1/32 resolution are still visually indicated using dim orange pads. If multiple 1/32 notes exist within the same 1/16 step, the 1/16 step itself is shown in bright orange. This is for visual reference only and does not affect playback or note priority.
These finer notes cannot be edited in zoomed-out view. Zoom in to 1/32 to modify their timing or position.

Notes at 1/32 resolution are shown in dim orange, while the 1/16 step is highlighted in bright orange.
Note durations are also visually represented: the longest note within a step is displayed as an extended pad highlight. This is purely for visual alignment with what is actually playing.

4 notes with 1/4 duration per step, 1st and 3rd notes are on 1/16 while 2nd and 4th are on 1/32.
The function buttons are located on the right side of the interface
Each button corresponds to a specific function as indicated by its label. For example pressing will SOLO Track 1.
Global Track Overview
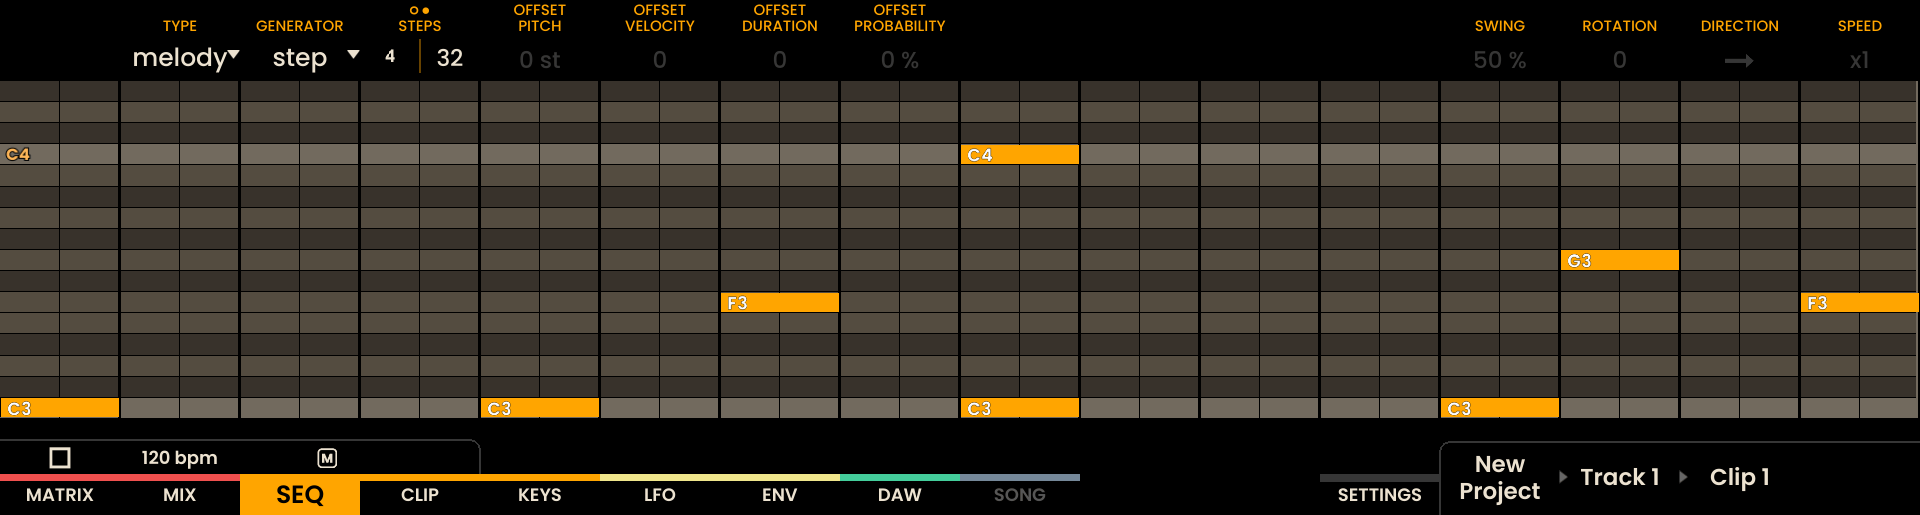
When a track is selected, the sequencer’s Overview Page displays several parameters for that track. These settings are global, meaning they affect the entire content of the track. Some of these settings are destructive—such as input and output assignments—while others act as modifiers that apply Offset to the step and voice parameters.
On the overview page, the display interface is divided into four main areas:
Parameter Strip (Top): - A row of rotary-accessible parameters, grouped as follows:
Track Behavior:
TYPE: Defines pitch handling (Free, Melody, Chord, Drum)
GENERATOR: Step or Euclidean engine
STEPS | SHEETS: Sequence length display and mode toggle
Modifiers: - PITCH OFFSET, VELOCITY OFFSET, DURATION OFFSET, PROBABILITY OFFSET
Generator-specific parameters (dynamic, depending on mode)
Playback Control: - SWING, ROTATE, DIRECTION, SPEED
Header (Mid Left):
Track Name is shown in the center.
Just below, a compact info panel summarizes:
Root, Scale, and Link status
Input and Output routings
MIDI Channels, ARM, MUTE, and SOLO states
Above the name, active LFO or Envelope shapes are shown if present on the track.
Main View (Mid Center):
A Piano Roll Overview displays the note data for the current sheet, giving a visual cue of melodic or rhythmic activity.
Clip Info (Mid Right):
Displays the current Clip name for reference.

Track-level parameters—including Direction, Speed, Pitch Offset, Velocity Offset, Duration Offset, Probability Offset, Swing, and Rotate—can be instantly reset to their default values. To reset any of these, hold SHIFT and click the corresponding encoder above the parameter label. For example, holding SHIFT and clicking the encoder above PITCH OFFSET will reset it to 0 semitones. This shortcut applies to all listed parameters, streamlining workflow and making it easy to restore default settings.
Track Settings
Each track has its own set of global (destructive) settings including Output, Input, Scale / Drum Sounds, and Instrument options. These settings are accessible from the Sequencer Settings subpage.
To access the Track Settings panel, press the Encoder above the Gear icon on the top-left corner of the display. This opens a dedicated settings view containing the following parameters:
Output
Each track can be assigned to an output and MIDI channel using the encoder above the OUTPUT label. The available output types include:
MIDI OUT 1 — TRS MIDI output labeled MIDI OUT 1 on the rear of the device
MIDI OUT 2 — TRS MIDI output labeled MIDI OUT 2
MIDI OUT 3 — TRS MIDI output labeled MIDI OUT 3
USB — MIDI data sent via the rear USB connection labeled USB MIDI
CV — Uses the CV outputs on the Breakout Module.
For example:
- If Track 5 is set to CV output:
Pitch → A5
Velocity/Modulation → B5
Gate → Gate 5
When MIDI or USB is selected, the encoder above the CHANNEL label allows you to select a MIDI channel (1–16). MIDI and USB tracks support 8-voice polyphony, whereas CV tracks are monophonic (only the highest voice is used).

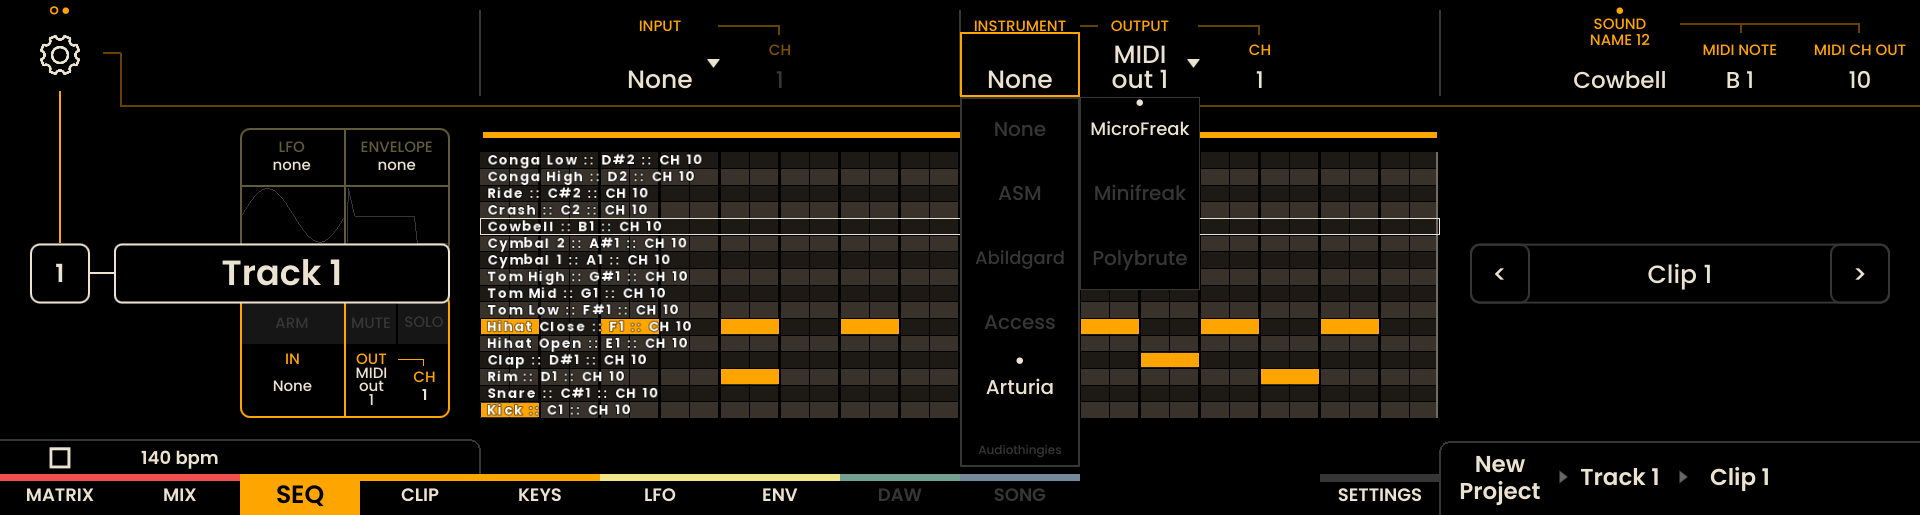
Instrument
Each track can be assigned an Instrument in addition to a traditional Output routing. Assigning an Instrument links the track to a manufacturer and device definition so Reliq can present human-friendly parameter names for CC destinations in pages such as LFO, ENVELOPE and AUTOMATION, and offer device-specific parameter lists where available.
To assign an Instrument:
Move the encoder above INSTRUMENT to open the Manufacturers menu.
Use the encoder next to it to select a specific device from the chosen manufacturer.
Click the encoder to confirm the selected instrument.
Instrument definitions and device parameter mappings reference community-maintained MIDI data from midi.guide and the Pencil Research MIDI repository. Portions of that database that are not owned by specific manufacturers are licensed under Creative Commons Attribution-ShareAlike 4.0 International (CC-BY-SA-4.0).
Note
At the moment Reliq does not support 14-bit MIDI (MSB/LSB combined) or NRPN messages. This is planned for a future update. When a selected instrument exposes parameters as NRPN or 14-bit values, Reliq will default to the best-matching single-CC representation where applicable. Support for modifying and adding additional or user-specific instrument definitions is also planned for a future update.
Input
Each track’s input can be set using the encoder above the INPUT label. Available options include:
NONE — No input is assigned to the track
MIDI IN — Receives MIDI from the TRS MIDI input
USB — Receives MIDI from the USB MIDI port on the rear
USB HOST — Receives MIDI from any device connected to the USB Host port. This port also provides power and works with any class-compliant MIDI device.
The encoder above the CHANNEL label allows selecting a specific MIDI input channel.
When set to All, the track receives input from all channels on the selected port.

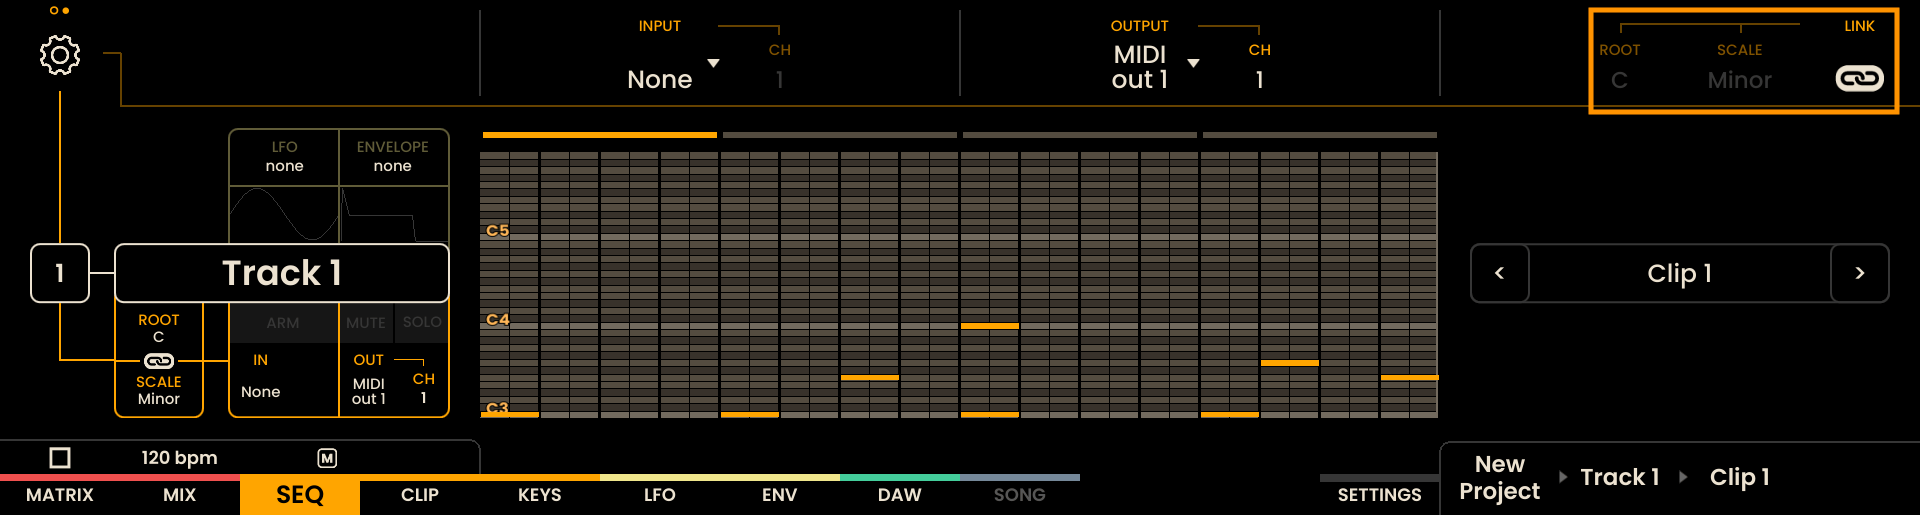
Scale Settings
Each track can have its own Root Note, Scale, and Link setting. These control how notes are interpreted in the Piano Roll and other scale-aware views.
ROOT — Defines the base note of the scale (e.g., C, D#, A, etc.)
SCALE — Selects the active musical scale (e.g., Major, Minor, Dorian)
LINK — When enabled, the track inherits the global Root and Scale from Settings → Sequencer → LINK ROOT / LINK SCALE. When disabled, the track uses its own local Root and Scale.
This makes it easy to have harmonically linked tracks using a shared scale, while still allowing overrides per track when needed.
Track Monitoring
To monitor incoming MIDI Input on a track:
Hold RECORD and press one or more TRACK buttons to ARM them. Armed tracks will respond to incoming MIDI notes and MIDI CCs based on their input settings. Armed tracks are indicated by red-lit track buttons.
To quickly disarm all tracks, press SHIFT + RECORD .
Track Overview
On the Sequencer Overview Page, each track’s settings are displayed in a compact info panel just below the track name. This panel provides a quick summary of key parameters for the selected track. On the overview page, a series of non destructive modifiers can be applied to each track, affecting all steps without altering the underlying sequence. These include:
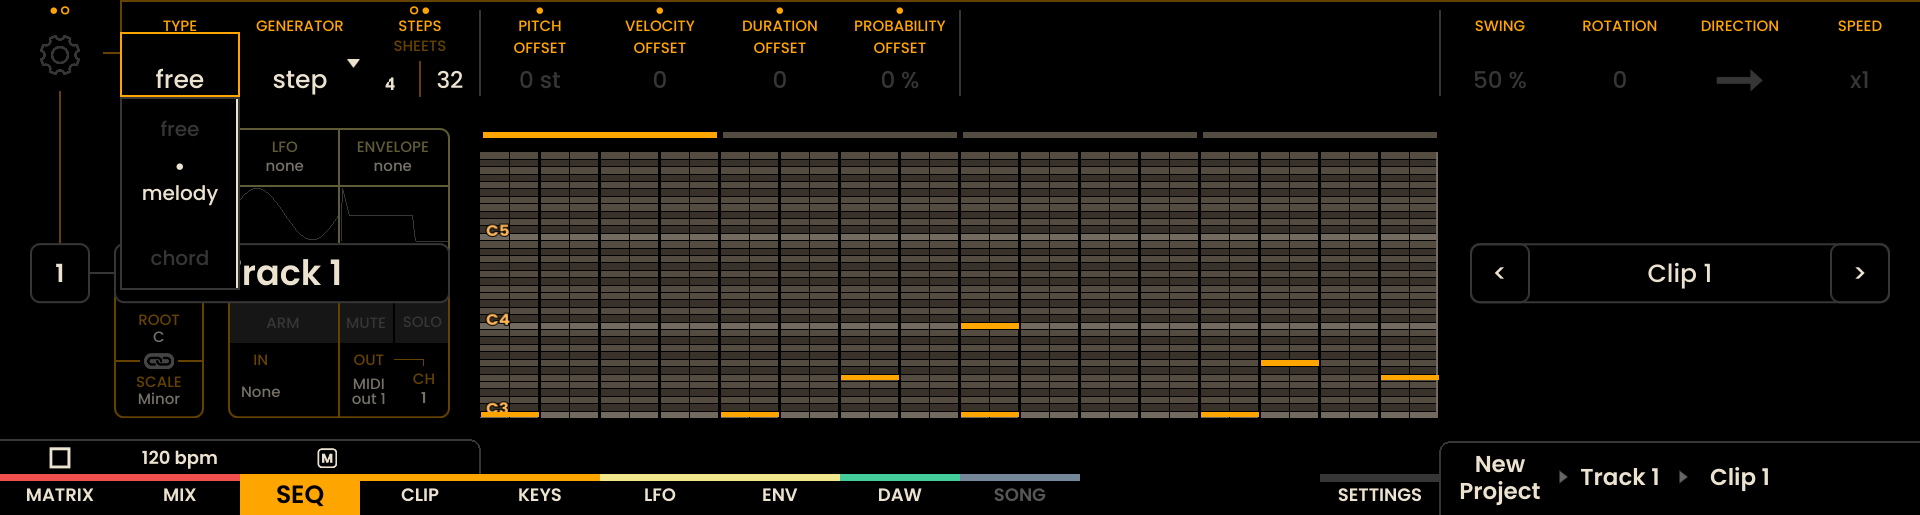
Track Types
Each sequencer track has a Track Type that defines how pitches are entered and interpreted in relation to a musical key and scale. This setting is independent from the Track Generator (Step Sequencer / Euclidean) and only affects pitch behavior and note input in the Piano Roll.
Available Track Types are:
Free
Melody
Chord
Drum
Track Types are non-destructive. Changing the type does not rewrite or delete the underlying notes in the sequence, so you can freely switch between modes and always return to the original material.
Interaction with Key and Scale
Key and Scale can be defined locally per track or inherited from a global Key and Scale defined in the Settings Page. This makes it possible to link multiple tracks harmonically by letting them all follow the same global musical context, while still allowing individual tracks to override these values when needed.
The selected Root Note and Scale determine:
How pads are backlit in the Pitch Piano Roll.
How notes are constrained or quantized in Melody and Chord modes.
Which chords are available in Chord mode.
Even when no harmonic constraints are enforced (as in Free mode), the visual feedback from the pad backlight still reflects the currently selected Root Note and Scale, providing a harmonic reference while you edit.
Note
When the Root is changed on a track that is using Melody or Chord mode, the entire sequence is transposed relative to the new root. The internal interval relationships between notes are preserved.
For example, if a sequence contains a C while the Root is set to C Chromatic, changing the Root to D Chromatic will shift that C to D, maintaining the relative structure of the pattern.
When the Scale is changed, notes are re-quantized to fit the newly selected scale. This can alter the exact melodic and harmonic intervals of the sequence.
If the goal is to shift the sequence by a fixed number of semitones independently of scale or root behavior, the Pitch Offset parameter can be used. Pitch Offset moves all notes by a defined semitone amount while preserving their internal interval relationships.
Free Mode
In Free mode, the track does not apply any harmonic constraint to the notes:
Notes are entered exactly as they are played or edited, regardless of the current Key or Scale.
Any pitch can be placed in the Piano Roll, including notes outside the selected scale.
Timing quantization (if enabled in the Keys page) affects only timing, not pitch.
The pad backlight in the Pitch Piano Roll still follows the selected Root Note and Scale, so you can use the highlighted pads as a visual guide while keeping full chromatic freedom.
Free mode is useful when:
You want chromatic or atonal material.
You need deliberate notes outside the current scale.
You want to fine-tune individual pitches without automatic correction.
Melody Mode
In Melody mode, the track becomes scale-aware:
Every note in the Piano Roll is quantized to the selected Key and Scale.
Notes that are recorded, drawn, or transposed are automatically moved to the nearest in-scale pitch.
It is not possible to create or keep notes that lie outside the selected scale while the track is in Melody mode.
This applies both to:
Notes that already exist in the clip when you switch the track to Melody mode.
Notes that are added later via recording, external MIDI input, or manual editing.
If you need to place specific out-of-scale notes (for example, chromatic passing tones or altered notes), switch the track back to Free mode, perform your edits, and then optionally return to Melody mode. Because Track Types are non-destructive, the original pitches are always preserved.
Chord Mode
Chord mode extends the behavior of Melody mode from single-note lines to harmonies:
Pitch handling and scale awareness are the same as in Melody mode: all notes remain constrained to the current Key and Scale.
Instead of entering arbitrary stacks of notes, you can select chords that belong to the current scale and use them as building blocks for your sequence.
Manual edits still obey the scale: newly added notes will be quantized to the nearest in-scale pitch.
Chord mode is useful for:
Quickly programming harmonically consistent progressions.
Building polyphonic patterns without worrying about out-of-scale notes.
Note
Track Types are non-destructive: switching modes does not permanently alter the underlying sequence data, and you can switch back to restore a previous mode’s behaviour.
Chord Input and Chord Picker
When a track is in Chord mode, you can either:
Play chords live, derived from the scale selected on the Keys page, or
Select specific chords to be placed directly on steps in the Piano Roll.
To access Chord mode inside the Piano Roll, press the dedicated tab on the encoder to switch to the Chord Piano Roll.

In this view:
The bottom row of pads (row 16th) is used to enable or disable steps.
Pressing and holding a pad on this row opens the Chord Picker for that step, allowing you to choose which chord will be inserted into your progression. Releasing the pad will close the Chord Picker without making changes.
A short press on a pad on this row will toggle the step on or off.
The duration of the chord can be adjusted using the DURATION encoder above the DURATION label on the screen or using a combination of two pads, like in the regular Piano Roll.
COPY , PASTE , and CLEAR + functions are also available for quick editing of chords in the Piano Roll.
Pressing and holding a step in combination with the PLAY button allows you to preview the chord assigned to that step.
The Chord Picker interface mirrors the one used on the Keys Page.
Chord Picker Views
Depending on the current scale and configuration, the Chord Picker can operate in two main views:
Chromatic mode view
In-scale mode view
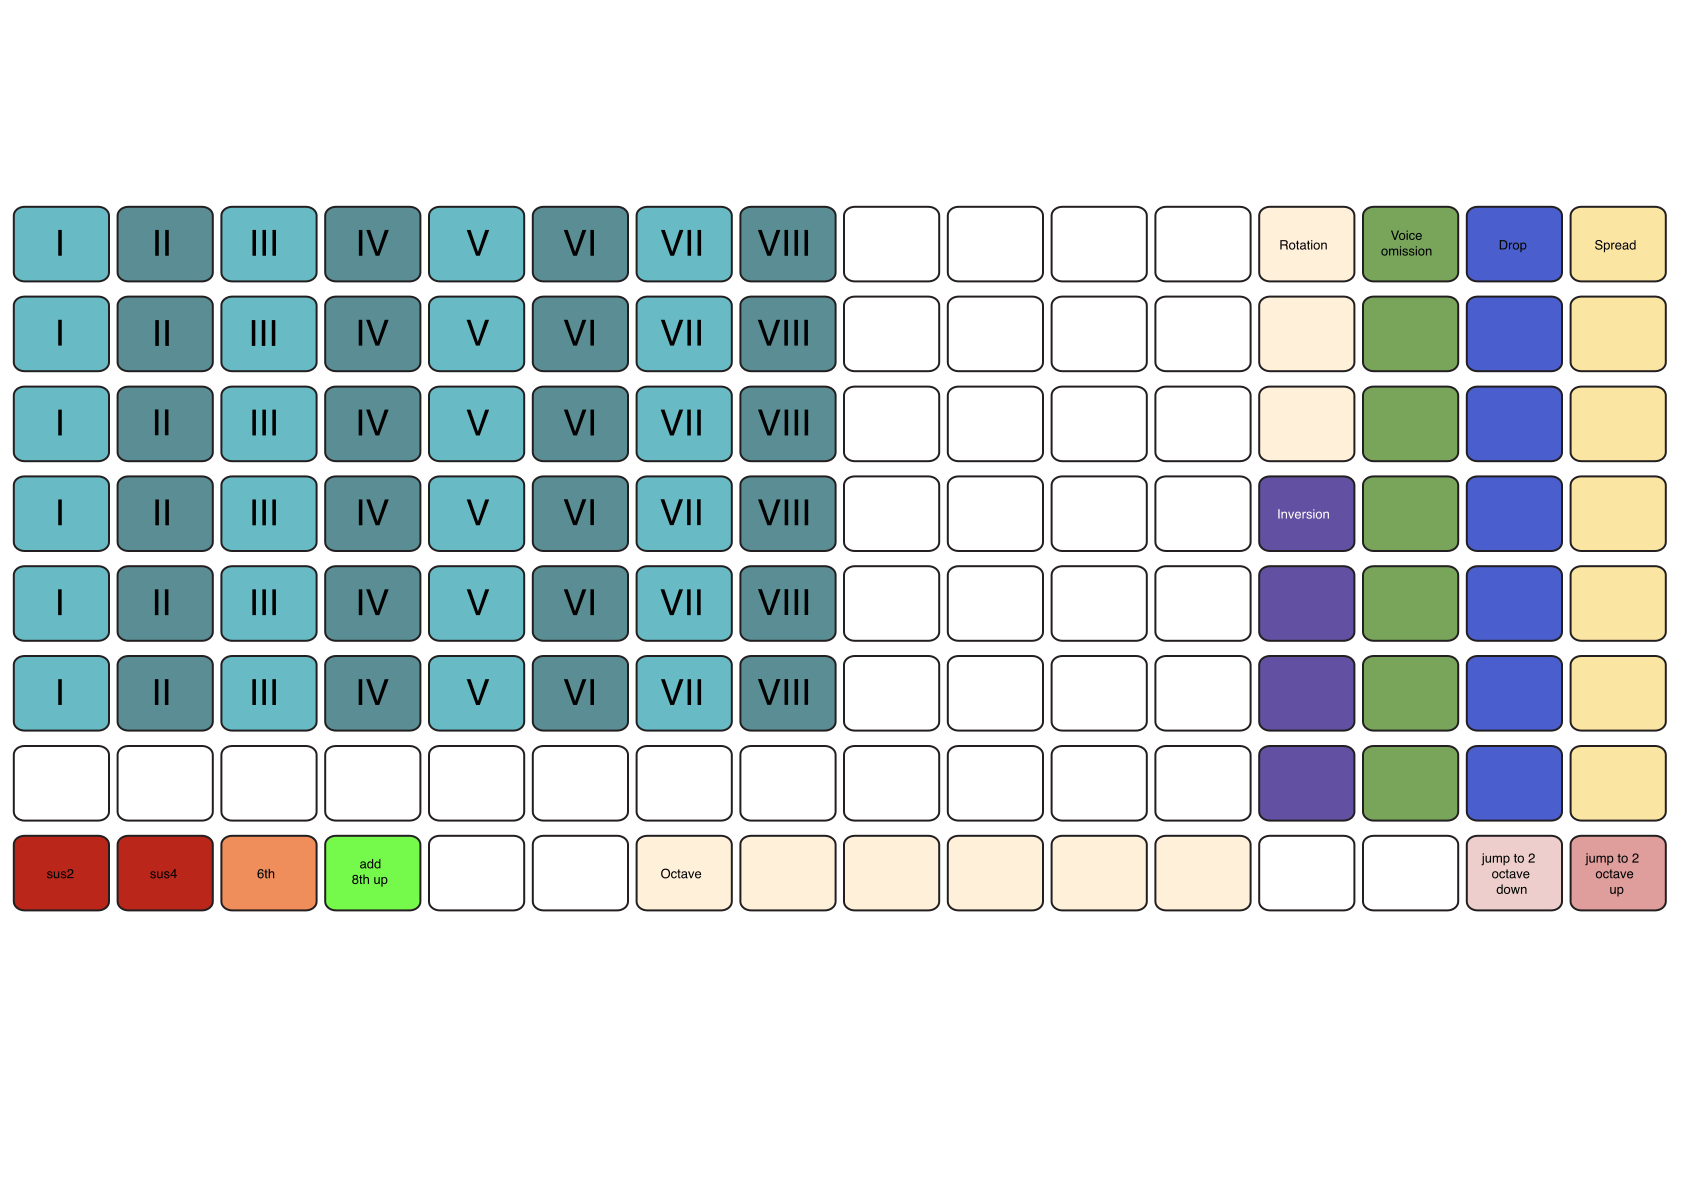
Chromatic Mode View
In Chromatic mode, chords are built freely from the chromatic set of notes.
Before a chord can be generated, you define its quality, alterations, and extensions using the parameters associated with the Chord Picker.
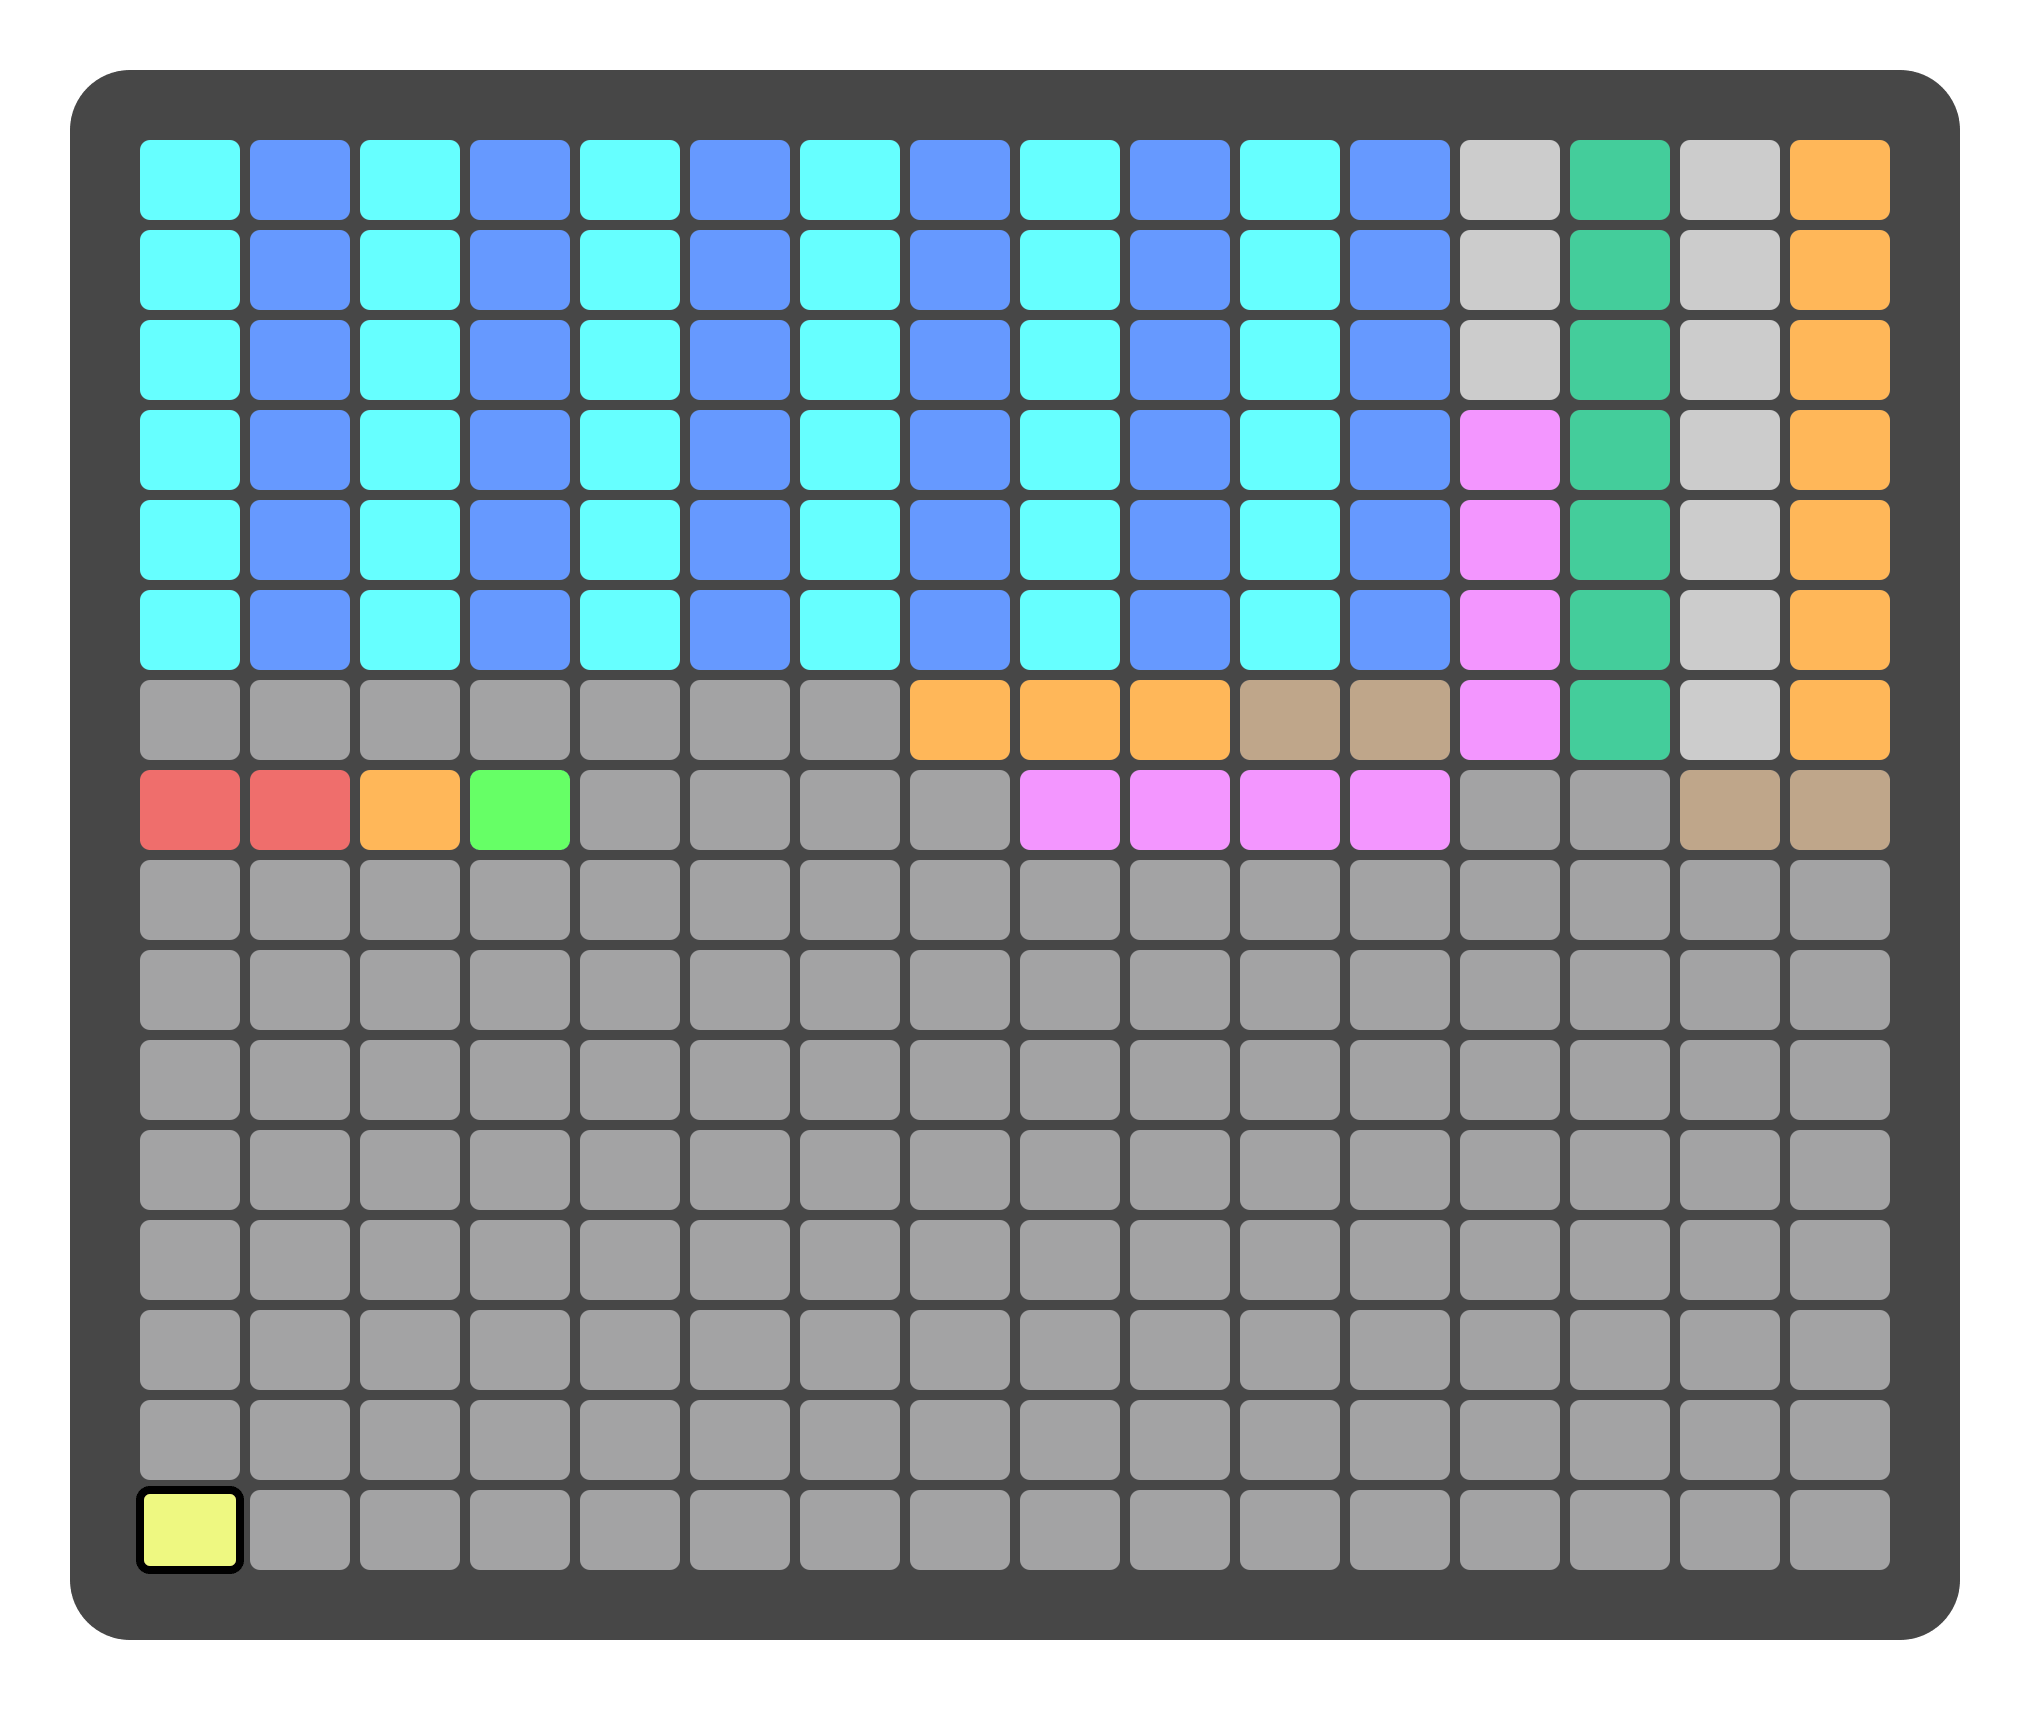
To actually generate the chord, you then select its root note from the blue and light-blue region at the top-left area of the grid:
Each row corresponds to an octave.
Each column runs from C up to B.
This layout makes it possible to build any chord quality on any chromatic root, independently of the currently selected scale.
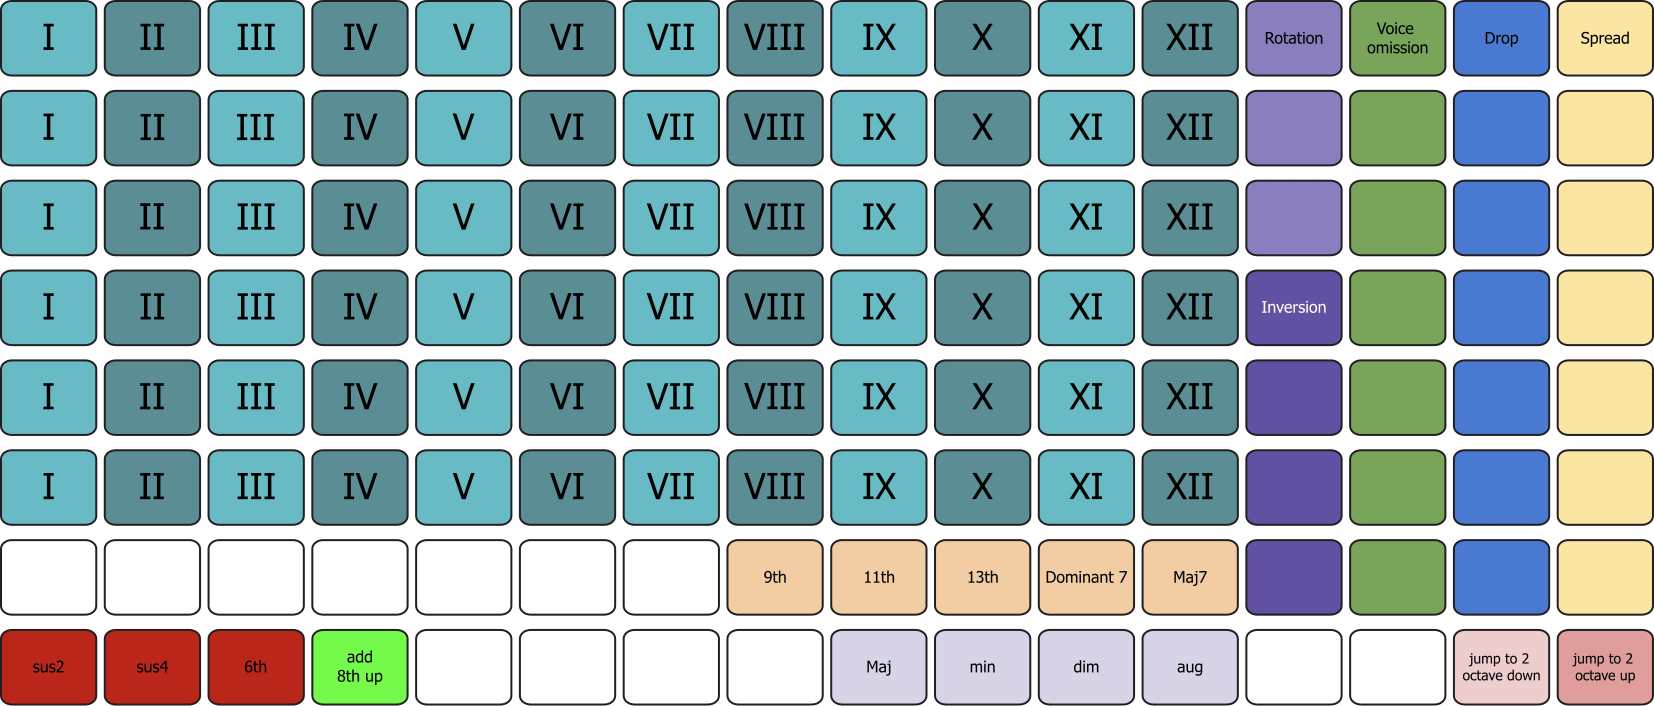
In-scale Mode View
In In-scale mode, chords are generated directly from the degrees of the selected scale rather than from absolute chromatic roots.
Using the diagram as reference:
The pad in blue and light blue represents the scale degree (I, II, III, …) from where the chord will be built.
The number of available degrees depends on the selected scale.
Each row represents how many notes are included in the chord. From bottom to top:
Power chord (Tonic + 5th)
Triad (Tonic, 3rd, 5th)
With 7th (Tonic, 3rd, 5th, 7th)
With 9th (Tonic, 3rd, 5th, 7th, 9th)
With 11th (Tonic, 3rd, 5th, 7th, 9th, 11th)
With 13th (Tonic, 3rd, 5th, 7th, 9th, 11th, 13th)
This view is ideal when you want to stay strictly within the current scale and quickly build harmonically consistent progressions (I–IV–V, ii–V–I, etc.) without thinking about individual chromatic root notes.
Note
In both views, in order to generate a new chord, you must first define its quality, alterations, and extensions using the controls on the right side of the Chord Picker. Once these parameters are set, selecting a root note (in Chromatic mode) or a scale degree (in In-scale mode) will create the chord to the selected step.
Common Chord Parameters
Both views share a common set of controls for defining the following aspects of the chord:
inversion
rotation
voice omission
spread
drop
alterations
Inversion and Rotation
You can select the inversion (the first four pads) or the rotation (the last three pads) of the chord by selecting one of the pads in the pink/white column on the right side of the Chord Picker.
Counting from the bottom to the top:
The first pad selects the root position (no inversion).
The second pad selects the first inversion.
The third pad selects the second inversion, and so on.
For example, for a C major triad (C–E–G), the first inversion places E as the lowest note (E–G–C), while the second inversion has G as the lowest note (G–C–E).
Using inversion does not move any extension above the 7th (9th, 11th, 13th) if present. Selecting an inversion outside of the available voices will have no effect and will keep the chord in its original position.
The last three pads in the pink/white column allow you to select the rotation of the chord starting from the 9th, the 11th, or the 13th. For example, if you have a chord with a 9th extension and you select the first rotation, the 9th will be moved to the bottom of the chord voicing and all the other notes will be shifted above the 9th.
Voice Omission
You can omit specific voices from the chord by selecting the corresponding pads in the green column on the right side of the Chord Picker. Counting from the bottom to the top:
The first pad omits the root note.
The second pad omits the 3rd.
The third pad omits the 5th, and so on.
Spread and Drop
You can modify the voicing of the chord using the Spread and Drop functions located in the yellow (spread) and white (drop) columns on the right side of the Chord Picker.
As with voice omission, the voices are counted from the bottom to the top:
Selecting one of the pads in the yellow column will spread the corresponding voice up by one octave.
Selecting one of the pads in the white column will drop the corresponding voice down by one octave.
At the bottom of each column, two additional options are available to increase the spread or drop by two octaves.
Alterations
There are four extra options for altering the chord. You can find the four pads in the bottom-left corner of the Chord Picker.
The currently available alterations are:
sus2: replaces the 3rd of the chord with the 2nd.
sus4: replaces the 3rd of the chord with the 4th.
6th: adds the 6th to the chord and removes the 7th if present.
Add octave of the bass note (excluding dropped notes). For example, in an inverted chord this will add the octave of the current bass note.
Per-Degree Chord Presets NEW
The Chord Picker supports independent chord settings for each scale degree (In-scale mode) or each root-note/octave cell (Chromatic mode). This allows you to program a progression where each degree uses a completely different voicing, inversion, or alteration without having to reconfigure the controls every time you select a different degree.
Selecting and editing a Degree Slot
Pressing a degree pad selects it and highlights it in white. All chord parameter controls (inversion, rotation, voice omission, spread, drop, alterations) then apply exclusively to that selected degree’s preset. The selection persists after you release the pad, so you can adjust any parameter freely while that degree remains active.
Copy, Paste, and Clear
COPY + pad: copies the chord settings of that degree to the clipboard.
PASTE + pad: pastes the clipboard contents onto that degree and marks it as locked.
UNDO + pad: clears the preset for that degree, resetting it to its default settings and removing the locked state.
Propagating Settings Across Octaves (Chromatic mode only)
In Chromatic mode, pressing SHIFT + pad on a specific degree slot applies that pad’s preset to all octave rows within the same column. This is useful when you want a particular chromatic degree to always use the same voicing regardless of which octave row is played.
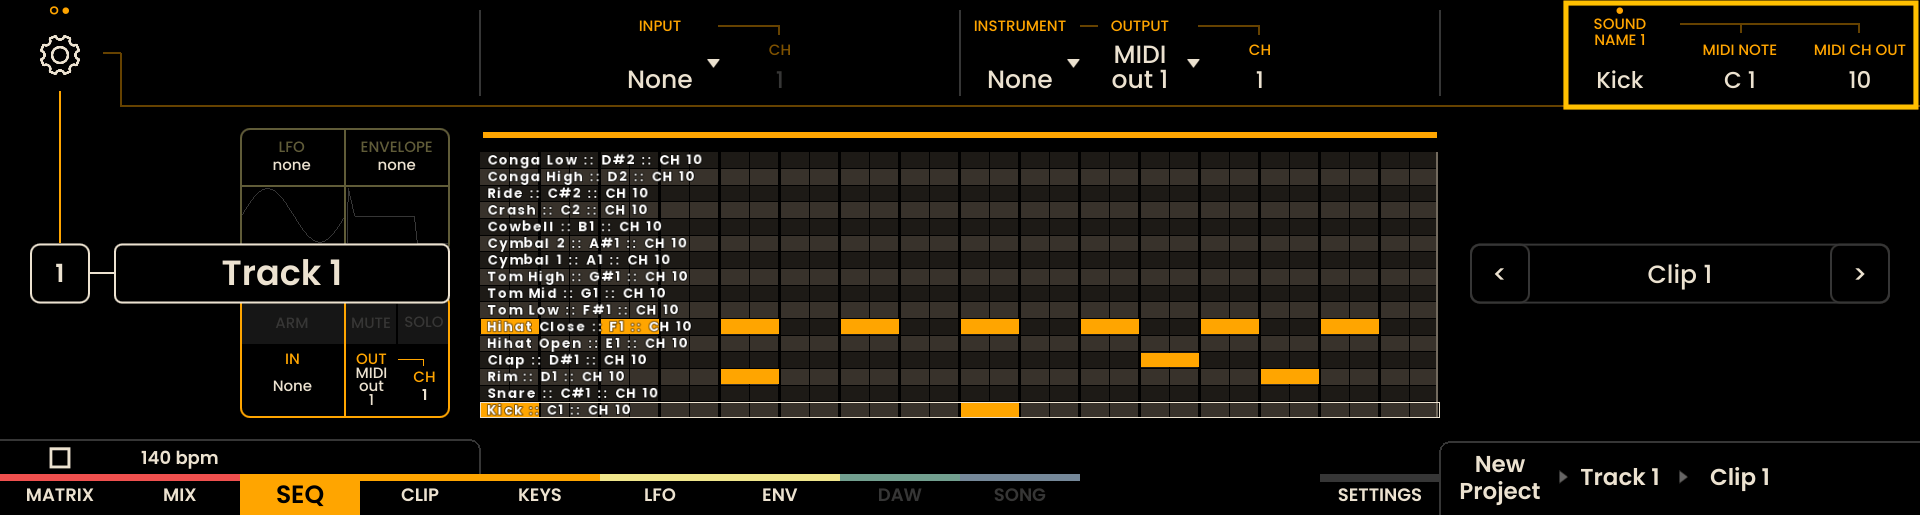
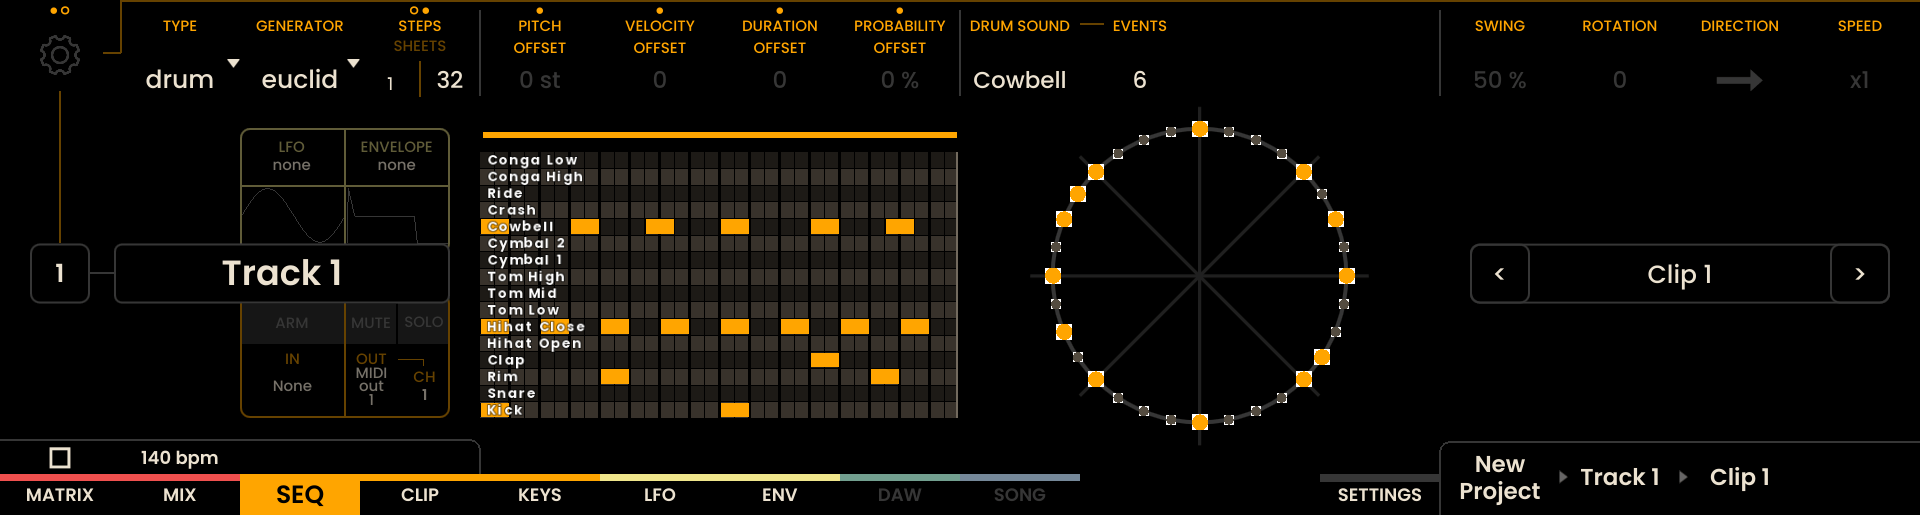
Drum Mode
In Drum mode a track behaves as a 16-sound kit: each sound can be given a custom name, a specific MIDI note number, and its own MIDI output channel. Drum mappings are stored per clip and are inherited only when a new clip is created (the same behaviour used for track outputs). Drum tracks include 16 sounds and support up to 8-voice polyphony.
Editing drum sounds
Use the three encoders above the labels SOUND NAME , MIDI NOTE and MIDI CH OUT in the Track Settings panel (click the encoder above the Gear icon ) to edit the active sound:
Rotate the encoder above SOUND NAME to select which of the 16 kit sounds is active.
With a sound selected, rotate the MIDI NOTE encoder to set its MIDI note (display shows note name/number) and rotate the MIDI CH OUT encoder to choose its MIDI channel (1–16).
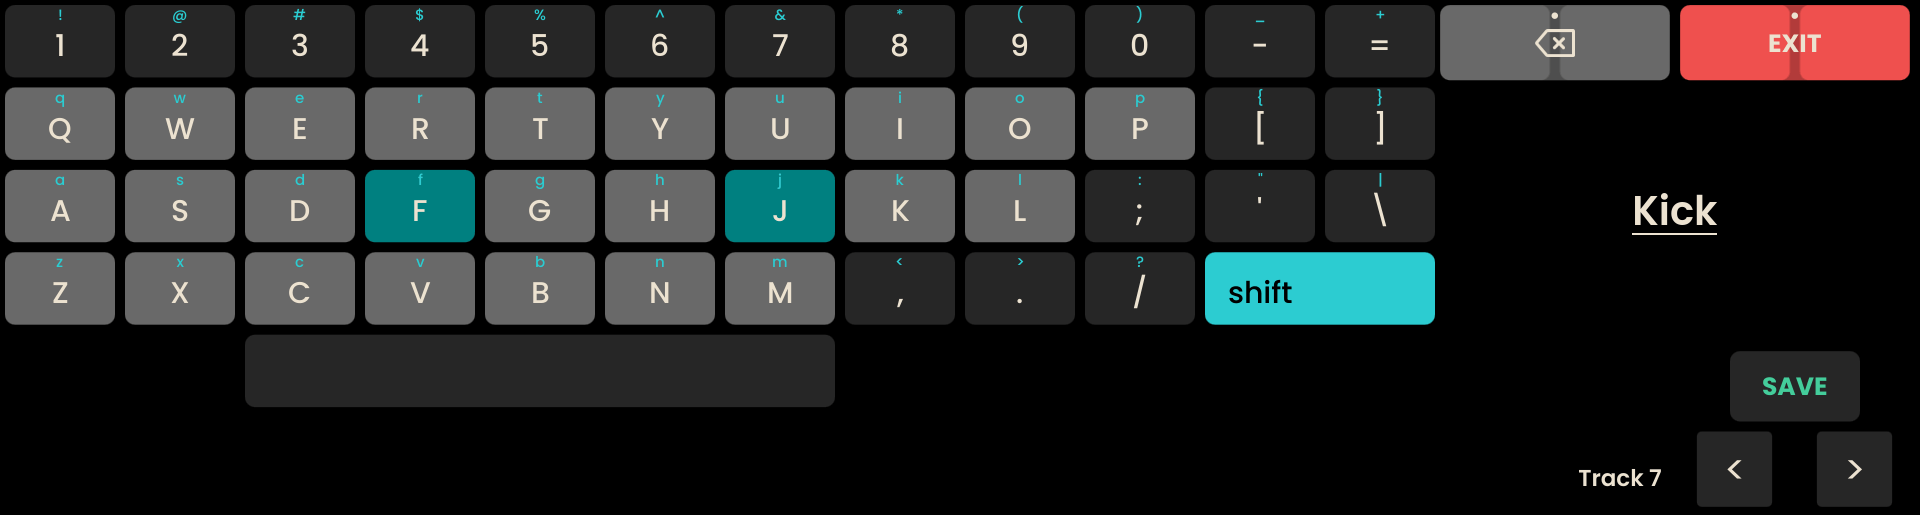
Click the encoder above SOUND NAME to open the virtual keyboard and type a custom name for the sound.
The same per-sound controls are available in the DRUM piano roll and on the KEYS page. From the Piano Roll open DRUM MODE SETUP (click the encoder above that label) to access the per-sound controls; on the KEYS page use the encoders above SOUND NAME, MIDI NOTE and MIDI CH OUT in the upper-right area of the screen.
Per-Sound Solo and Mute
Individual drum sounds can be muted or soloed directly from the Keys Page page.
To mute or solo a sound, press and hold MUTE or SOLO, then press any pad belonging to the desired drum sound. The mute or solo state applies to the entire sound (all pads within its 4×4 block).
Muting individual drum sounds is available only from the Keys Page page.
Entering and modifying drum steps
Drum steps can be entered and edited from the Sequencer page or the Piano Roll, following the same workflow as other Track Types. In Drum tracks the PITCH piano roll becomes the DRUM piano roll and displays the 16 kit sounds rather than pitched notes. Use the grid pads to add or remove steps, and open the Piano Roll for detailed per-step editing of drum events.

Generators and MIDI effects
Generators such as the Euclidean engine operate per-drum-sound: select the sound with the DRUM SOUND encoder and set the pattern with the EVENTS encoder. Drum tracks accept MIDI effects as usual, but pitch-based MIDI effects (for example arpeggiators or pitch quantizers) do not affect drum sounds.
Automation Lanes on Drum Tracks
Drum tracks include the standard eight automation lanes. On drum tracks these lanes are bound to the first eight kit sounds: each lane is named after the corresponding sound (for example Kick, Snare, etc.) and will output on the MIDI channel configured for that sound’s MIDI CH OUT setting. For example, if the Kick sound’s MIDI channel is set to 3, the Kick automation lane will send its CCs on channel 3. This allows mapping of identical CC numbers to different physical channels and sounds on multi-channel drum machines and devices.
Automation lanes behave the same as on other track types: they appear in the Automation Piano Roll, show device-specific Parameter names when an Instrument is assigned, and record/quantize as usual.
Note
Track Types are non-destructive: switching modes does not permanently alter the underlying sequence data, and you can switch back to restore a previous mode’s behaviour.
However, switching between Drum mode and other Track Types does not translate or remap events between their representations. For example, a pitched note such as C3 in Melody mode will not automatically become a drum sound (for example, “Kick”) when the track is switched to Drum mode, and vice versa. Events for each representation are preserved so you can revert modes without data loss, but they remain in their original form.
Track Generator
Track Generators are designed as conversational tools within the Sequencer. They respond to musical input with structured suggestions that remain constrained by the active Scale, Root, and Harmony Link.
Their purpose is to introduce variation within defined musical boundaries. They assist in exploring alternative interpretations while remaining consistent with the harmonic context.
Generated notes are written directly into clips and behave exactly like manually created material. They can be edited, rearranged, modified, or combined with any other Sequencer feature.
Track Generators do not replace sequencing or performance. They provide structured musical interpretations that remain fully editable at all times. Each track type has specific Generators that define how musical material is produced.
Generators can interact using the input track feature where available. For example, a MELODY track can provide melodic material, a CHORD track running Chordrift can derive harmonic structure from it, and Monogroove can generate a corresponding bass line.
Track Generators can be used to initiate an idea, expand existing material, or introduce controlled variation within a composition.
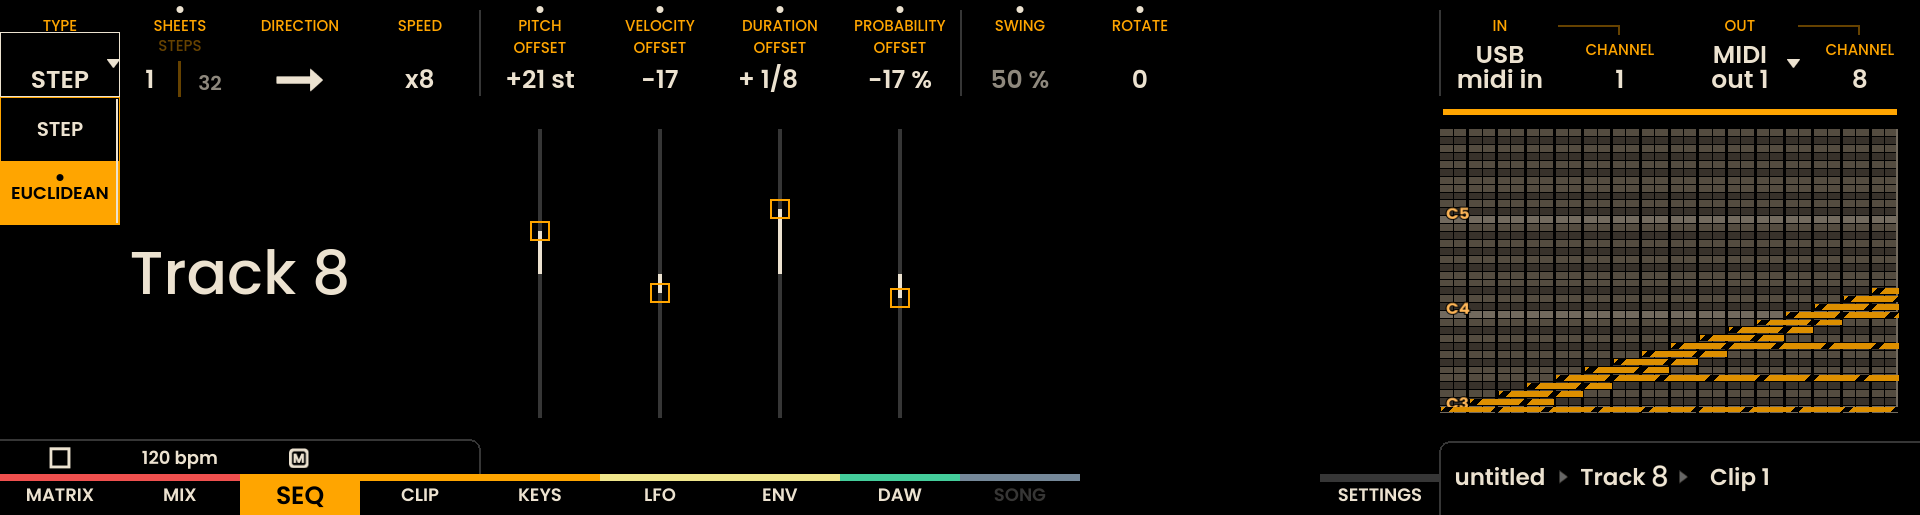
Step
In Step Mode, the track divides a measure of music into 32 note values, referred to as steps. Each step can be enabled or disabled and modified independently, giving full control over note placement.
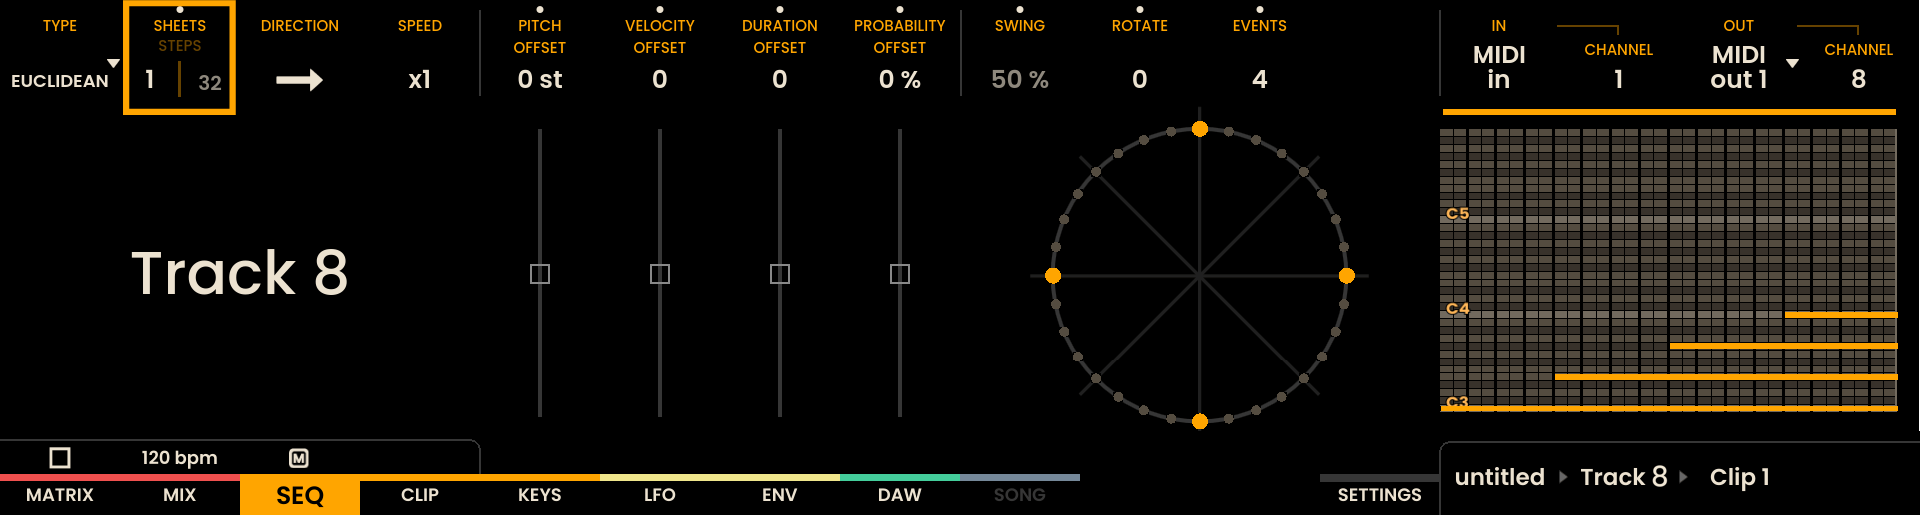
Euclidean
In Euclidean Mode, steps can be enabled manually or automatically by setting the EVENTS parameter (adjusted via the encoder above the EVENTS label ). Reliq will then space the events as evenly as possible across the sequence, creating Euclidean rhythms. The ROTATE parameter (adjustable via the encoder above the ROTATE label ) allows to rotate the starting point of the sequence, shifting the events by a set number of steps.

Melodrift
Melodrift generates melodic phrases inside MELODY tracks. Its focus is on creating balanced phrases rather than isolated notes.
The generator distributes notes across a rhythmic hierarchy and selects pitches within the active scale. The resulting phrases maintain internal contour and direction, making them suitable as melodic foundations, starting points, or as evolving melodic layers.

Parameters
Density Controls the overall note activity within the phrase. Lower values generate fewer note events with more space between them. Higher values increase the number of events and reduce spacing.
Rhythm Controls rhythmic variation. Lower values favor regular subdivisions and predictable timing. Higher values introduce subdivision diversity and less repetitive timing structures.
Melody Controls scale usage. Lower values emphasize the root and nearby scale tones. Higher values allow broader exploration of available scale degrees.
Octaves Controls the vertical register span. Lower values constrain the melody to a compact range. Higher values allow interval jumps across multiple octaves.
Evolve FREEZE maintains a consistent phrase for each repetition of the clip. MUTATE introduces variation on each repetition while preserving the overall parameter balance.
RESEED Generates a new phrase interpretation using the current parameter configuration. Click the encoder above the RESEED label to generate a new phrase while keeping the same parameter settings.
User Interface
The Melodrift interface visualizes the melodic space defined by the parameters. The horizontal axis represents note span across the available register. The vertical axis indicates the relative emphasis on interval movement.
The display provides a visual overview of how constrained or expansive the melodic behavior is likely to be.

Example Configurations
Density 25%, Rhythm 0%, Melody 15%, Octaves +/- 1 Produces sparse motifs centered around the root with stable timing.

Density 60%, Rhythm 10%, Melody 50%, Octaves +/- 2 Produces rhythmically active phrases using multiple scale tones within a moderate range.

Density 80%, Rhythm 85%, Melody 90%, Octaves +/- 1 Produces wide-ranging melodic lines with significant subdivision and interval movement.

Density 100%, Rhythm 10%, Melody 100%, Octaves +/- 1, Evolve: MUTATE Produces dense, repeating patterns with subtle variation between repetitions, suitable for arpeggiator-like results.

Melodrift combines structural control with musical flexibility, enabling both stable motifs and dynamic phrase development.
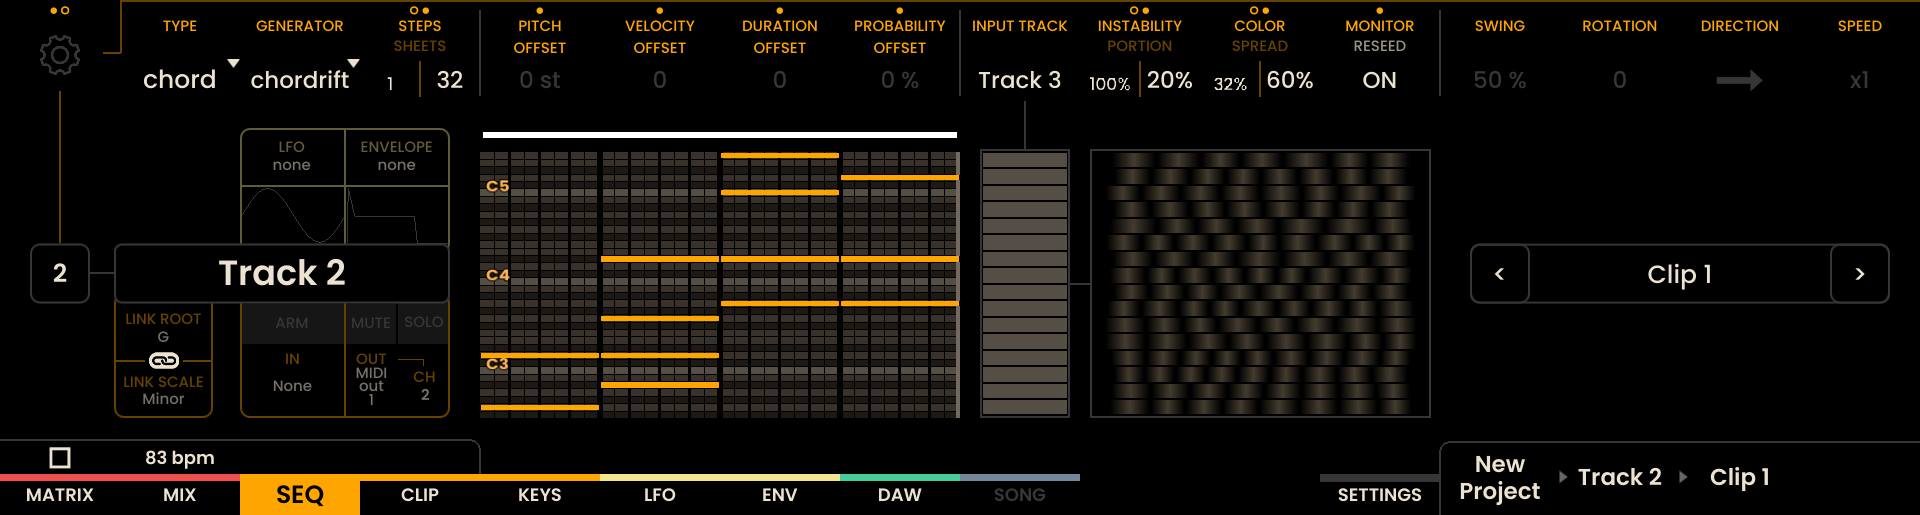
Chordrift
Chordrift generates harmonic material inside CHORD tracks by analyzing a selected MELODY track. It always requires an input track and derives its harmonic structure directly from the melodic activity of that track.
In its most stable configuration, Chordrift behaves similarly to a harmonizer, generating chords closely aligned with each melodic event. As instability increases, it gradually shifts from strict harmonization toward more independent harmonic interpretation.
All generated chords remain compatible with the active Scale and Root, and are written directly into clips where they can be edited at any time.

Parameters
Input Track Selects the MELODY track used as harmonic reference. Chordrift analyzes the melodic content of this track to derive chord progressions.
Portion Controls how many melodic events are harmonized. Lower values generate chords for fewer notes of the input track. Higher values generate chords for a larger portion of the input track.
Instability Controls harmonic deviation from the melody. Lower values maintain close alignment with melodic phrasing and harmonic center. Higher values allow chord movement that deviates further from the immediate melodic center.
Spread Controls chord voicing width. Lower values keep chord tones compact. Higher values distribute chord tones across a wider register.
Color Controls harmonic richness. Lower values favor simpler chord structures. Higher values introduce more extended harmonies.
Monitor ON updates harmony automatically when the input track is modified. OFF requires manual regeneration using RESEED.
RESEED Generates a new harmonic interpretation based on the current parameter configuration.
User Interface
The Chordrift interface visualizes the relationship between the input melody and the generated harmony. The reference bar represents the selected input track, while the connected region indicates how parameter settings influence harmonic density, voicing, and reinterpretation.
The width and density of the visual region reflect the influence of Portion, Spread, and Instability. The visualization is indicative of harmonic behavior rather than exact chord placement.

Example Configurations
Portion 100%, Instability 0%, Spread 0%, Color 0% Produces strict harmonization closely aligned with the melody.

Portion 70%, Instability 40%, Spread 50%, Color 40% Produces structured harmonic movement with moderate reinterpretation.

Portion 80%, Instability 75%, Spread 70%, Color 80% Produces more independent harmonic progressions with extended voicings.

Portion 100%, Instability 20%, Spread 30%, Color 60%, Monitor: ON Produces responsive harmonic support that adapts continuously to melodic changes.
Chordrift balances harmonic stability with controlled reinterpretation, enabling both traditional harmonization and more exploratory harmonic structures.
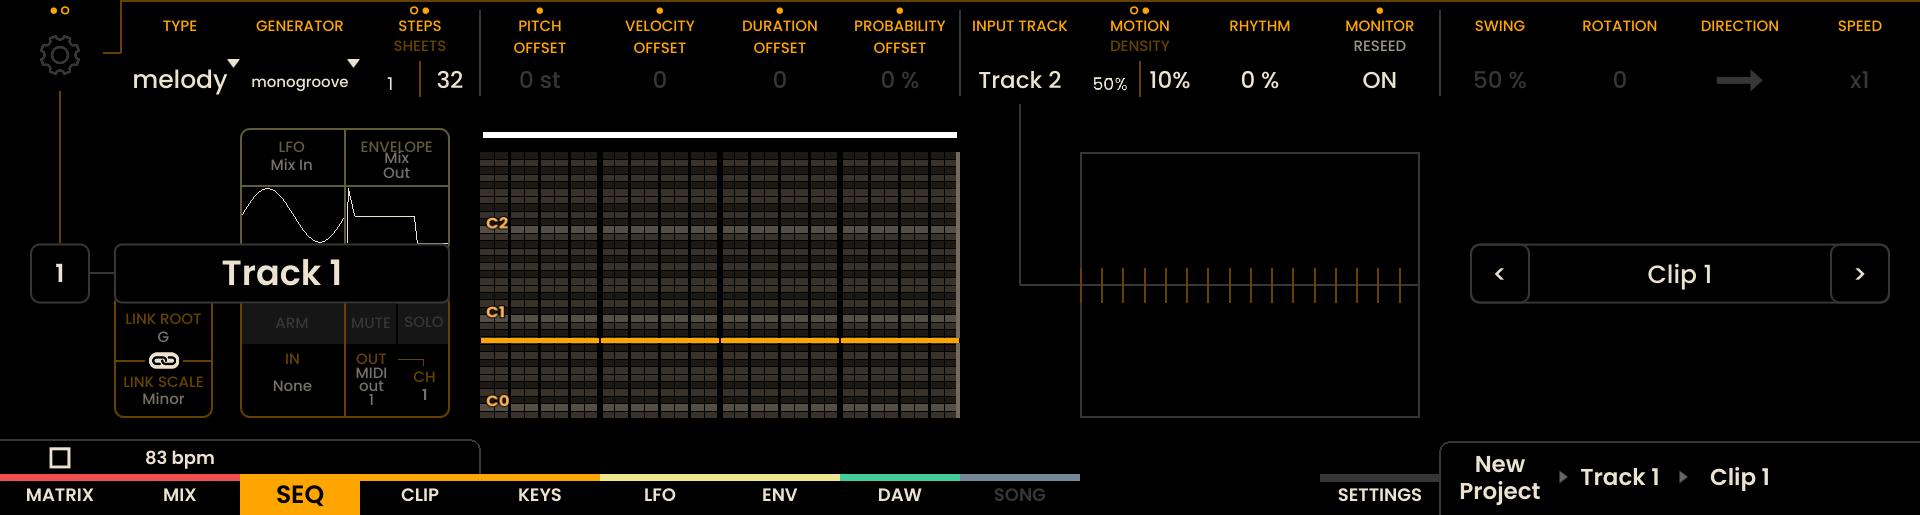
Monogroove
Monogroove generates monophonic bass lines derived from a selected MELODY or CHORD track. It analyzes the harmonic and rhythmic structure of the input track and produces a supportive bass voice that remains consistent with the active Scale and Root.
The generator builds a bass pattern in two stages: a regular placement grid defined by Density, followed by timing and articulation variation shaped by Rhythm.
All generated notes are written directly into clips and remain fully editable.

Parameters
Input Track Selects the MELODY or CHORD track used as harmonic reference.
Density Controls the base placement grid of the bass pattern. Lower values generate fewer, more widely spaced note positions. Higher values generate denser placement grids with shorter spacing between note positions.
Motion Controls pitch movement within the bass line. Lower values remain close to the harmonic root. Higher values introduce interval variation and more active melodic movement.
Rhythm Controls rhythmic freedom applied to the density grid. Lower values follow the base grid more strictly. Higher values introduce variation in timing, duration, and placement around the grid.
Monitor ON updates the bass line automatically when the input track is modified. OFF requires manual regeneration using RESEED.
RESEED Generates a new bass interpretation based on the current parameter configuration.
User Interface
The Monogroove interface visualizes the generated rhythmic grid and its variation. The number and spacing of vertical markers reflect the base placement defined by Density. Additional variation in marker thickness and vertical movement represents the influence of Rhythm and Motion on the generated result.
The visualization is indicative of groove behavior rather than exact note placement.

Example Configurations
Density 1%, Motion 10%, Rhythm 0% Produces a single anchored bass hit per cycle with minimal movement.

Density 50%, Motion 10%, Rhythm 0% Produces a regular, evenly spaced bass pattern with stable pitch.
Density 50%, Motion 55%, Rhythm 30% Produces a steady bass grid with moderate pitch movement and rhythmic variation.

Density 100%, Motion 100%, Rhythm 70%, Monitor: ON Produces a highly active bass grid with expressive movement that adapts to harmonic changes.

Monogroove balances harmonic grounding with controllable rhythmic structure, allowing bass lines to range from minimal foundations to more expressive patterns.
Note
More track generators are currently under development and will be added in future updates.
Sequence Length
The length of a sequence can be adjusted by rotating the encoder above the STEPS label . The number of steps per Sheet is fixed at 32, but sequences can span multiple sheets. Each track can have a maximum of 32,768 steps per clip (for more information look at the Clips chapter). Pressing the encoder above the STEPS/SHEETS label , will toggle the step setting between adjusting the step count or the sheet count. Holding SHIFT while increasing the sheet count with the encoder will duplicate the contents of the last sheet onto the newly created one, ideal for quickly building longer sequences.
Step Count
Defines the total number of steps in the sequence.

Sheet Count
Defines the sequence length in sheets (32 steps per Sheet).
Example:
To create a sequence of 3.5 sheets, first set the Sheet Count to 4 sheets , , then switch to Step Count and decrease the step count of the last sheet to 16 steps (half a sheet) , . This allows for variable-length sequences.

Track Modifiers
Several non-destructive modifiers can be applied to each track, affecting all steps without altering the underlying data. These include:
Pitch Offset: Adjusts the pitch of all steps by a positive or negative amount in a range of +/- 72 semitones.
Velocity Offset: Modifies the velocity (dynamics) of all steps in a range of +/- 127.
Duration Offset: Changes the duration of each step, with a range of +/- 1/1 (full musical duration).
Probability Offset: Alters the likelihood that a given step will trigger, with a range of +/- 100%. For example, a step with 50% probability will trigger approximately once every two cycles.
Swing: Applies a rhythmic shift to the steps. A swing value of 50% results in no timing shift. Below 50%, odd-numbered steps (1, 3, 5, etc.) are moved forward. Above 50%, the even-numbered steps (2, 4, 6, etc.) are moved forward instead.
When adjusting Pitch Offset, you can quickly jump by octaves using a shortcut: Hold SHIFT and turn the encoder above the PITCH OFFSET label to increment or decrement the offset in steps of 12 semitones (one octave).

Generator Parameters
The available generator parameters depend on the selected Track Generator mode (Step Sequencer or Euclidean). These parameters are located in the center of the parameter strip and can be adjusted using the encoders above their respective labels.
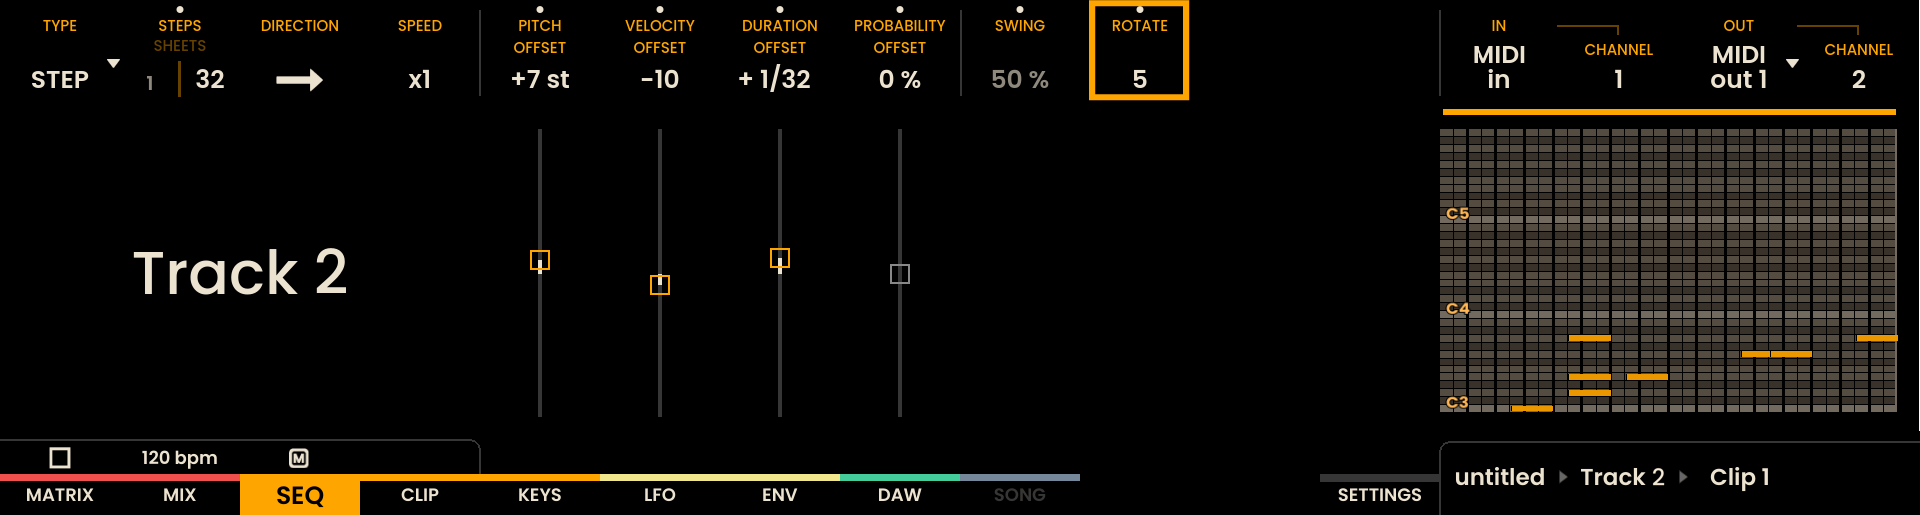
Rotate
The ROTATE parameter moves the starting point of the sequence by a specified number of steps. For example, a rotation value of 1 shifts the first step to the second position, the second step to the third, and so on. The last step is rotated back to the first position, effectively cycling through the steps.
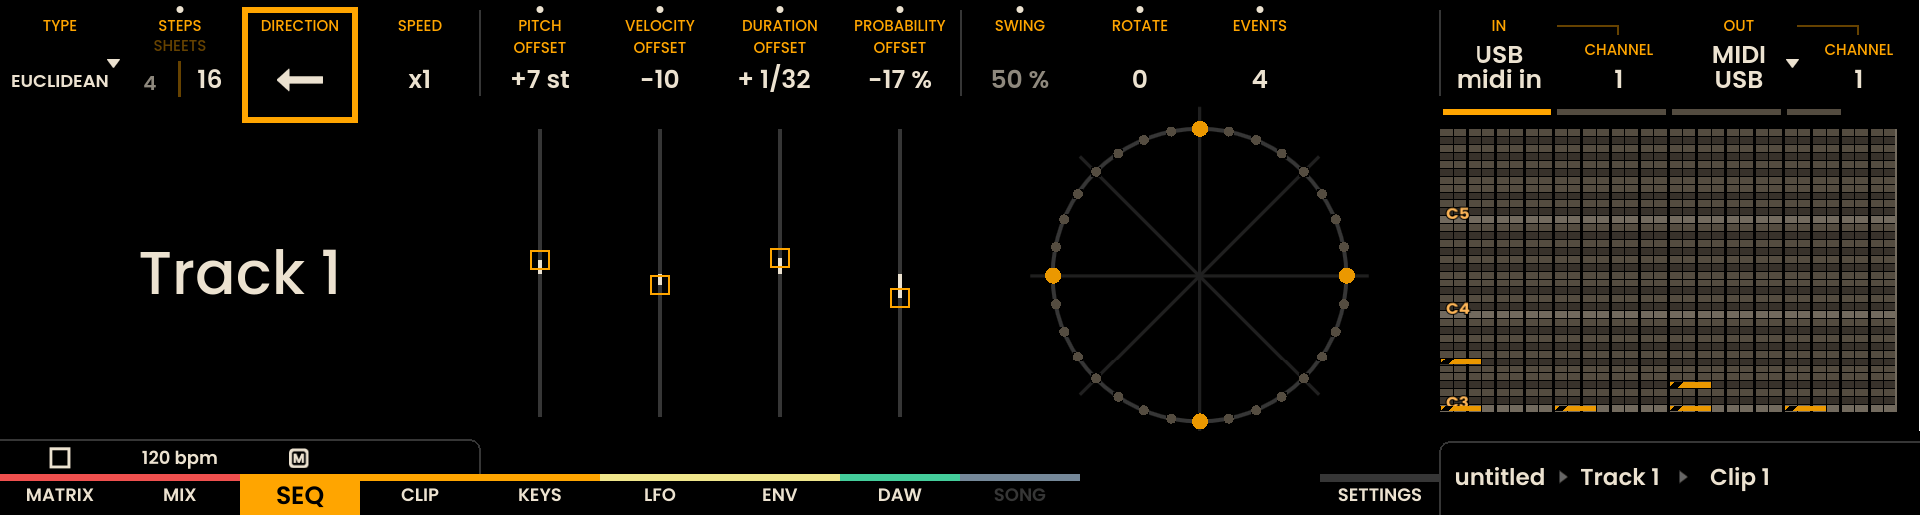
Direction
The DIRECTION parameter determines the cursor’s movement through the sequence. This can be adjusted using the encoder above the DIRECTION label . Available options include:
Forward: The sequence starts at the first step and progresses incrementally to the last step before looping back.
Backward: The sequence starts at the last step and moves decrementally to the first step before looping back.
Ping Pong: The sequence progresses from the first to the last step, then reverses direction back to the first step before repeating.
Random: The sequencer randomly triggers steps from within the defined step count, creating unpredictable patterns.

Speed
The SPEED parameter applies a multiplier or divisor to the overall speed of the sequence. This is controlled using the encoder above the SPEED label . Available speed settings include:
x2, x4, x8: faster.
/2, /4, /8: slower.

Navigating the Sequencer Layout
The layout of the sequencer is structured around the Grid Pads, with each row representing a track. Selecting a track can be done by pressing the corresponding Track Button on the device.
The interface behavior can switch between two modes: EDIT and FOLLOW by pressing the BPM encoder .
In Follow Mode, the displayed sheet on the Grid Pads automatically follows the cursor when the sequencer is playing, ensuring that the current position of the sequence is always visible.
In Edit Mode, the sheet display remains fixed, allowing to make edits without the grid changing automatically.
To manually navigate between different sheets, the Joystick Encoder can be clicked left or right , .
By default, the sequencer is in No Zoom mode, meaning the Grid Pads represent 16 steps in 1/16 note values. To access the in-between steps, Zoom mode can be enabled by clicking the Joystick Encoder up . Disabling Zoom can be done by clicking the Joystick Encoder down .
In Zoom mode, the 16 Grid Pads will represent 16 steps at a 1/32 note resolution (half a Sheet). You can continue navigating between sheets by clicking the Joystick Encoder right .

Zoom in with and click left to go the first half

Click right to go the second half
For example, in a 4-sheet sequence, the interface will display 4 rectangles indicating the current view position. Enabling Zoom will change the display to show 8 rectangles, representing the finer level of detail available in Zoom mode.

SOLO and MUTE
Tracks can be soloed or muted by holding the SOLO or MUTE button and pressing the desired TRACK button . The action takes effect when the SOLO or MUTE button is released, allowing to select multiple tracks in a single gesture.
Multiple tracks can be soloed or muted at the same time. If a track is both soloed and muted, solo takes precedence. Muted tracks will still play if they are also soloed.
To solo or mute several tracks:
Hold SOLO or MUTE .
Press one or more TRACK buttons to select.
Release the SOLO or MUTE button to apply.
To quickly release all mutes, press SHIFT + MUTE . To release all solos, press SHIFT + SOLO .
It is possible to solo or mute the currently selected track by pressing only the SOLO or MUTE button. The action takes effect when the SOLO or MUTE button is released and no track buttons have been pressed.
When a track is muted, its TRACK button and associated Grid Pads turn blue. When a track is soloed, its TRACK button turns orange, and the Grid Pads of non-soloed tracks turn blue to indicate exclusion.
The screen also reflects mute and solo states:
Soloed tracks appear in color.
Muted tracks are grayed out.
Indicators appear just below the track number or name.
The MUTE or SOLO buttons will light up blue whenever any track, including Matrix Sequencer tracks, is currently muted or soloed.
Entering and Modifying Steps
There are two primary ways to enter and modify steps in the sequencer: using the Sequencer Page or the Piano Roll. Each method offers unique controls and editing capabilities.
Sequencer Page
To enable a step, simply press the corresponding Grid Pad. The LED on the pad will turn orange to indicate that the step is active, while non-active steps remain unlit. The parameters of each step can be edited using Parameter Lock. To modify a step, press and hold the step that requires editing. The display will switch to show various adjustable parameters:
STEP PARAMETERS:
PITCH (the note assigned to the step)
VELOCITY (the intensity or force of the step)
DURATION (how long the note plays)
PROBABILITY (the likelihood of the step triggering, represented as a percentage)
TRIGGER (the frequency at which the step is triggered, e.g., 1:1 for every cycle, 1:2 for every two cycles, etc.).
MICROTIME (shift the step’s position within the range, from -95 to +95 ticks, where 96 ticks equal one 1/32 note).
RATCHET (the number of times a step is repeated within its duration).

When modifying steps in the Sequencer Page, changes to step parameters apply to all voices within the step. For example, adjusting Velocity, Duration, Probability, Trig Condition, or Micro Timing will affect every voice at that step equally. Changing the Pitch of the current voice will transpose all voices in the step by the same interval. Editing individual voices is possible in the Piano Roll, which provides per-voice control within each step.
While in Parameter Lock mode, press and hold the PLAY button to preview the contents of the selected step. - On the Sequencer Page, this will play back all voices in the step with their current pitch and velocity. - The preview lasts as long as the PLAY button is held.
Parameter Lock with External MIDI Input: When in Parameter Lock mode, if an external MIDI input is enabled and the track is armed, hold a grid pad to enter parameter lock and play a note on the external device: - On the Sequencer Landing Page, the step will take the contents of the incoming note. If the step already contains a chord, the chord will be transposed and all velocity values will be updated from the external input. - In the Piano Roll (Pitch), the incoming note will be assigned to the selected voice only.
The duration of a step can directly be adjusted from the grid: while holding a step, press another pad further along the same row to set how long the note lasts. The selected duration will apply to all voices on that step. To set the minimum duration, press a pad directly above or below the held step. Grid pad highlights will reflect the chosen duration visually for immediate feedback.
A note’s duration can extend up to the maximum number of sheets in the current clip. For example, if a clip has 4 sheets, the maximum duration for a note starting at step 1, sheet 1 can be up to 4 sheets long.
To delete a step, hold UNDO and press the corresponding Grid Pad. This resets the step’s pitch, velocity, duration, probability, trigger condition, microtime, and ratchet to their default values.
Piano Roll
Piano Roll Interface
The Piano Roll Interface allows detailed control over individual steps, voices, and parameters within a track. This section is divided into several parameters:
PITCH
CHORD (only available in Chord mode)
VELOCITY
DURATION
PROBABILITY
TRIGGER
MICROTIME
RATCHET
AUTOMATIONS
Each section can be accessed by clicking the encoders located above each parameter on the sequencer page. Different sections offers specific controls for modifying the properties of steps and voices through the Grid Pads and encoders.
In the Piano Roll, the Grid Pads represent steps on the horizontal axis and parameter values on the vertical axis. For instance, in the Pitch Piano Roll, the Grid Pads reflect both steps and notes. The encoders above each step allow for pitch offset adjustments , while using the Parameter Lock feature enables independent adjustments for each voice. The same structure applies to other parameters like VELOCITY, where the vertical axis represents the velocity level for each step.


The Piano Roll allows for finer control over step parameters and can be accessed by clicking the encoders located above each parameter— PITCH OFFSET, VELOCITY OFFSET, DURATION OFFSET, PROBABILITY OFFSET, and SWING. Clicking an encoder opens the respective Piano Roll for that parameter. For example, clicking the encoder above PITCH OFFSET brings up the Pitch Piano Roll, while clicking the encoder above VELOCITY OFFSET opens the Velocity Piano Roll, and so on.

The Piano Roll interface provides two primary methods for modifying parameters per step. First, you can use the encoders positioned above each step, or alternatively, the Grid Pads can be used for direct control. For Navigating the Piano Roll : rotate the Joystick Encoder to scroll through octaves, click the encoder left or right to move between sheets, and click the encoder up or down to zoom in or out of the steps. To exit the Piano Roll, either click the encoder on top of the highlighted parameter or click the encoder above the TRACK SETTINGS label.

Zoom in with
Move right with

Change pitch of a step with
Defining properties for individual voices within a step can be done with Parameter Lock.

Parameter lock a step
It is also possible to adjust the global offset of a parameter directly from the Piano Roll by holding SHIFT and rotating the encoder above the corresponding parameter label. For example, in the Pitch Piano Roll, holding SHIFT and turning the encoder above PITCH will adjust the clip’s Pitch Offset globally, affecting all steps in the clip.
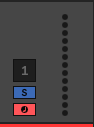
Pitch Piano Roll
In the Pitch Piano Roll, the layout changes so that instead of representing tracks and steps, the Grid Pads displays steps along the horizontal axis and pitch along the vertical axis. The corresponding notes are displayed, and you can enter a note by pressing a pad. To scroll through different octaves, rotate the Joystick Encoder . It’s also possible to add multiple voices to the same step by pressing a pad on another pitch row. The encoder above each step allows you to adjust the pitch of all voices proportionally. To change the duration of an individual note, hold the note’s pad and press another pad further along the row to set the desired length. To assign the minimum duration, press a pad directly above or below the held note. Grid pad highlights will represent the note duration visually in real time.
The Pitch Piano Roll includes several visual enhancements to aid in real-time composition and scale-aware sequencing.
When the view is zoomed out, notes that have been placed at a finer resolution (1/32) will still be visually indicated on the grid. These notes appear as dim orange pads, allowing to see that more detailed timing information exists at that step. If multiple sub-steps are active within a single zoomed-out step, only the first active sub-step is shown with a bright orange pad.
Additionally, the root note of the track (as configured in the KEYS Page) is shown as a dim yellow, making it easier to align sequences with a chosen musical key. The active scale is also represented on the grid. When using the default Chromatic scale, the white keys (C, D, E, etc.) are shown in dim white, simulating a traditional keyboard layout. If a different scale is selected, all pitches belonging to that scale will appear as dim dark orange pads. These enhancements make it easier to identify in-scale and out-of-scale notes at a glance, allowing for more confident and musical step programming.

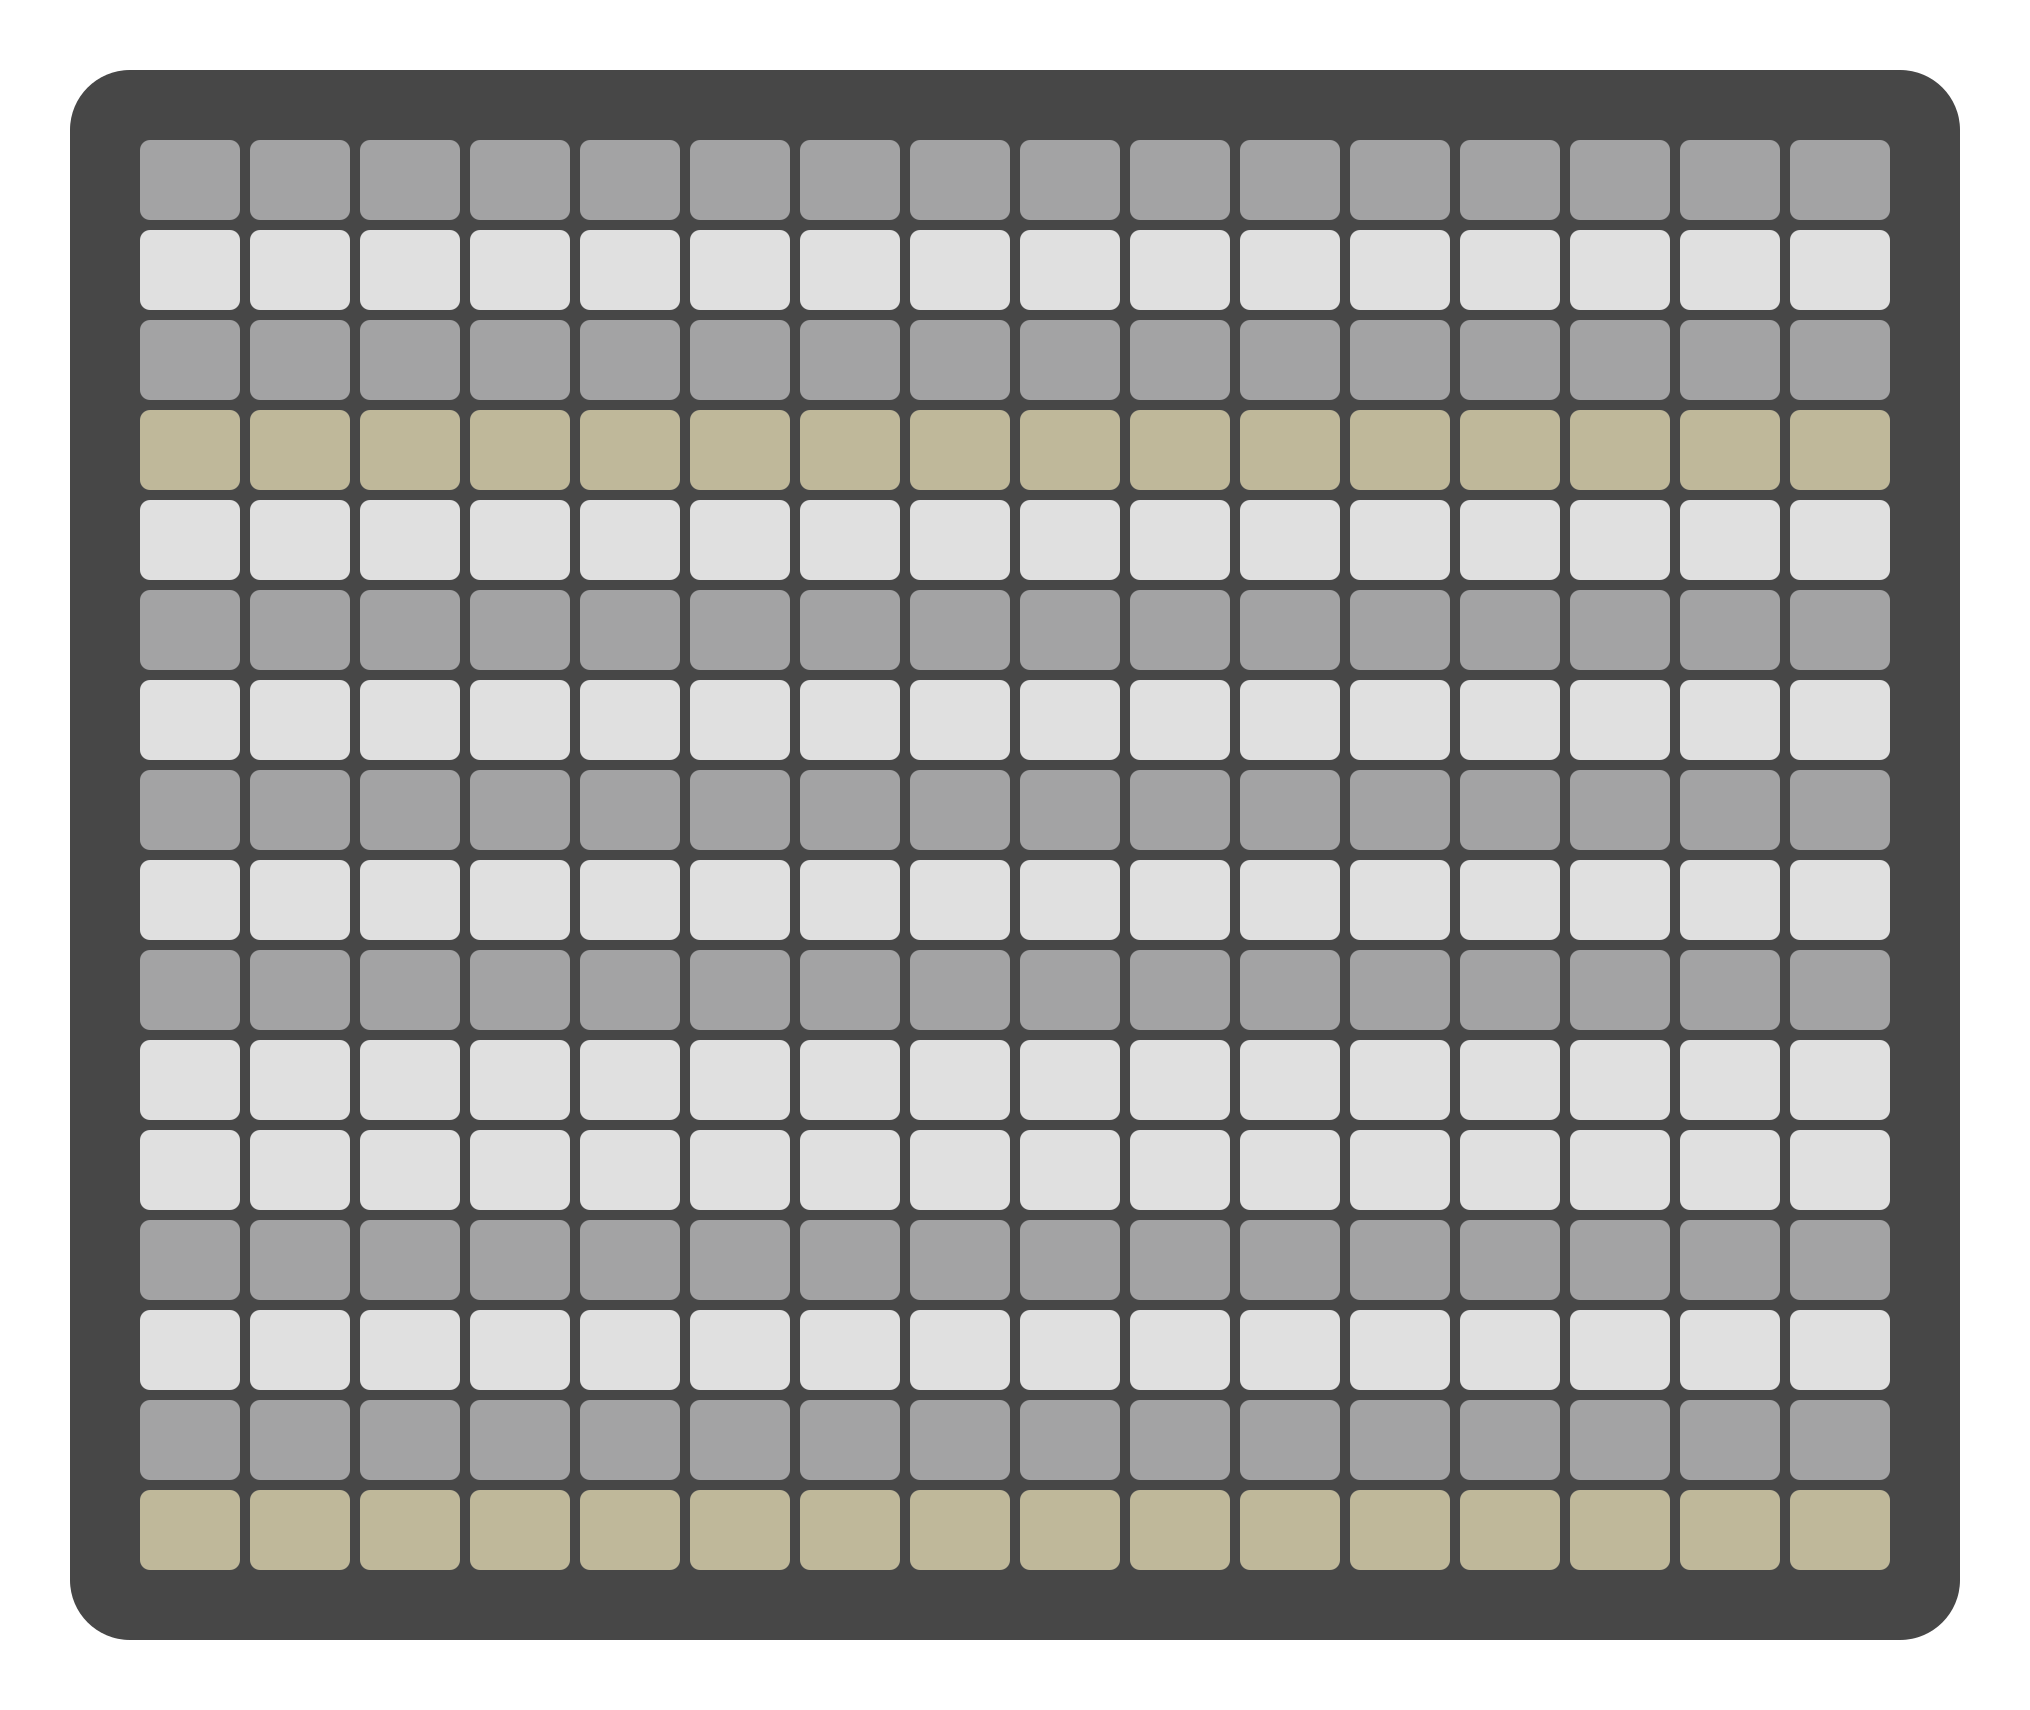
Pitch Piano Roll with Chromatic Scale on Pads and Root Note C
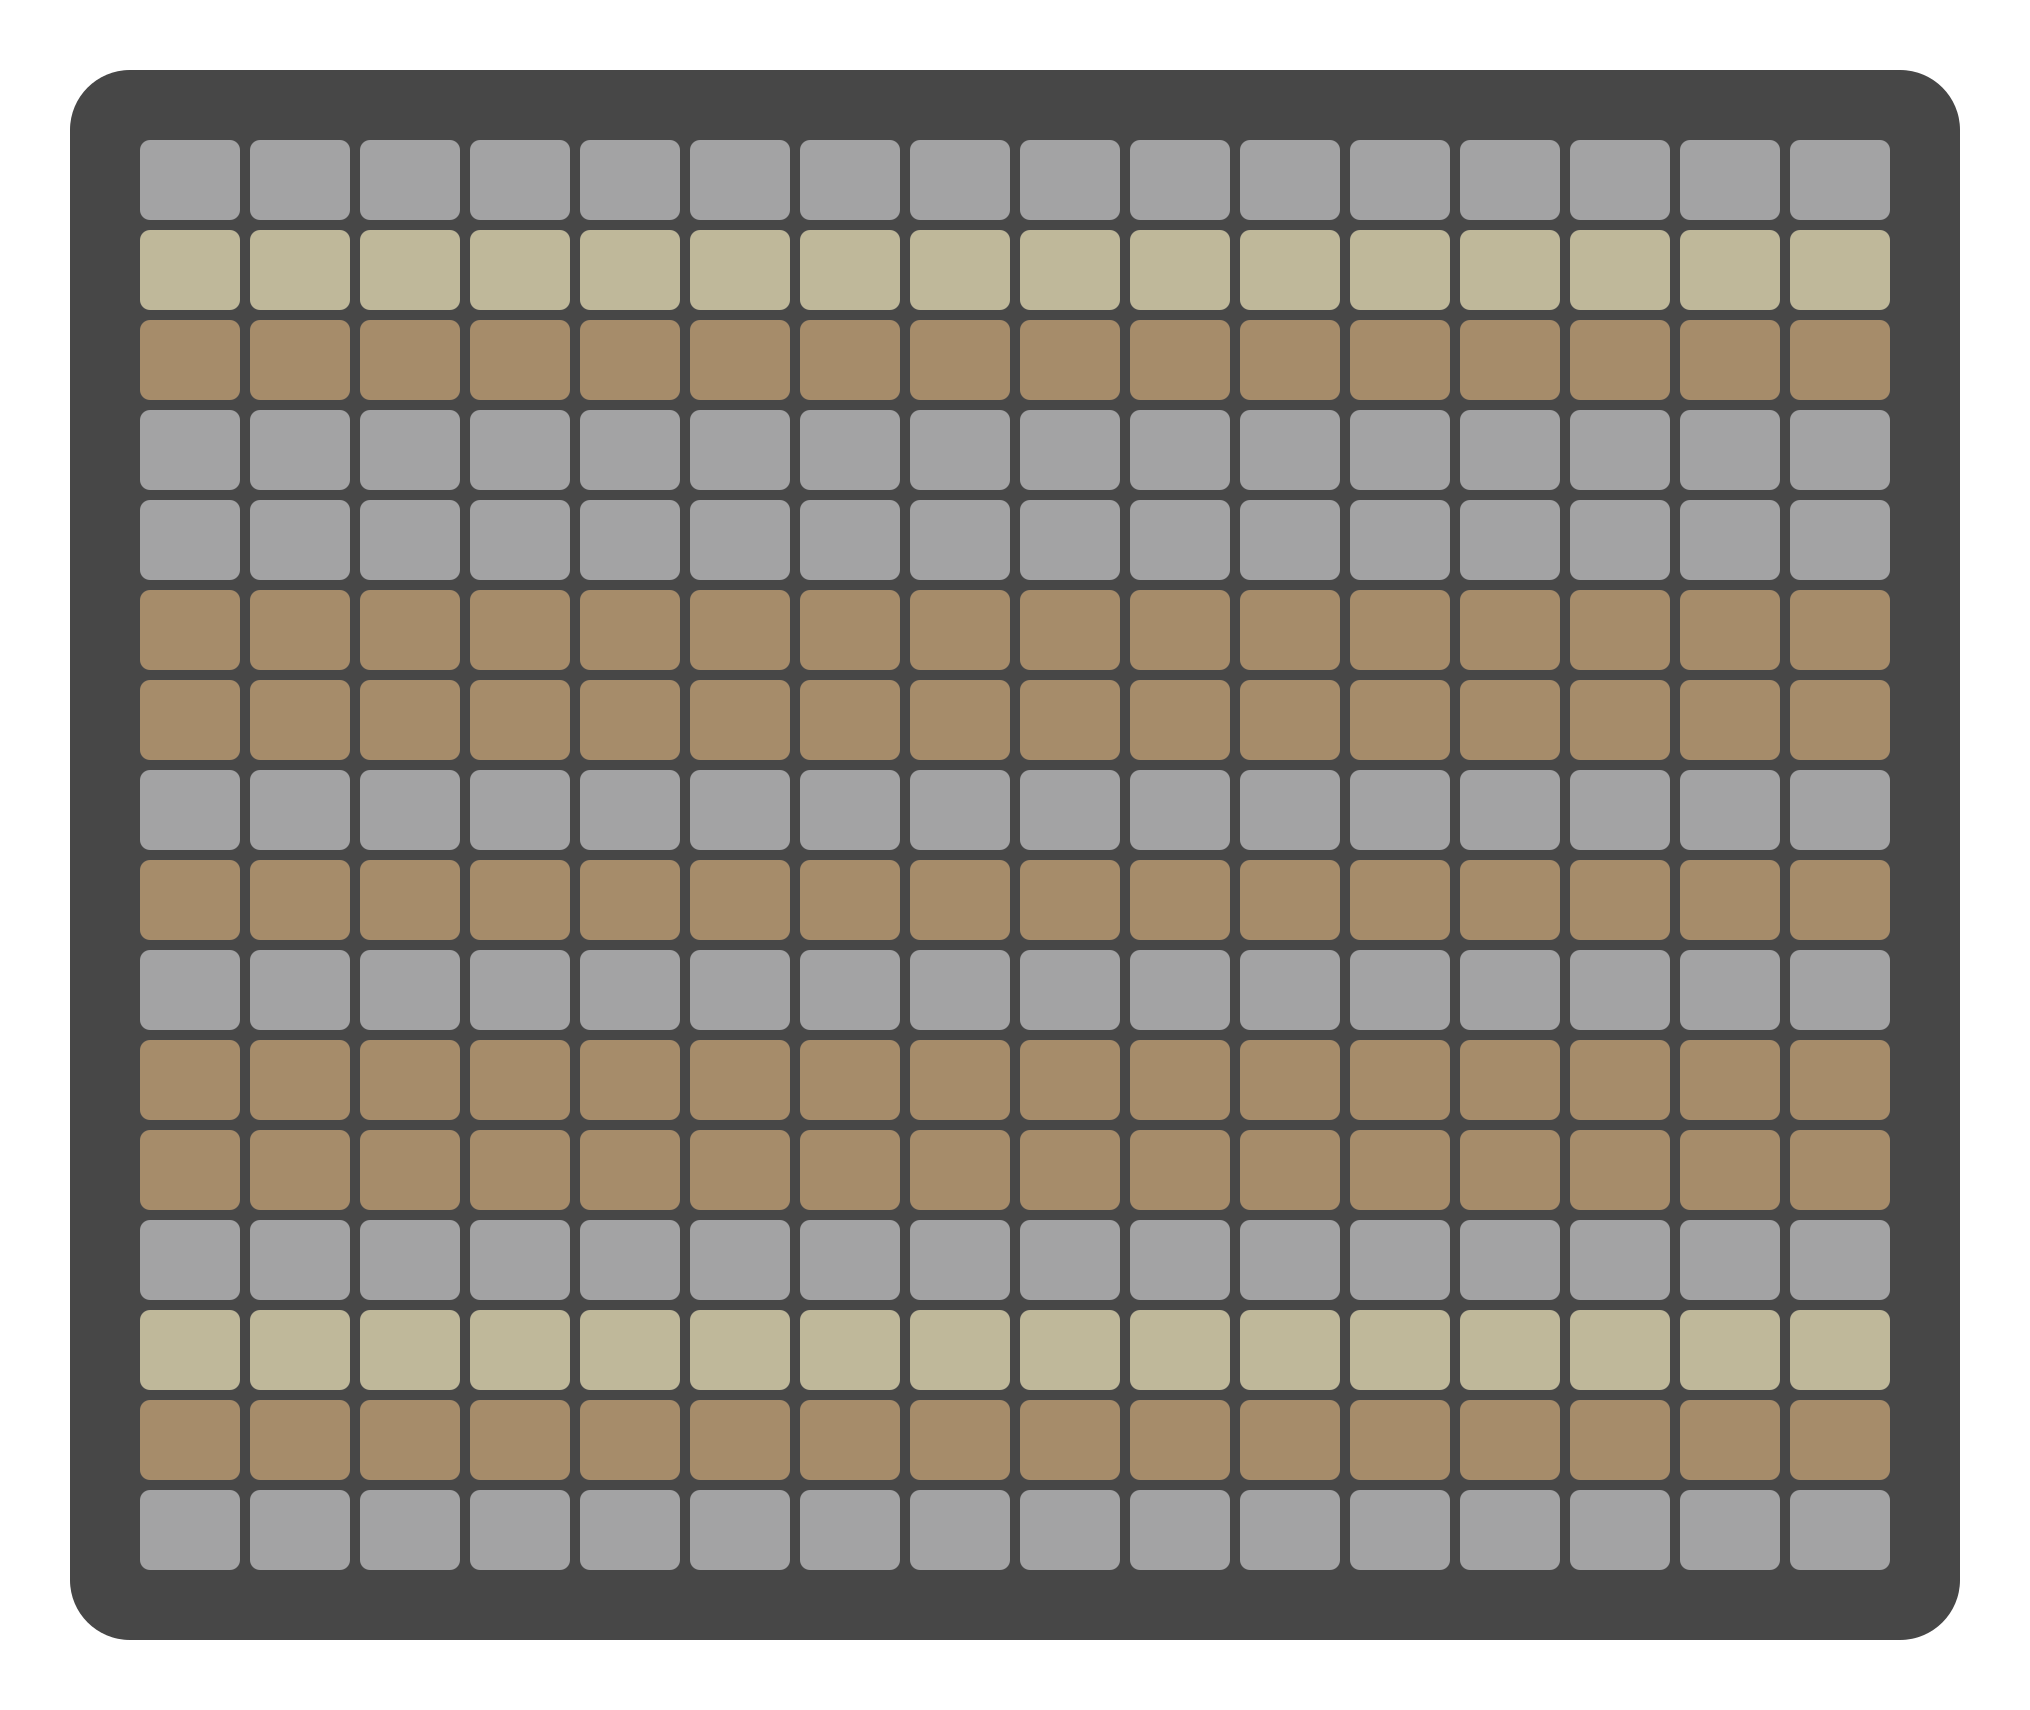
Pitch Piano Roll with Harmonic Minor scale on Pads and Root Note D

Pitch Piano Roll notes with 1/32 resolution on display
Chord Piano Roll
The Chord Piano Roll appears directly before the Pitch Piano Roll in the top encoder view selector. It is available only when the current track is in Chord Mode.
Unlike the Pitch view, the Chord Piano Roll is optimized for step-based chord entry and control:
Layout and Interaction
The last/bottom row of pads represents the steps of the sequence. These are always shown in yellow to distinguish them from note pitch views. Pressing a bottom-row pad will enable/disable a step.
Press and hold a pad on the bottom row to open the Chord Picker. The Chord Picker appears in the upper part of the grid and allows you to choose or modify the chord assigned to that step.
You can still hold one step on the bottom row and tap another to define the duration of the chord.
Chord Editing Behavior
Chords are entered non-destructively. You can modify or override them freely, and changes will not affect the underlying sequence when switching modes.
Once a chord is entered, you can edit individual voices using the Pitch Piano Roll, allowing for full control over voicing and inversion.
This view is designed to streamline chord sequencing, making it easy to assign harmonically consistent progressions without menu diving.
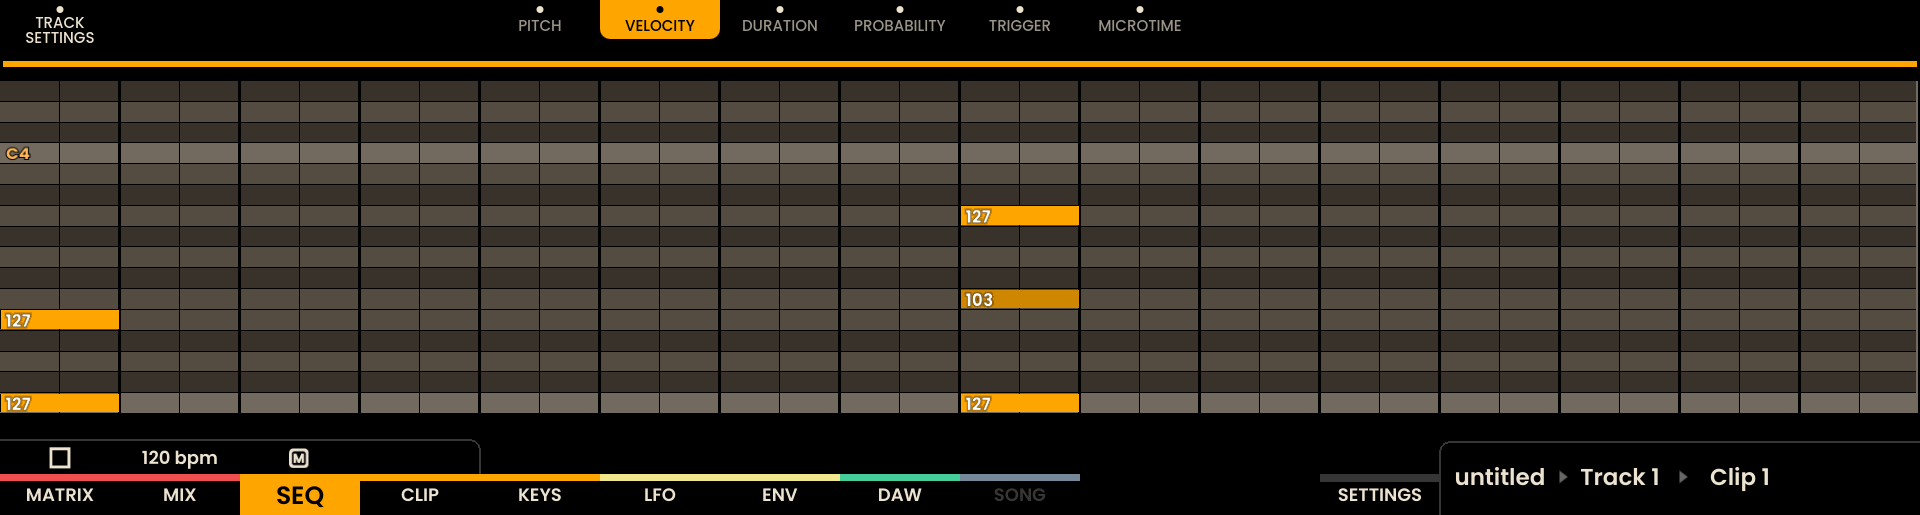
Velocity Piano Roll
In the Velocity Piano Roll, each step is represented by a virtual fader on the grid, with each column functioning as a fader. The lit portions of the fader indicate the velocity of the step. If the fader is orange, it means all voices in the step have the same velocity, a yellow fader signals that the voices have different velocities within the step. Pressing a Grid Pad on the LED Pad Grid Fader sets the velocity for all voices within the step, overwriting any differences between individual voices. Pressing SHIFT + the lowest pads sets the velocity to 0. To adjust the velocity with more precision, rotate the encoder above the step .

Duration Piano Roll
The layout of the Duration Piano Roll mirrors that of the Pitch Piano Roll. The encoders positioned above each step allow to adjust the DURATION of the note proportionally for all voices within the step.

Probability Piano Roll
The Probability Piano Roll works similarly to the Velocity Piano Roll, but instead of modifying velocity, is adjusting the probability that a step will trigger. PROBABILITY can be set between 0% and 100%, giving fine control over the likelihood of each step being played.


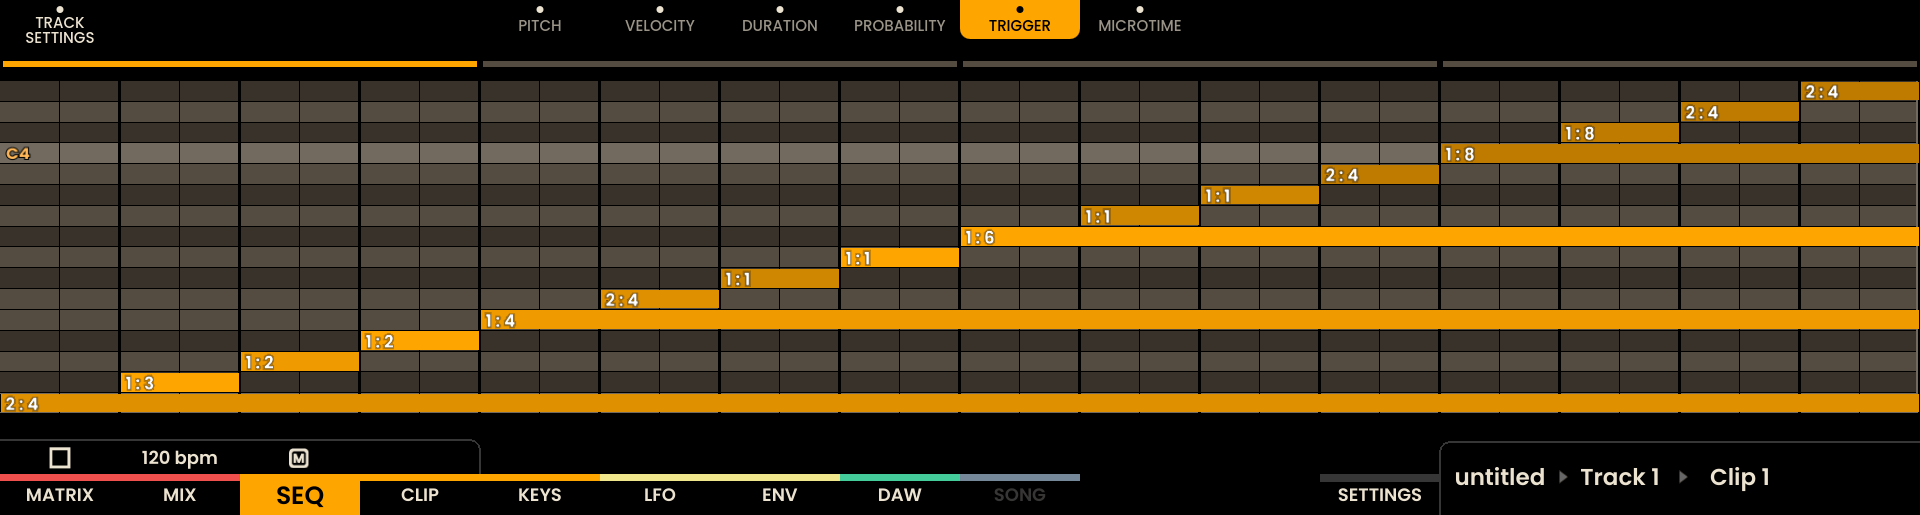
Trigger Piano Roll
In the Trigger Piano Roll, the layout is similar to the Pitch Piano Roll, but instead of adjusting the pitch, it’s modifying the TRIGGER frequency. This parameter defines how often a step will trigger based on the looping cycles of the sequence (e.g., 1:1 for every loop, 1:2 for every two loops, etc.).
Microtime Piano Roll
The Microtime Piano Roll has the same layout as the Pitch Piano Roll but adjusts the MICROTIME of each step. This allows fine-tuning the position of the step within the grid, allowing to shift the timing of the entire step closer to the following step for subtle timing adjustments.

Ratchet Piano Roll
The Ratchet Piano Roll shares the same layout as the Pitch Piano Roll, but it adjusts the RATCHET of each step. This parameter defines how many times a step will repeat within its duration.

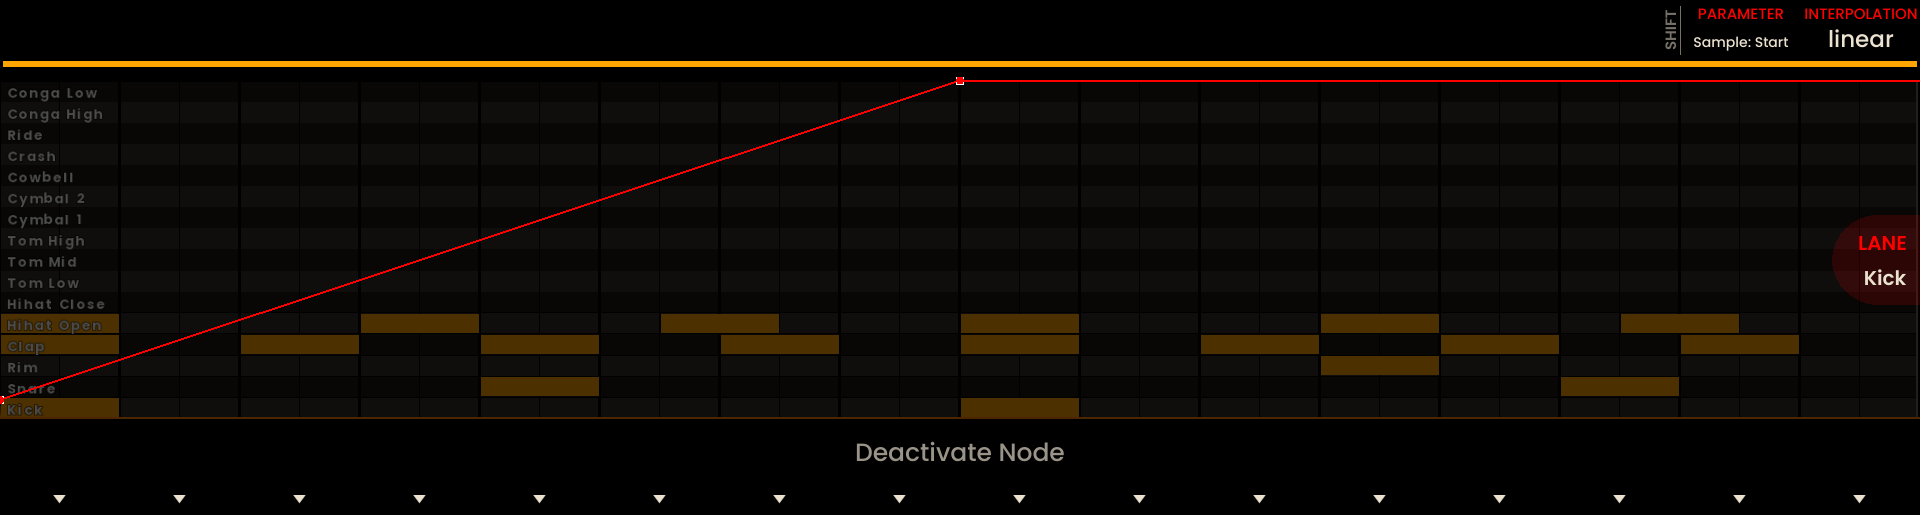
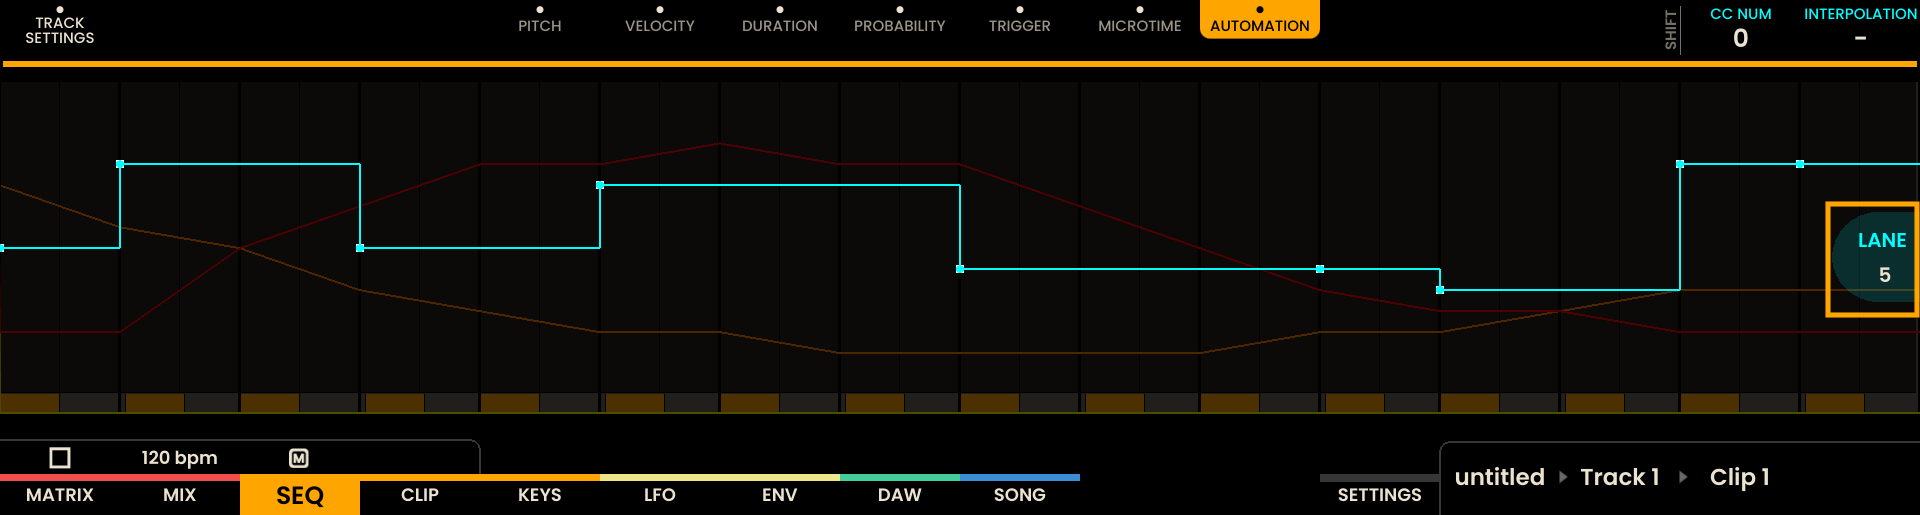
Automation Piano Roll
The Automation Piano Roll allows for precise, per-step modulation and is available for both MIDI and CV tracks. Automations are stored per-clip and form part of each track’s sequence data.

Accessing Automation View
To enter the Automation Piano Roll, click the encoder located above the AUTOMATION label on the sequencer page. This opens the current automation view for the selected TRACK.

To switch between lanes, rotate the Joystick Encoder .
Automation Lanes
Automation lanes differ by track type:
MIDI tracks: up to 8 Automation Lanes. Each lane exposes two parameters: PARAMETER and INTERPOLATION.
CV tracks: 2 Automation Lanes, bound to the track’s CVA and CVB outputs. Each CV lane exposes TYPE and INTERPOLATION.
MIDI lanes
PARAMETER: Selects the Control Change target for the lane — either a CC number, or a named device parameter when an Instrument is loaded on this track.
INTERPOLATION: Controls whether automation values between steps are Linear (smooth) or Off (stepped).
To edit PARAMETER or INTERPOLATION on a MIDI track, press and hold SHIFT and rotate the encoders above those labels.

CV lanes
CV lanes are tied to physical outputs: the first lane maps to CVA, the second to CVB. To edit TYPE or INTERPOLATION on a CV track, press and hold SHIFT and rotate the encoders above those labels.
TYPE: Selects the CV lane behaviour (see CV types below).
INTERPOLATION: Same as MIDI — Linear for smooth transitions, Off for stepped values.
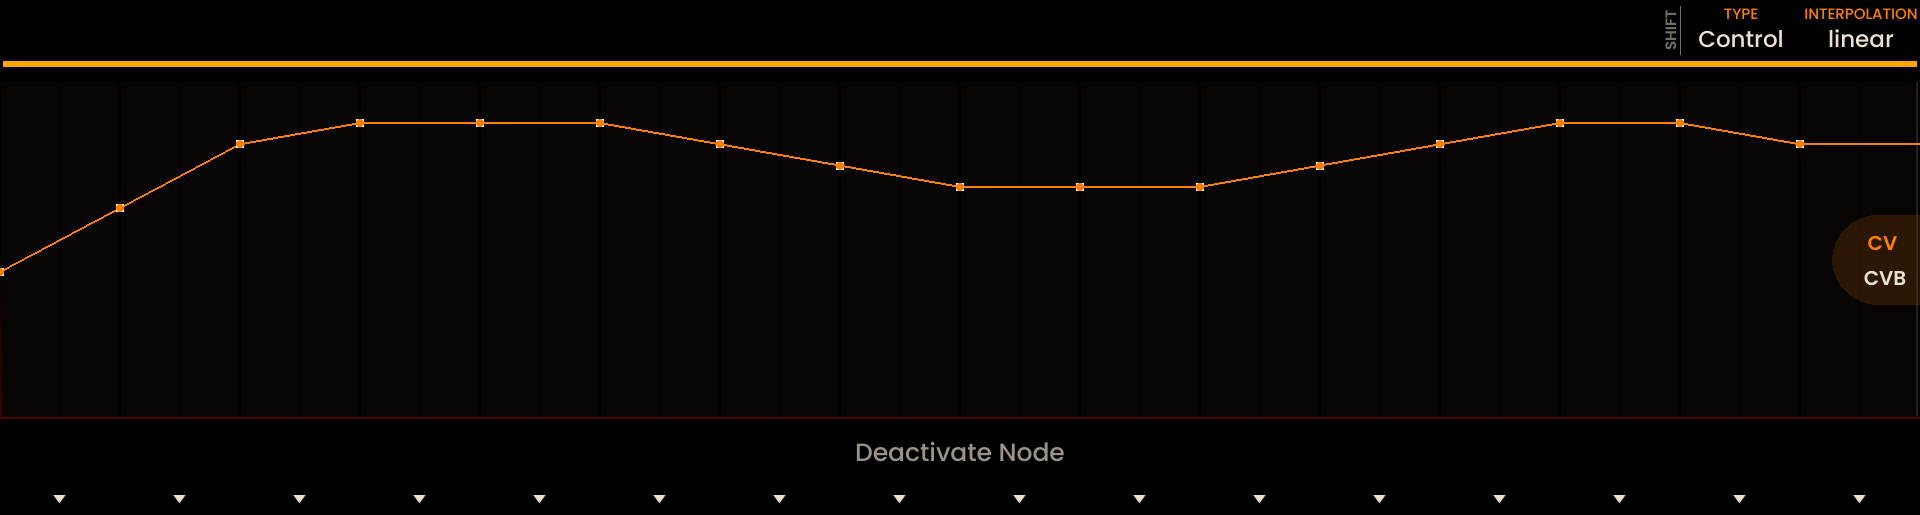
The TYPE parameter selects how the CV lane generates its output. Available choices depend on the lane (CVA or CVB):
- CVA — Pitch or Control:
Pitch: CV is derived from the clip’s pitch (V/Oct) data. Use this for continuous pitch modulation and glide; when INTERPOLATION is enabled the voltage will smoothly move between step pitches. Custom free-form automation cannot be drawn in this mode.
Control: Free-form automation mode (+/- 10V). Draw or edit automation points freely; values written in this mode override any pitch-derived output on CVA.
- CVB — Velocity or Control:
Velocity: CV is derived from the clip’s per-step velocity values (useful for level-related modulation). Range is 0-5V.
Control: Free-form automation mode for CVB (+/- 10V); values can be drawn or edited normally and will be sent as control voltages on CVB.
Switching a lane’s TYPE toggles between derived-data modes (Pitch/Velocity) and manual Control mode. When switching from a derived mode to Control, previously derived behaviour is preserved and can be restored by switching back.
Enabling Automation Points
Each Automation Line can hold one point per step. Automation points can be enabled in multiple ways:
Hold SHIFT and press the Page Button below a step to activate or deactivate a point. When the automation point is enabled, the Page Button LED turns green.
Move the encoder above the step to activate and set a value.
Press a Grid Pad in the column corresponding to the step to quickly enable and draw automation data. Pressing SHIFT + the lowest pads sets the automation data to 0.
Adjusting Automation Values
Automation values can be modified either through:
Grid Pads: Each column represents a step; vertical pad rows act as a virtual fader for quick, gestural drawing.
Encoders: Use the encoders above each step for precise adjustments.


Sequencer Functions
The sequencer offers a range of functions for quick interactions and additional control over sequences. These functions can be accessed using the function buttons located on the right side of the interface.
: Access the FX page for the selected track
: Copy the full clip of the track to clipboard
: Paste the full clip from clipboard to the track
+ SELECT : Copy the selected sheet of the track to clipboard
+ SELECT : Paste the selected sheet from clipboard to the track
: Redo the last action. If there are multiple actions that can be undone the button will stay lit until the last action is reached.
: Undo the last action. If there are multiple actions that can be undone the button will stay lit until the last action is reached.
: Pressing SOLO will solo the currently selected track. Pressing the SOLO button again will unsolo this track.
: Pressing MUTE will mute the currently selected track. Pressing the MUTE button again will unmute this track.
: Holding SOLO and pressing a track button will solo this track. Pressing the SOLO button again will unsolo this track. Multiple tracks can be in solo in the same time.
: Holding MUTE and pressing a track button will mute this track. Pressing the MUTE button again will unmute this track. Multiple tracks can be muted in the same time.
: Move to the previous or next Clips for the selected track.
: Holding the SHIFT Button and pressing Track Button 16 ( ) will switch the view of track to Matrix Sequencer mode. Holding the SHIFT Button and pressing Track Button 16 ( ) again will switch the view of track back to Sequencer mode.
: Holding the SHIFT Button and pressing MUTE releases all Mutes.
: Holding the SHIFT Button and pressing SOLO releases all Solos.
: Holding RECORD and pressing a track button will ARM the selected track for monitoring live input and recording.
: Holding the SHIFT Button and pressing RECORD releases all Armed states.
: Holding UNDO and pressing a track button will DELETE the contents of the current clip on this track
: Holding UNDO and pressing the encoder on top of the CC NUMBER label will DELETE the contents of the current Automation Lane
Grid Pad : Holding UNDO and pressing a step will reset the step’s parameters. On the Sequencer Page, this clears all voices and all step parameters (pitch, velocity, duration, probability, trigger, and microtime). On the Piano Rolls, this removes only the selected voice, leaving other voices in the same step intact.
: Hold SHIFT and click the encoder above any track-level parameter (Direction, Speed, Pitch Offset, Velocity Offset, Duration Offset, Probability Offset, Swing, Rotate) to instantly reset it to its default value.
: Hold SHIFT and turn the encoder above PITCH OFFSET to jump by octaves (increments of 12 semitones) for fast transposition.
Parameter Lock : PLOCK + PLAY While in Parameter Lock mode, press and hold the PLAY button to preview the contents of the selected step or voice.
: Click the encoder above Pitch, Velocity, Duration or Probability Offsets to open the respective Piano Roll for detailed editing of that parameter.
MIDI Effects
MIDI Effects are real-time modulation tools that can be applied to any sequencer track. Each track supports up to 4 MIDI FX in a linear chain. Effects are stored per-project as part of each track, and apply globally across all clips in that track. MIDI FX also affect incoming data from external inputs such as USB HOST, USB MIDI, MIDI IN, and notes triggered from the KEYS Page.
To access the MIDI FX view for the selected track, press the FX Button . This can be done from any sequencer subpage—including the Piano Roll, Sequencer Landing Page, or Automation View.

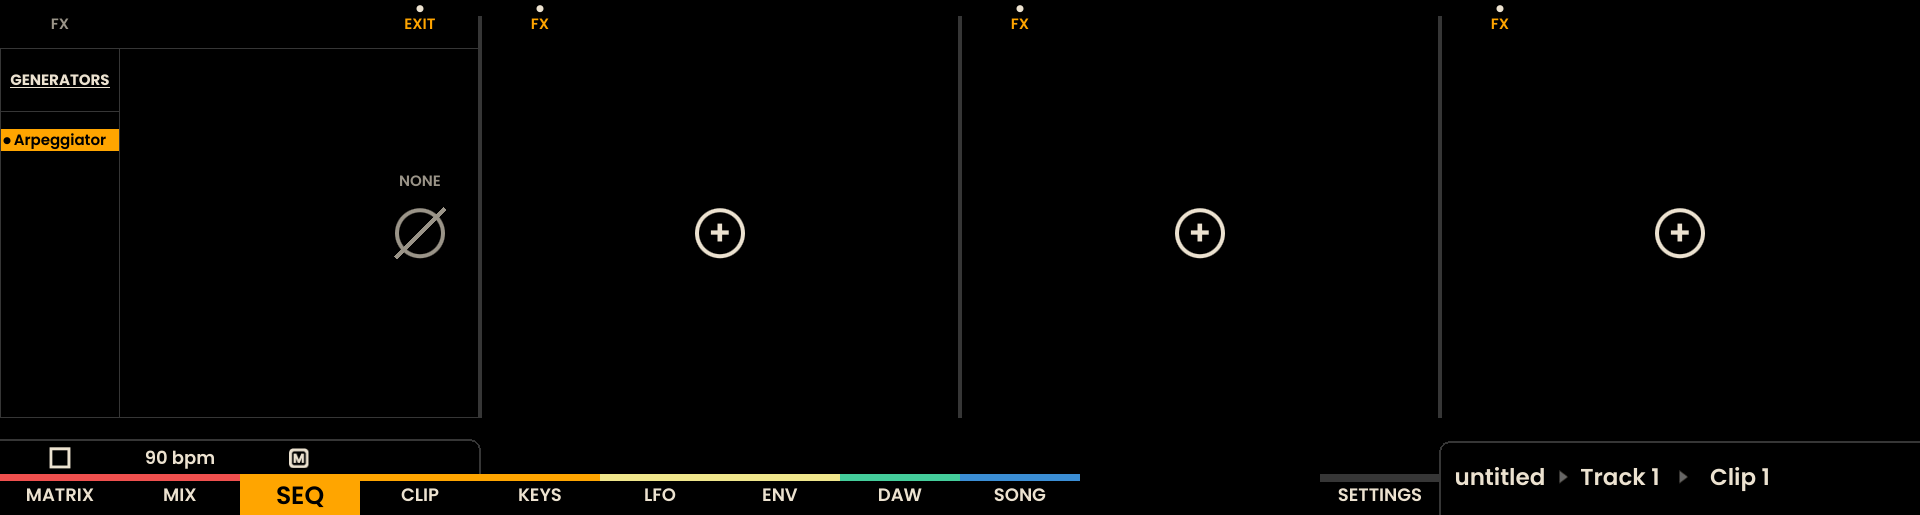
FX Chain Overview
The MIDI FX interface is divided into four segments, each representing a slot in the FX chain. Each slot can hold one MIDI FX at a time.
To load a MIDI FX:
Click the encoder above the empty FX slot label on screen.
Rotate the encoder to browse through the list of available FX and categories.
Click the encoder again to load the selected effect.
To enable or disable an FX:
Press the encoder above the Power Toggle Icon on the screen. When active, the icon will be highlighted.
Once loaded, each MIDI FX displays its parameters, which can be adjusted using the encoders positioned above each on-screen label.
Available FX
Arpeggiator
The Arpeggiator generates rhythmically ordered patterns from held notes or incoming MIDI data. It cycles through active notes in a defined order, repeating them across steps and octaves to create dynamic melodic motion.
Parameters:
MODE – Defines the playback order of the arpeggio:
Up: Notes ascend from lowest to highest.
Down: Notes descend from highest to lowest.
UpDown: Ascends and then descends, excluding repeated endpoints.
DownUp: Descends and then ascends, excluding repeated endpoints.
Up & Down: Ascends and then descends, including endpoints.
Down & Up: Descends and then ascends, including endpoints.
Random: Notes are shuffled randomly.
RATE – Sets the speed of the arpeggio in musical divisions (e.g., 1/16, 1/8, etc.).
OCTAVE RANGE – Defines the number of octaves the arpeggio spans.
LATCH – When enabled, notes remain active even after release, allowing the arpeggiator to continue playing them indefinitely until replaced.

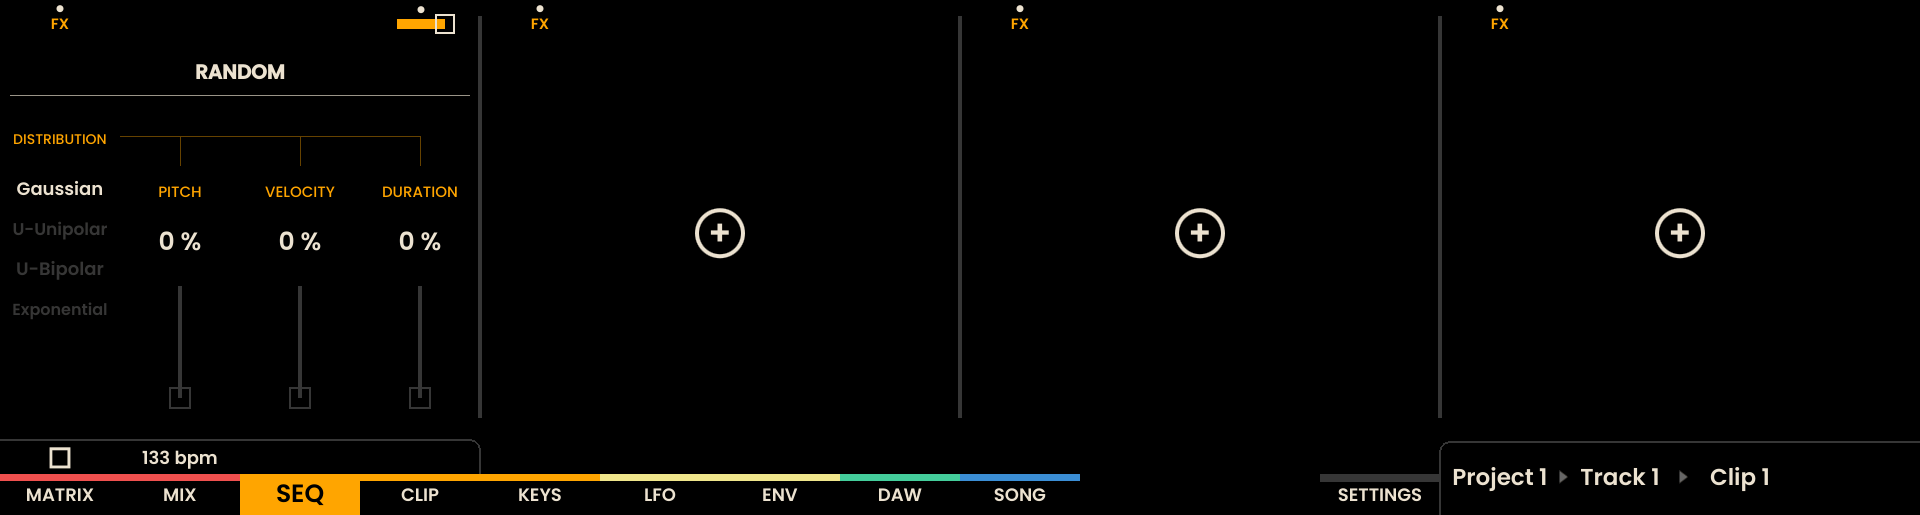
Random
The Random effect introduces controlled pseudo-randomness to a selection of MIDI parameters, adding variation and unpredictability to sequences. It can affect pitch, velocity and duration. The random value generated for each parameter is applied as an offset to the original value, allowing for subtle or extreme variations based on the selected distribution and amount.
Parameters:
DISTRIBUTION – Selects the type of random distribution applied:
Gaussian: Values cluster around a central point, creating a bell-curve effect.
Uniform Unipolar: Values are evenly distributed across the specified range.
Uniform Bipolar: Values oscillate between positive and negative extremes, creating a back-and-forth effect.
Exponential: Values are skewed towards one end of the range, creating a rapid increase or decrease.
…more distribution types are planned for future updates.
PITCH – Adjusts the amount of randomness applied to the pitch of the notes.
VELOCITY – Alters the amount of randomness applied to the velocity of the notes.
DURATION – Modifies the amount of randomness applied to the duration of the notes.
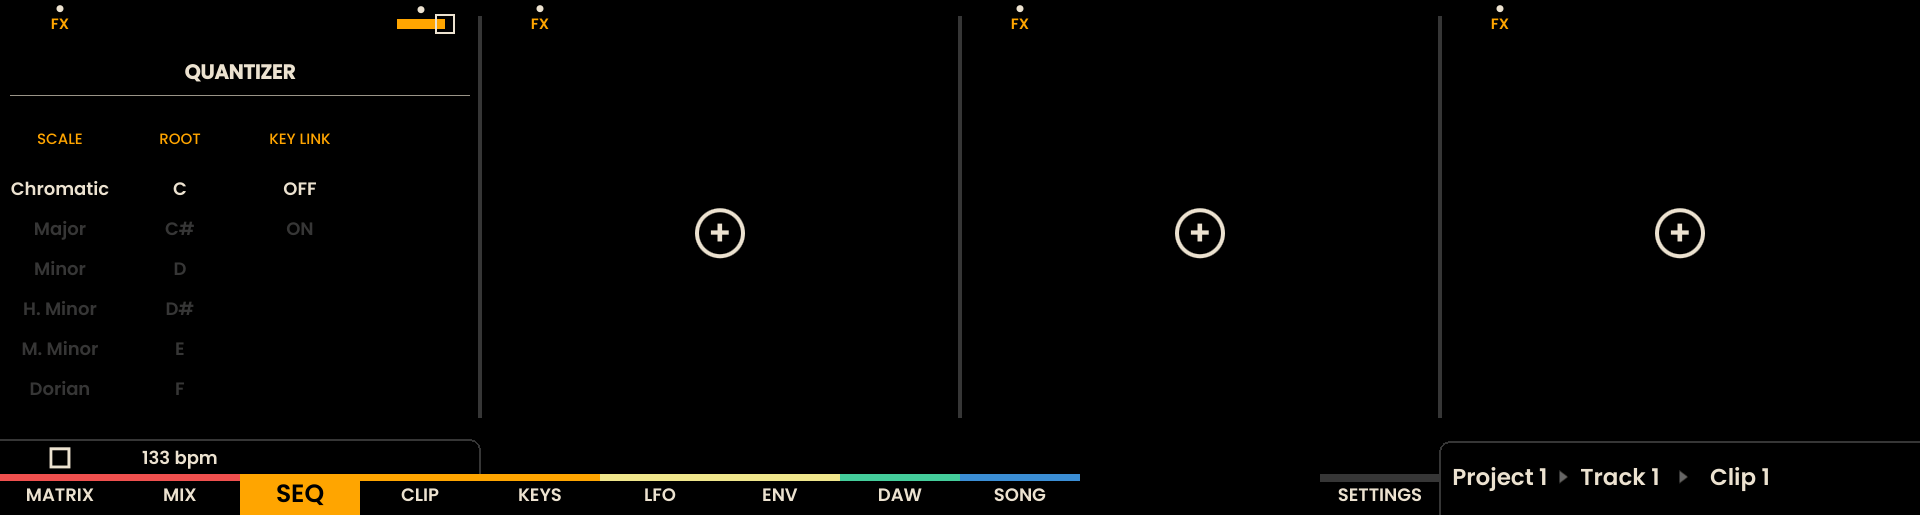
Quantizer
The Quantizer effect constrains incoming MIDI notes to a specified musical scale and root note.
Parameters:
SCALE – Selects the musical scale to which incoming notes will be quantized. Options include Chromatic, Major, Minor, Dorian, Phrygian, Lydian, Mixolydian, Aeolian, Locrian, and more.
ROOT NOTE – Sets the root note for the selected scale, determining the tonal center for quantization.
KEY LINK – When enabled, the Quantizer will automatically sync its root note and scale to match the settings defined in the KEYS Page, overriding the Scale and Root Note set in the FX parameters.
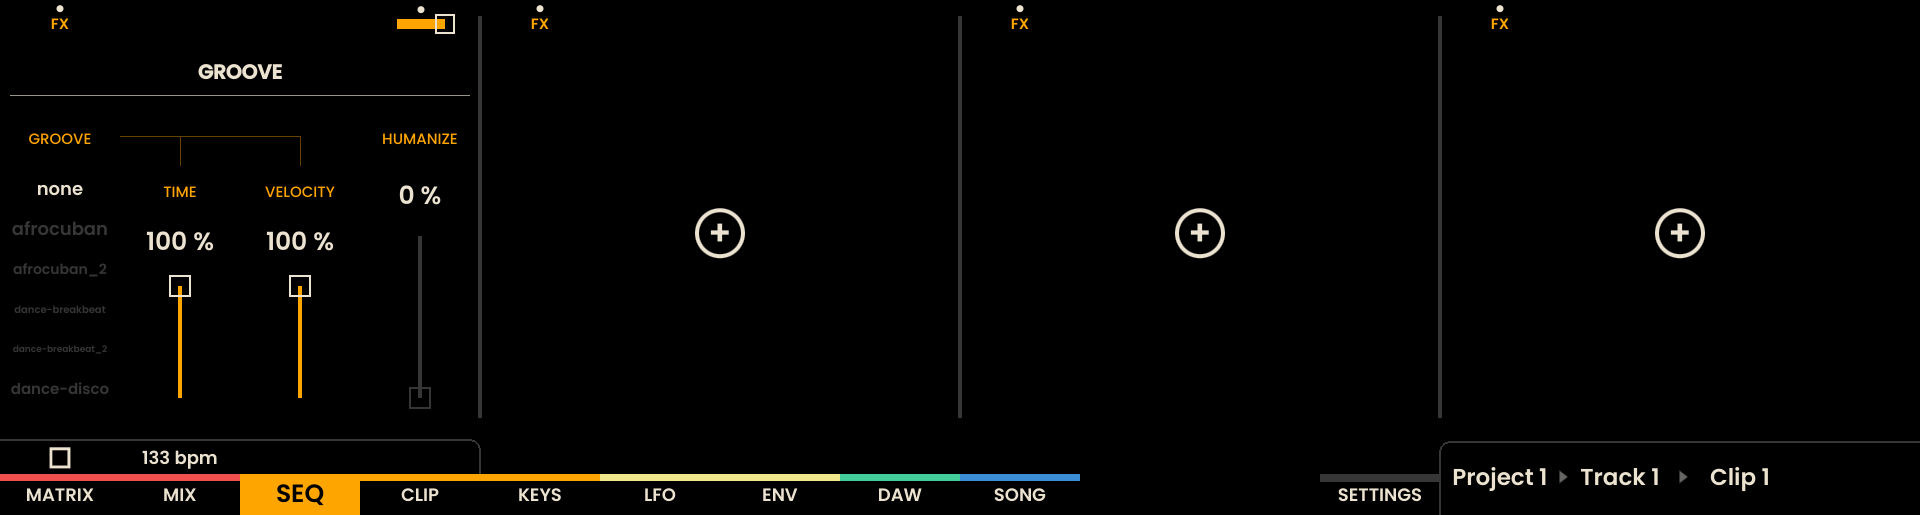
Groove
The Groove effect applies a rhythmic mask to the sequence, altering the timing and the velocity of notes to create a more human feel or not.
Parameters:
GROOVE – Selects from a variety of groove templates, each offering a unique rhythmic feel.
TIME – Adjusts the intensity of the groove effect on the timing of notes (aka the tempo feel).
VELOCITY – Modifies the intensity of the groove effect on the velocity of notes (aka the dynamic feel).
HUMANIZE – Introduces subtle random variations to the timing and velocity of notes, simulating a more human performance. This parameter is independent from the Groove template selected.
Note
Whenever a groove template is selected, the swing parameter in the main sequencer page is overridden and it would make no effect until the groove is bypassed or removed.
Creating Custom Groove Files
The Groove effect loads its templates from JSON files stored in the internal memory at /user_data/grooves/. You can create your own groove files to define custom rhythmic feels.
File location: you can add new groove files or remove existing ones via the Reliq Updater. The sequencer scans this folder and lists all available groove files alphabetically.
JSON Format
A groove file is a JSON object with the following structure:
{
"name": "my_custom_groove",
  "BPM": 120,
  "resolution": 768,
  "division": 16,
  "steps": [
    { "timingOffset": 0, "velocityOffset": 0 },
    { "timingOffset": -10, "velocityOffset": -20 },
    { "timingOffset": 5, "velocityOffset": 15 }
  ]
}
Fields:
name (string) – A descriptive name for the groove.
BPM (integer) – The original tempo at which the groove was captured or designed. (*)
resolution (integer) – Ticks per quarter note (PPQN). Typically set to
768. (*)division (integer) – The rhythmic grid subdivision. Typically
16for a 16th-note grid. (*)steps (array of objects) – An array of up to 32 step objects, each containing:
timingOffset (integer) – Timing deviation in ticks. Range: -95 to +95. Negative values push the note earlier (ahead of the beat), positive values push it later (behind the beat).
velocityOffset (integer) – Velocity deviation in MIDI values. Range: -127 to +127. Negative values make the note softer, positive values make it louder.
The steps array maps directly to the sequencer’s 32-step grid. Step 0 corresponds to the first 32th note, step 1 to the second, and so on. If fewer than 32 steps are provided, the remaining steps default to zero offset (no groove applied). Values of 0 for both offsets mean the step plays exactly on the grid at its original velocity.
Note
(*) The BPM, resolution, and division fields are included for potential future use in tempo-synced groove adjustments or for informational purposes when designing grooves, but they do not currently affect how the groove is applied in the sequencer.
Tips for creating groove files:
Start with small offset values (e.g., -10 to +10 for timing) and adjust from there. Subtle grooves often feel more natural than extreme ones.
The TIME and VELOCITY parameters in the Groove effect scale the offsets from 0% to 100%, so you can design grooves at full intensity and let the user dial them back.
Credits
The groove templates included with Reliq are derived from the Groove MIDI Dataset by Google, licensed under CC BY 4.0. The original data has been adapted and converted to the Reliq groove format.
Note
Additional MIDI FX types will be introduced in future updates. This chapter will expand as new effects are added.
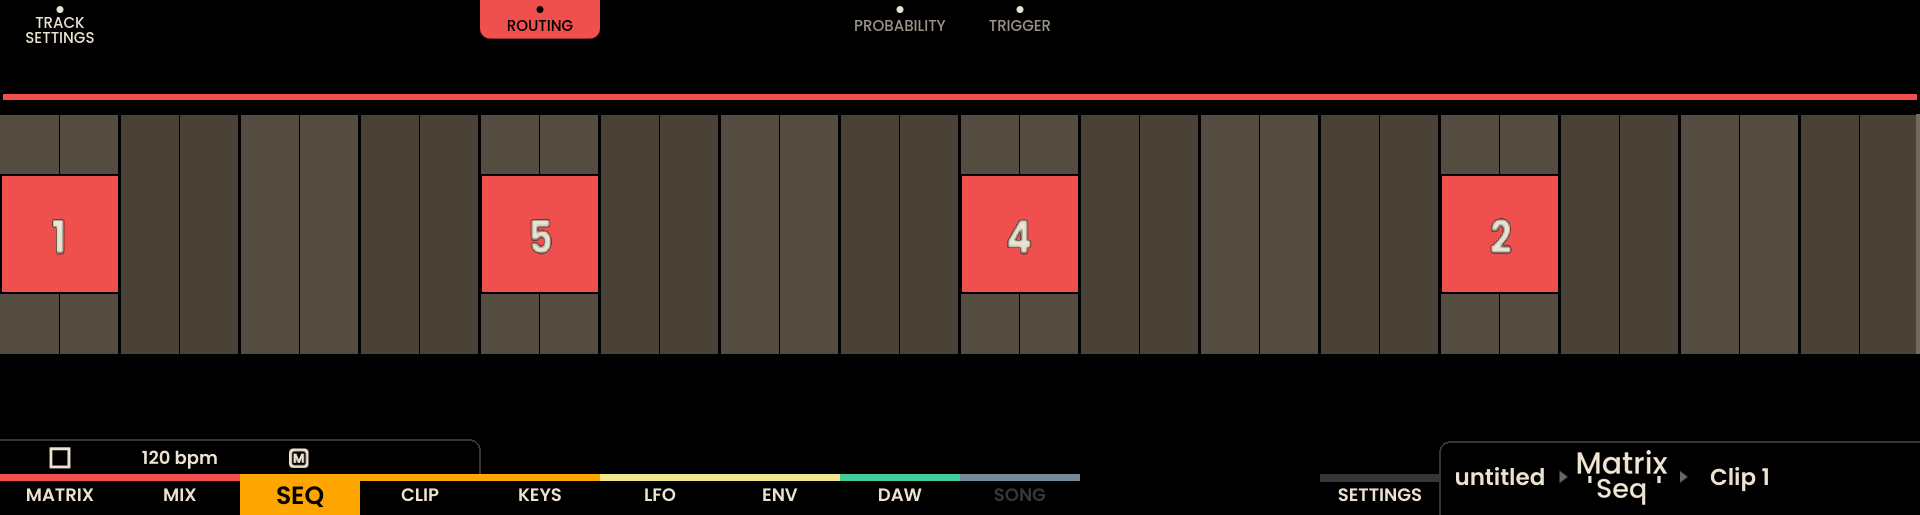
Matrix Sequencer
The Matrix Sequencer is a specialized track designed to sequence Matrix Routings, providing real-time control over signal paths. The Matrix Sequencer track has 16 steps per sheet with a musical duration of 1/16 note values. Each step can be enabled or disabled, with the ability to adjust the Routing that will be triggered in each step. The Matrix Sequencer can be accessed by pressing the SHIFT button and Track Button 16 ( ). Although the Matrix Sequencer is a specialized track, it shares many of the same features as the standard sequencer, such as Clip and Parameter Lock.
Global Matrix Sequencer Settings
STEPS: Defines the total number of steps in the sequence.
DIRECTION: Determines the cursor’s movement through the sequence.
SPEED: Applies a multiplier or divisor to the overall speed of the sequence.
PROBABILITY OFFSET: Alters the likelihood that a given step will trigger, with a range of +/- 100%.

Assigning Routings to Steps
To assign Routings to steps in the Matrix Sequencer, press and hold the step that requires editing to enter Parameter Lock mode. The display will switch to show the routing parameter above the fifth encoder. The ROUTING of each step can be adjusted using Parameter Lock and the encoder above the display label ROUTING.
Alternatively, you can quickly assign routings to all visible steps by clicking the encoder above the ROUTING label. This activates a routing “piano roll” mode, where each encoder above a step controls the routing for that step directly.

Like the other tracks, also the Matrix Sequencer Track can be soloed or muted.
Technical Specifications
Specification | Details |
|---|---|
Tracks | 16 |
Steps per Track | 32 |
Polyphony per Step | 8 voices |
Clock Specifications | MIDI, Analog Clock, Reset |
Clips | Variable (Up to 256) |
Internal Resolution (Pulses Per Quarter Note) | 768 |
Sequence Length | Up to 32,768 steps |
Step Division | 1/32 note values |
Modulation Parameters | Pitch Bend, Mod Wheel, Control Change, CV |
Output Types | MIDI OUT 1, MIDI OUT 2, MIDI OUT 3, USB, CV |
Input Types | MIDI IN, USB, USB HOST |
Track Modes | Step Sequencer, Euclidean |
Speed Settings | x2, x4, x8, /2, /4, /8 |
Track Modifiers | Pitch Offset, Velocity Offset, Duration Offset, Probability Offset, Swing |
Direction Options | Forward, Backward, Ping Pong, Random |
Zoom Mode | 1/32 note resolution |