Settings
Global Settings
Reliq features a set of Global Settings that can be defined and edited from any page. These settings are saved and recalled along with the project, ensuring that key configurations remain consistent between sessions.
BPM
The BPM (Beats Per Minute) setting controls the global tempo of the project, with values ranging from 30 to 250 BPM. While BPM is a global project parameter, individual tracks can be adjusted to multiples of the defined BPM using the Multiplier Track Settings.
The current BPM is displayed in the bottom-left corner of the screen and can be modified from any page by rotating the BPM encoder , which is located on the top-left of the device. Although BPM operates globally across the project, it can be overridden on a per Song Block basis, allowing specific song blocks to have their own BPM settings.
Action Notifications
For all global actions performed in Reliq, a notification will appear on the middle bottom of display to confirm the action. This notification will remain visible for a few seconds before disappearing.

Status Bar Indicators
On the bottom left corner of the display, the Status Bar provides real-time information about the current project. The status bar displays the following information: - Playing Status: Indicates whether the project is currently playing, stopped or recording. - BPM: The current tempo of the project, displayed in beats per minute. - Breakout Module Status: Indicates whether the Breakout Module is connected and active. - Current Mode: Displays the current mode of Reliq, which can be either Follow Mode or Edit Mode.

Reliq Modes
Reliq operates in two primary modes: Follow Mode and Edit Mode. These modes define how actions are executed and how the interface responds during different workflows.
Follow Mode
This is the default operating mode. In this mode, all actions across pages are performed in real-time. The sequencer cursor continuously follows the current position of the sequence, and both the grid pads and display update in real-time to reflect changes.
In the Clip, LFO, and Envelope pages, any clip or slot selected in Follow Mode is added to the End Of Sheet (EOS) queue and triggered at the end of the current bar. In the Matrix and Mix pages, the display and grid pads update as the sequencer cursor moves, showing real-time changes as new routings are activated.
Edit Mode
Edit Mode provides a non-real-time workflow, allowing detailed adjustments without the need to follow the active sequencer position. In this mode, the sequencer cursor does not move, and the grid pads and display remain static, enabling editing without the constraints of real-time sequencing.
In the Sequencer Page, the sequencer cursor is shown only if it is within the current view. If the cursor is outside the current sheet, it is hidden from view. In the Clip, LFO, and Envelope pages, selecting a Clip or Slot in Edit Mode does not add it to the End Of Sheet (EOS) but instead prepares it for modification. In the Matrix and Mix pages, selecting routings in Edit Mode opens them for editing without triggering the routing or making real-time changes. When edit mode is active the selected Clip, Slot or routing is highlighted in pink.
Switching between Follow Mode and Edit Mode is done by pressing the BPM encoder . In Edit Mode, the encoder illuminates in blue, while in Follow Mode, it lights up white. When recording is active, the encoder blinks according to the current tempo, displaying the color of the active mode.

Syncing External Gear
Reliq functions as a high-resolution master clock, capable of synchronizing external gear with exceptional precision. Its internal sequencer engine runs at 768 PPQN (Pulses Per Quarter Note)—32× the resolution of standard MIDI Clock, which operates at 24 PPQN. This allows Reliq to deliver tight, jitter-free sync to connected devices across both MIDI and analog domains.
Clock Outputs
When acting as the clock master, Reliq can transmit:
MIDI Clock via all available MIDI Outputs (TRS, USB, and USB Host)
Analog Clock and Reset Signals via dedicated outputs on the Breakout Module
These settings are project-specific and can be adjusted from the Settings Page. Each project remembers whether MIDI and analog clocks are enabled, and on which ports.
U‑SYNC: Clock Input
For best results when syncing Reliq to an external source, use U‑SYNC—Reliq’s dedicated high-resolution DAW sync system.
U‑SYNC allows Reliq to follow the DAW clock with full sample-level accuracy via USB.
Requires the U‑SYNC Plugin to be loaded in the DAW.
Offers tight synchronization for hybrid hardware/software setups.
Available for macOS, with Windows support planned in a future update.
MIDI Clock Input (Fallback)
While Reliq can also follow an external MIDI Clock via the MIDI IN port, this method is not recommended for precision sequencing:
MIDI Clock runs at only 24 PPQN, and any jitter or instability from the external source will degrade timing.
Due to Reliq’s much higher internal resolution, even small inconsistencies from the source clock can cause noticeable drift.
This fallback option is intended primarily for use with dedicated hardware clock generators such as Nome II, where timing accuracy is engineered at the source.
Note
Using standard synths, drum machines, or computers as MIDI Clock masters may result in unreliable timing when driving Reliq. For tight sync, always prefer U‑SYNC or let Reliq be the clock master.
Project-specific clock settings, accessible from the Settings Page
Project Settings
Project management in Reliq is handled through the Project Page, which provides control over key project settings, including the ability to save, load, and name projects. A built-in autosave feature automatically preserves the current project state in the event of power loss or unexpected shutdown. The autosave function can be enabled or disabled from the Project Settings Page.
Project Settings Interface Overview
The Project Page displays essential project information. All project-related options are shown at the top of the display.
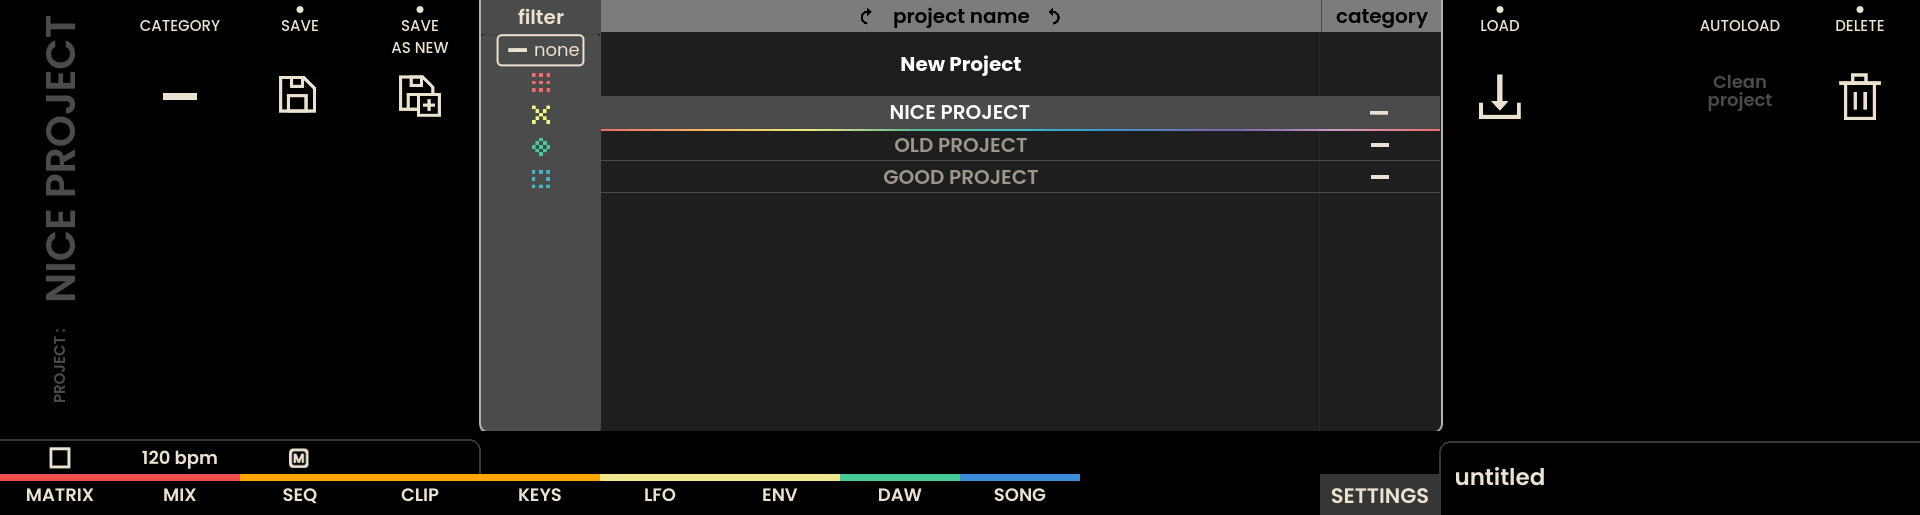
In the middle of the display, a project menu allows a project to be selected using the Encoders above the project list. The currently selected project is highlighted in white, and the active project is displayed in the bottom bar. Reliq has the capacity to store several thousand projects, which are saved directly to the device memory. Projects can also be backed up or restored through the Reliq Updater.
Saving a Project
The loaded project can be saved by pressing the SAVE Button or by clicking the encoder above the SAVE label. If no project is loaded, a new project is created and saved as new.
Projects can also be saved from any page by pressing the SAVE Button .
To save the current project as a new project, press the encoder above the SAVE AS NEW label .
Project Name
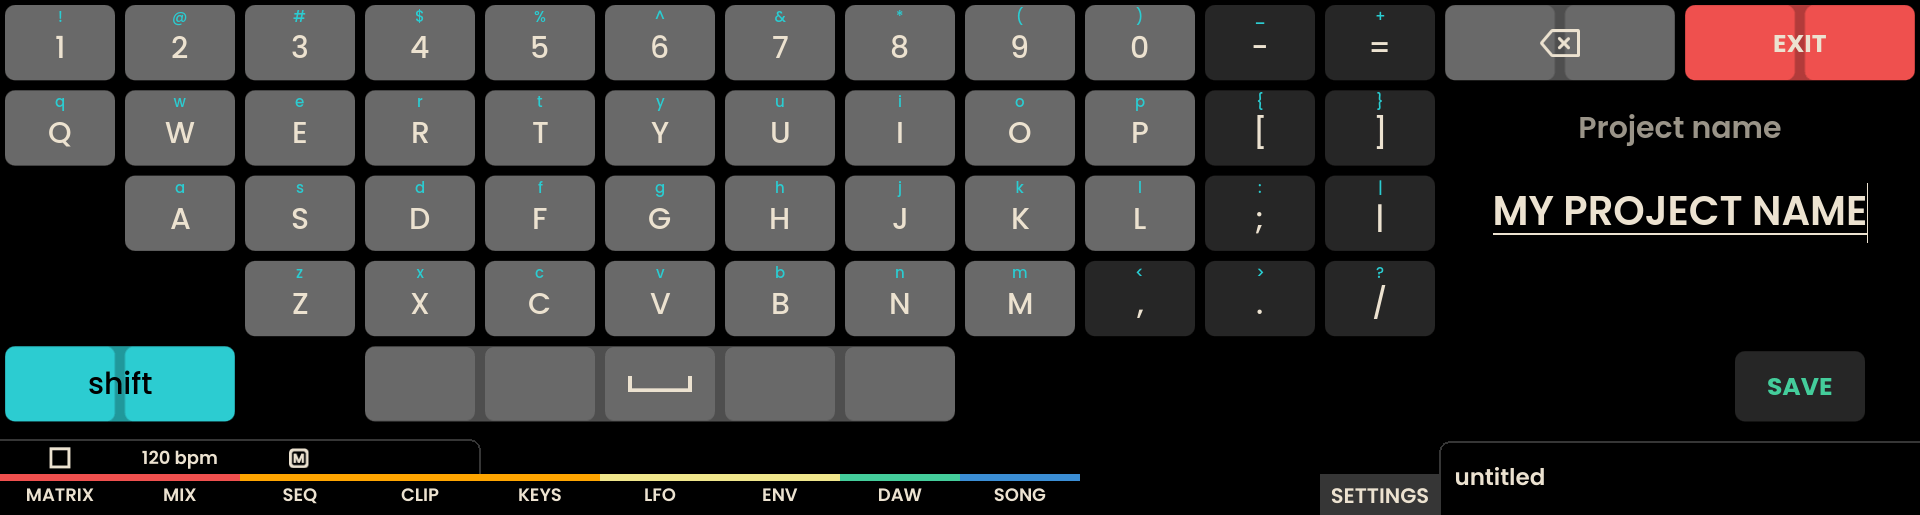
Project names can be defined during the SAVE AS NEW process. The virtual keyboard will appear on the display, allowing the project name to be entered using the grid as a keyboard. The project name can be up to 16 characters long and can include letters, numbers, and special characters.
Note
Future updates to the Reliq iOS application and Reliq Companion Software will allow project names and settings to be managed wirelessly. More details on this feature will be included in future updates to this chapter.
Loading a Project
Pressing any encoder above the project list loads the selected project. If the project is already loaded, pressing the encoder will reload the project. Please note that reloading a project will overwrite any unsaved changes.
Creating a New Project
To create a new project, select the New Project label at the top of the project list and press the encoder above the LOAD label. This action will create a new project with default sequence content. The new project is not saved yet, which you can notice from the name displayed in the project label in the bottom bar.
When a new project is created, it will inherit the global settings from the previously loaded project. This includes the current BPM, as well as all parameters in the Settings Page, such as clock configuration, MIDI resolution, and brightness.
Please remember to save the currently loaded project before creating a new one if needed.
Deleting a Project
To delete a project, select the project you wish to delete using the Encoder. Once the project is selected, press the encoder above the DELETE label. A confirmation dialog will appear on the display. Confirm the deletion by pressing the encoder above the CONFIRM label. The selected project will be permanently deleted from the device memory.
Note
WARNING Deleted projects cannot be recovered!
Autoload Behavior
The AUTOLOAD parameter defines how Reliq handles projects when powering on:
When set to Clean Project, Reliq will not autosave the current temporary state. Upon boot, a new clean project will be created automatically.
When set to Load Last Project, Reliq will autosave the current temporary state and reload the last active project upon boot.
When Load Last Project is active, the autosave only preserves the working memory and does not overwrite the originally loaded project file. The project must still be saved manually by pressing the SAVE button if you wish to permanently store changes.
Recovery Mode
If for any reason Reliq has a problem during boot in loading the last project, it is possible to skip the auto-load by pressing and holding SHIFT just after the splash-screen appears. The button can be released when the Intro animation ends. This will temporarily skip loading the last project and load a clean project.
Project Categories
Each project can be assigned to a category, which can be selected from the Category menu. To filter projects by category, rotate the encoder above the filter label to select the desired category.
Device Settings
The Settings Page provides access to various global project settings that can be modified according to the needs of the current workflow. These settings allow for fine-tuning of MIDI configurations, breakout module options, sequencer defaults, and display settings.
To access the Settings Page, the PAGE Button located beneath the SETTINGS label on the display should be pressed. Upon entering the Settings Page, the available setting menus are displayed at the top of the screen. Each menu can be accessed by pressing the encoder above the desired menu. When a menu is selected, it is highlighted in white, and the corresponding settings are shown on the display.
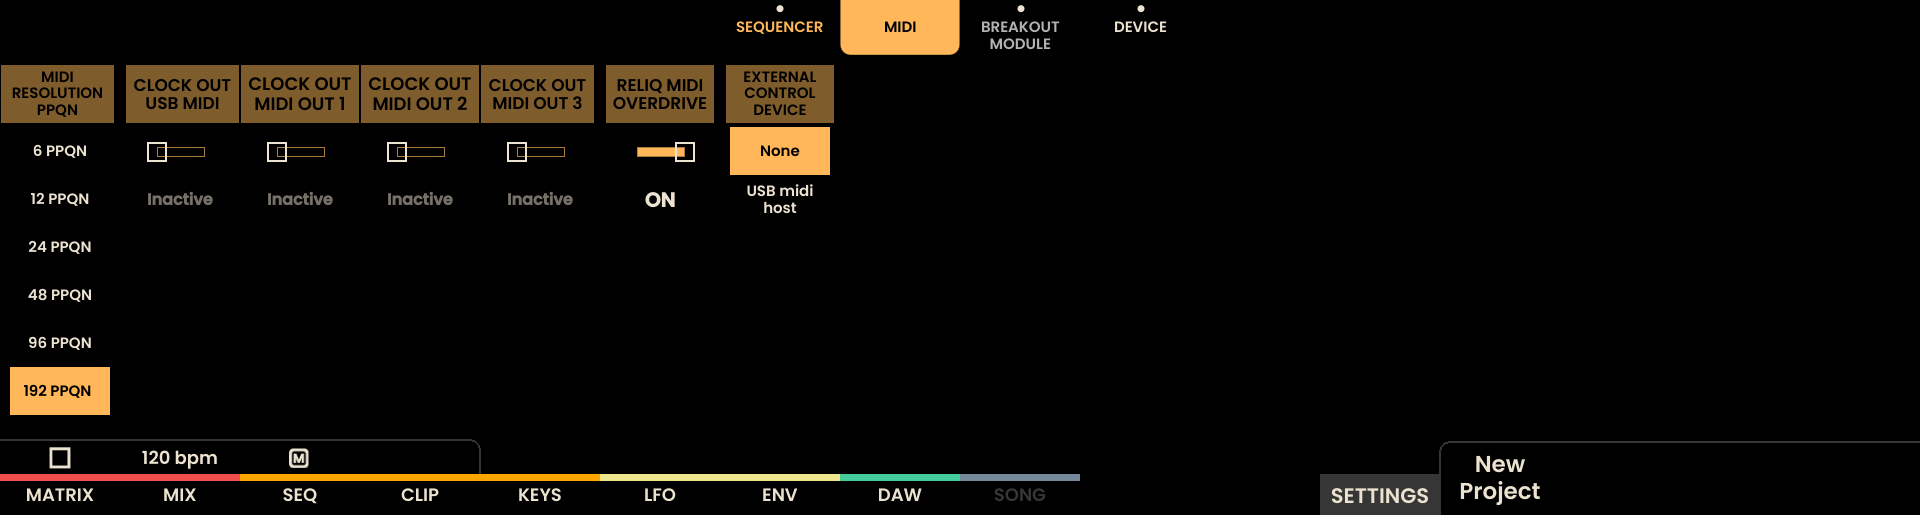
MIDI Settings
The MIDI Settings menu allows for configuring all MIDI-related parameters, including clock outputs, event resolutions, and external control options:
MIDI Resolution: Adjusts the PPQN (Pulses Per Quarter Note) resolution for Reliq’s MIDI event output, with options ranging from 24 to 192 PPQN. This setting controls how frequently event data is sent via MIDI, but does not affect the MIDI Clock itself. The MIDI Clock resolution remains fixed at 24 PPQN, as defined by the official MIDI standard.
Reliq MIDI Overdrive: When set to OFF, MIDI note and CC messages are sent at the user-selected MIDI Resolution. When ON, messages are sent at 192 PPQN, allowing for finer timing resolution independently of the clock.
Clock Out USB MIDI: Enables or disables MIDI Clock output via the USB MIDI port. When enabled, Reliq will send a MIDI Clock signal to any device connected via USB MIDI.
Clock Out MIDI OUT 1: Enables or disables MIDI Clock output via the MIDI OUT 1 port.
Clock Out MIDI OUT 2: Enables or disables MIDI Clock output via the MIDI OUT 2 port.
Clock Out MIDI OUT 3: Enables or disables MIDI Clock output via the MIDI OUT 3 port.
SYNC TO EXT. CLOCK: Enables or disables Syncing to (i.e. following) an external MIDI Clock coming from the MIDI IN port. A stable clock source is recommended, like a MIDI Master Clock device. When the option is enabled and the external clock is detected, a EXT icon appears next to the BPM value.
External Control Device: When enabled, Reliq allows a MIDI device connected to the USB Host port to act as an external controller. This enables incoming MIDI messages to control various parameters of Reliq in real time. (A detailed explanation of this feature is provided in the External Control Device sub-section later in this chapter.)
CONTROL PLAY/STOP EXTERNALLY: When enabled, Reliq allows an external device connected to USB HOST to control the PLAY/STOP status of Reliq.
Reliq MIDI Overdrive Explained
The Reliq MIDI Overdrive setting is designed for different use cases. When Reliq is being used to clock and send MIDI events to an external device that records these events, the Overdrive setting should be OFF, ensuring that MIDI events are sent at the selected MIDI Resolution PPQN resolution.
However, if Reliq is used to clock and send notes or CC messages without the intention of recording these events on the external device, Overdrive can be set to ON. This allows the MIDI events to be sent at the highest possible resolution, independent of the selected MIDI Resolution PPQN.
Breakout Module Settings
The Breakout Module Settings menu provides control over the configuration of the Breakout Module clock, reset, and gate outputs:
Clock Settings: Defines the clock output resolution of the Breakout Module from 1 bar to 96th division (24PPQN).
Reset Settings: Configures the behavior of the Reset Output. It can be set to RESET to send a reset signal at the start of playback, to RUN to remain high while Reliq is playing, or to TRIGGER ON STOP to send a reset signal when the sequencer is stopped.
Gate Settings: Sets the voltage range of the gate outputs. The range can be configured between 0-5V or 0-10V.
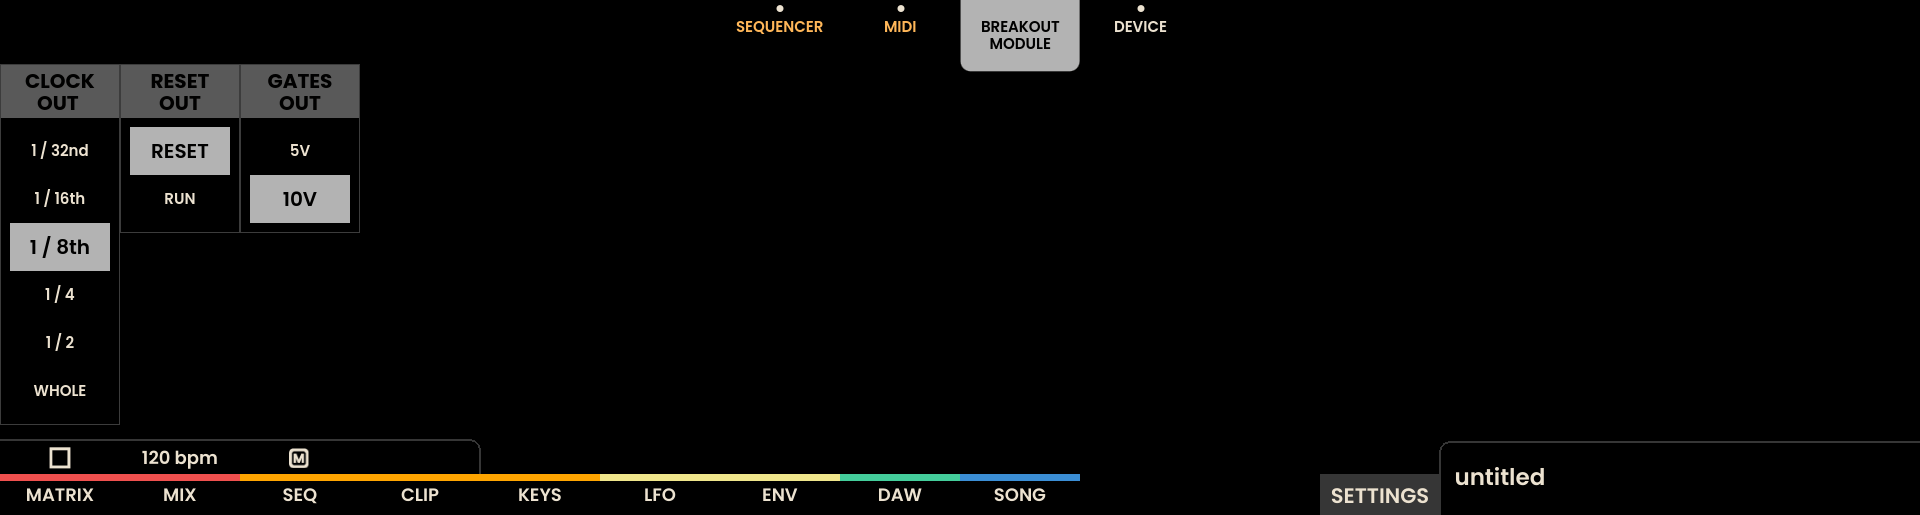
Additional Notes on Clock Outputs
The Breakout Module includes a single Clock Output. If additional clock outputs are required, a sequencer track with its output set to CV can be repurposed as a clock by utilizing the gate output of that track.
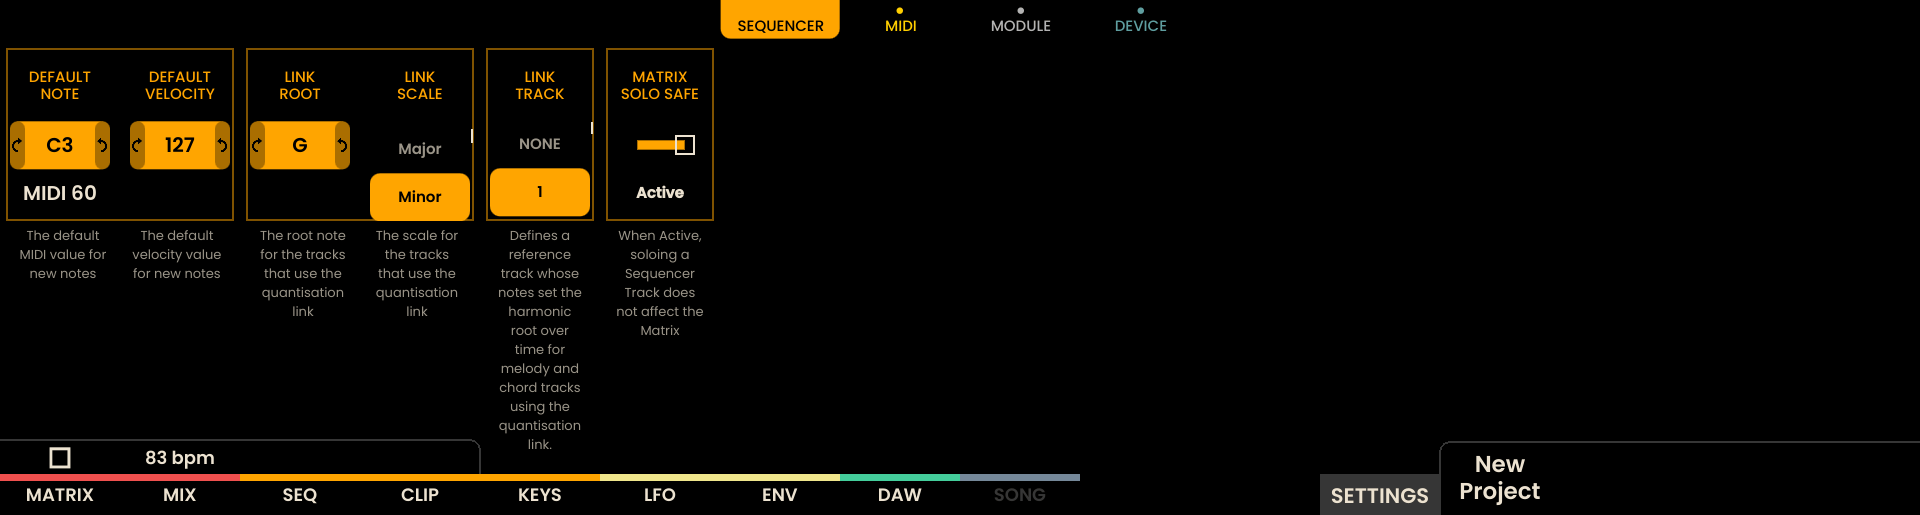
Sequencer Settings
The Sequencer Settings menu defines the default values for notes, velocity, and behavior within the sequencer:
Default Note: Specifies the default note value, which can be set anywhere from C-2 to G8.
Default Velocity: Specifies the default Velocity value, which can be set anywhere from 0 to 127.
LINK ROOT: Defines the root note for the tracks that use the Quantization LINK
LINK SCALE: Defines the scale for the tracks that use the Quantization LINK
NEW LINK TRACK: Selects a track whose notes define the active LINK ROOT during playback. When a note is played or sequenced on the selected track, its pitch becomes the temporary root for all tracks using the Quantization LINK. Melody and Chord tracks following the LINK will transpose relative to this note while preserving their internal interval structure.
Example:
Assume:
LINK SCALE: Major
LINK ROOT: C
Track 2 (MELODY) has LINK enabled
LINK TRACK is set to Track 1
If Track 2 contains C on step 1 and C on step 16:
When a D is played live on Track 1, Track 2 will output D on step 1 and D on step 16 while that note is active.
If Track 1 contains a sequence with C on step 1 and G on step 16, Track 2 will follow these root changes. It will output C on step 1 and transpose to G on step 16 accordingly.
If no note is currently active on the LINK TRACK, the system uses the most recently played note. If no note has been played, it falls back to the configured LINK ROOT.
Note
The original notes stored in Melody or Chord tracks are not modified. Transposition occurs during playback only and does not alter the underlying sequence data. Notes played live on chord and melody tracks will not get transposed by the LINK system.
Matrix SOLO Safe: When Active, soloing a Sequencer Track does not affect the Matrix.
Device Settings
The Device Settings menu allows for adjustment of the display and led brightness, with a range from MIN to MAX. This setting ensures that the display and leds can be adapted to different lighting conditions. The selected brightness level persists even after the device is powered off but is not saved per project. In the Device Settings menu, the Serial Number and Rlx version are displayed at the bottom of the screen. The Serial Number is unique to each device and is used for warranty and support purposes. The Rlx version indicates the current Operating System version installed on the device.
Note
In some rare cases, display flicker or visual instability has been reported. A new Display Calibration Mode has been added to help mitigate these issues.
To access Display Calibration:
Navigate to the Settings Page
Press and hold the FX and SELECT buttons
While holding these buttons, the first 3 Grid Pads will show the available display calibration options
Selecting an option will cause the display to temporarily power cycle (off and back on for a second)
Try different calibration modes to resolve any flicker on the display.
External Control Device
From the External Control Device menu in the SETTINGS, MIDI page, any USB MIDI device connected to the USB-HOST port can be selected to control Reliq externally.
A detailed list of external control mappings is provided below:
Page | Type | Channel | Note/CC Number | Value / Velocity Meaning |
|---|---|---|---|---|
MATRIX | Note | 11 | (Note Number 0–127) | Note-on toggles connection (0–127) |
MATRIX | Note | 12 | (Note Number 0–127) | Note-on toggles connection (128–255) |
MATRIX | CC | 2 | CC 50 | Routing index of current page (0-15) |
MATRIX | CC | 2 | CC 14 | Page routing view (0–3) |
MIXER | CC | Fader Index | CC 15 | Input fader level (0–127) |
MIXER | CC | Fader Index | CC 16 | Output fader level (0–127) |
MIXER | CC | Fader Index | CC 61 | Mixer input group level (0–127) |
MIXER | CC | Fader Index | CC 62 | Mixer output group level (0–127) |
SEQUENCER | CC | Track Index | CC 17 | Step count (0–127) |
SEQUENCER | CC | Track Index | CC 18 | Direction (0–127) |
SEQUENCER | CC | Track Index | CC 19 | Speed (0–127) |
SEQUENCER | CC | Track Index | CC 20 | Pitch offset (0–127) |
SEQUENCER | CC | Track Index | CC 21 | Velocity offset (0–127) |
SEQUENCER | CC | Track Index | CC 22 | Duration offset (0–127) |
SEQUENCER | CC | Track Index | CC 23 | Probability offset (0–127) |
SEQUENCER | CC | Track Index | CC 24 | Swing amount (0–127) |
SEQUENCER | CC | Track Index | CC 25 | Rotate (0–127) |
SEQUENCER | CC | Track Index | CC 26 | Events (0–127) |
SEQUENCER | CC | Track Index | CC 52 | Mute (0 = off, >63 = on) |
SEQUENCER | CC | Track Index | CC 53 | Solo (0 = off, >63 = on) |
SEQUENCER | CC | Track Index | CC 54 | Arm (0 = off, >63 = on) |
MATRIX SEQUENCER | CC | 2 | CC 45 | Step count (0–127) |
MATRIX SEQUENCER | CC | 2 | CC 46 | Direction (0–127) |
MATRIX SEQUENCER | CC | 2 | CC 47 | Speed (0–127) |
MATRIX SEQUENCER | CC | 2 | CC 48 | Probability offset (0-127) |
MATRIX SEQUENCER | CC | 2 | CC 55 | Mute (0 = off, >63 = on) |
MATRIX SEQUENCER | CC | 2 | CC 56 | Solo (0 = off, >63 = on) |
MATRIX SEQUENCER | CC | 2 | CC 49 | Trigger clip on current page (0–15) |
CLIP | CC | Track Index | CC 27 | Trigger clip on current page (0–15) |
CLIP | CC | 1 | CC 28 | Change page view (0–15) |
KEYS | CC | 1 | CC 29 | Overdub (0 = off, >63 = on) |
KEYS | CC | 1 | CC 30 | Quantize (0–127) |
LFO | CC | Track Index | CC 31 | Wave (0–127) |
LFO | CC | Track Index | CC 32 | Rate / Frequency (0-127) |
LFO | CC | Track Index | CC 33 | Depth/Amplitude (0–127) |
LFO | CC | Track Index | CC 34 | Sync (0) or Free Mode (>63) |
LFO | CC | Track Index | CC 57 | Offset (0–127) |
LFO | CC | Track Index | CC 58 | Phase (0–127) |
LFO | CC | Track Index | CC 60 | S & H (0 = off, >63 = on) |
LFO | CC | Track Index | CC 35 | Trigger Slot on current page (0–16) |
LFO | CC | 1 | CC 36 | Change page view (0–7) |
ENVELOPE | CC | Track Index | CC 37 | Amplitude (0–127) |
ENVELOPE | CC | Track Index | CC 38 | Shape (0 = linear, >63 = exponential) |
ENVELOPE | CC | Track Index | CC 39 | Attack (0–127) |
ENVELOPE | CC | Track Index | CC 40 | Decay (0–127) |
ENVELOPE | CC | Track Index | CC 41 | Sustain (0–127) |
ENVELOPE | CC | Track Index | CC 42 | Release (0–127) |
ENVELOPE | CC | Track Index | CC 59 | Offset (0–127) |
ENVELOPE | CC | Track Index | CC 43 | Trigger slot on current page (0–16) |
ENVELOPE | CC | 1 | CC 44 | Change page view (0–7) |
SONG | Note | 13 | (Note Number 0–127) | Note-on triggers song block 0-127 |
SONG | Note | 14 | (Note Number 0–127) | Note-on triggers song block 128-255 |
GLOBAL | MIDI Message | FA (250) / FC (252) | Play / Stop | |
GLOBAL | CC | 0 | CC 51 | Rec toggle (>63 = Toggle Rec) |
Updating Rlx
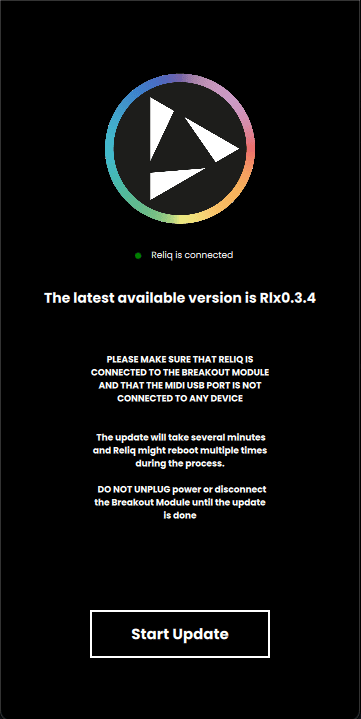
Reliq software (RLX) can be updated using the Reliq Updater, which is available for download for Intel Mac, Apple Silicon Mac, and Windows. The software provides an interface for updating both the Reliq device and its Breakout Module, ensuring that the latest features and improvements are applied.

Update Process
To update Reliq through the Reliq Updater, the following steps should be followed:
Connect the USB-C to USB-A Reliq cable to the HOST port of Reliq (USB-C) and to the computer (USB-A).
Ensure that the Breakout Module is connected to Reliq by using the USB-C to USB-C cable from the Module Output on Reliq to the USB-C port on the Breakout Module.
Make sure that No cables are connected to the USB MIDI port of Reliq.
In the software, click the Update Button to begin the update process.
The Reliq Updater will check for the latest Operating System version and prompt for an update if a new version is available.
To start the update, click the Update Button again. The software will update Reliq and the Breakout Module. The update process may take a few minutes, after which Reliq will automatically reboot to complete the installation.
Note
If the Update process fails during the File Transfer step, unplug all other USB devices from your computer and try again.
Transferring Projects and Instrument Definitions
Starting with Reliq Updater v1.2 (used with RLX 1.5 and later), project backup and restore are handled using the updater’s Transfer workflow. Transfer mode mounts Reliq on the connected computer so project folders and instrument definitions can be copied directly.
Quick overview
Use Transfer to copy projects and custom instrument definition files between Reliq and your computer.
To create an offline backup, copy the project folder from the Reliq projects directory to a location on your computer or external drive.
To restore, copy the saved project folder back into the Reliq projects directory and complete the transfer so the device picks up the changes.
Using Transfer mode
Connect the USB-C to USB-A Reliq cable to the HOST port on Reliq and to your computer.
Open the Reliq Updater on the host computer.
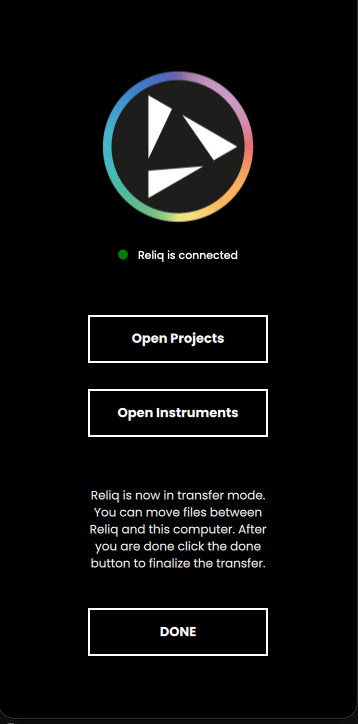
Click Transfer. The updater will mount Reliq as a removable device on the host.
After connection, choose one of the quick-open actions:
Open Projects — opens the Reliq project directory in your file manager.
Open Instruments — opens the instrument definitions directory in your file manager.
Use Finder (macOS) or Explorer (Windows) to copy, move, or edit files between the host and the opened Reliq folders:
To back up a project: copy its project folder from the Reliq projects directory to your computer.
To restore a project: copy the saved project folder into the Reliq projects directory.
To add or edit instrument definitions: place valid instrument definition files into the Reliq instruments directory.
When all file operations are complete, click DONE on the Reliq Updater. This step finalises the transfer and instructs Reliq to refresh its internal file database so the new or updated files become available.
Best practices
Always click DONE instead of ejecting or disconnecting the USB cable.
Keep a copy of important projects on your computer or an external drive as an archive.
Instrument definition files should follow the PencilResearch MIDI conventions.

U-SYNC
Overview
U-SYNC is a synchronization protocol developed in collaboration between Reliq Instruments and Sim’n Tonic. It is designed to provide precise clock synchronization between your DAW and sequencers through a single USB-C connection (the USB MIDI port on Reliq). This means your Reliq will start at the same time as your DAW, and stay in perfect sync throughout the DAW session.
On Ableton Live and Bitwig Studio, U-SYNC also provides bi-directional control, meaning that transport and tempo can be changed on the DAW or on the Reliq directly.
U-SYNC is currently available for Mac only, but a Windows version is under development.
Installation and Usage
To install and configure U-SYNC, please follow the U-SYNC manual.
To use U-SYNC, use a USB cable (like the provided USB-C to USB-A Cable) and plug the USB-C side into the USB MIDI port on Reliq and the other side into the computer.
The updated list of supported DAWs is in the U-SYNC manual, but as of September 2025, the following DAWs are supported:
Ableton Live
Bitwig Studio
Apple Logic Pro
Steinberg Cubase & Nuendo
Avid Pro Tools
Cockos Reaper
Presonus Studio One
Image-Line FL Studio
UAD Luna
Other DAWs that support loading a VST3 plugin might work as well - see the “Other DAWs” section in the manual.
Note
U-SYNC for Windows is currently under development and will be released in an upcoming update.